This version of this article is for using repository custom instructions and prompt files in VS Code. Click the tabs above for instructions on using custom instructions in other environments.
イントロダクション
リポジトリ カスタム指示を使うと、Copilot にリポジトリ固有のガイダンスとユーザー設定を提供できます。 詳しくは、「GitHub Copilotの応答をカスタマイズする方法」をご覧ください。
リポジトリ カスタム指示の前提条件
-
カスタム指示ファイルが必要です (後述する手順を参照してください)。
-
Custom instructions must be enabled. This feature is enabled by default. See Enabling or disabling repository custom instructions later in this article.
Creating custom instructions
VS Code supports three types of repository custom instructions. For details of which GitHub Copilot features support these types of instructions, see GitHub Copilotの応答をカスタマイズする方法.
-
Repository-wide custom instructions, which apply to all requests made in the context of a repository.
These are specified in a
copilot-instructions.mdfile in the.githubdirectory of the repository. See Creating repository-wide custom instructions. -
Path-specific custom instructions, which apply to requests made in the context of files that match a specified path.
These are specified in one or more
NAME.instructions.mdfiles within or below the.github/instructionsdirectory in the repository. See Creating path-specific custom instructions.If the path you specify matches a file that Copilot is working on, and a repository-wide custom instructions file also exists, then the instructions from both files are used.
-
Agent instructions are used by AI agents.
1 つ以上の
AGENTS.mdファイルを作成し、リポジトリ内の任意の場所に格納できます。 Copilotが動作している場合は、ディレクトリ ツリー内の最も近いAGENTS.mdファイルが優先されます。 詳細については、 agentsmd/agents.md リポジトリを参照してください。メモ
Support of
AGENTS.mdfiles outside of the workspace root is currently turned off by default. For details of how to enable this feature, see Use custom instructions in VS Code in the VS Code documentation.
Creating repository-wide custom instructions
-
In the root of your repository, create a file named
.github/copilot-instructions.md.Create the
.githubdirectory if it does not already exist. -
Add natural language instructions to the file, in Markdown format.
Whitespace between instructions is ignored, so the instructions can be written as a single paragraph, each on a new line, or separated by blank lines for legibility.
Creating path-specific custom instructions
-
.github/instructionsディレクトリがまだ存在しない場合は作成します。 -
必要に応じて、
.github/instructionsのサブディレクトリを作成して命令ファイルを整理します。 -
1 つ以上の
NAME.instructions.mdファイルを作成します。ここで、NAMEは指示の目的を示します。 ファイル名は.instructions.mdで終わる必要があります。 -
ファイルの先頭に、
applyToキーワードを含む frontmatter ブロックを作成します。 glob 構文を使用して、指示が適用されるファイルまたはディレクトリを指定します。次に例を示します。
---
applyTo: "app/models/**/*.rb"
---
複数のパターンをコンマで区切って指定できます。 たとえば、リポジトリ内のすべての TypeScript ファイルに指示を適用するには、次の frontmatter ブロックを使用できます。
---
applyTo: "**/*.ts,**/*.tsx"
---
Glob の例:
*- 現在のディレクトリ内のすべてのファイルと一致します。**または**/*- すべてのディレクトリ内のすべてのファイルと一致します。*.py- 現在のディレクトリ内のすべての.pyファイルと一致します。**/*.py- すべてのディレクトリ内のすべての.pyファイルと再帰的に一致します。src/*.py-.pyディレクトリ内のすべてのsrcファイルと一致します。 たとえば、src/foo.pyとsrc/bar.pyしかし_ではない_src/foo/bar.py。src/**/*.py-.pyディレクトリ内のすべてのsrcファイルと再帰的に一致します。 たとえば、src/foo.py、src/foo/bar.py、src/foo/bar/baz.pyなどです。**/subdir/**/*.py- 任意の.pyディレクトリ内のすべてのsubdirファイルを任意の深さで再帰的に照合します。 たとえば、subdir/foo.py、subdir/nested/bar.py、parent/subdir/baz.py、deep/parent/subdir/nested/qux.pyは使用できますが、__ ディレクトリを含まないパスではfoo.py``subdir。
-
必要に応じて、ファイルが Copilot cloud agent または Copilot code reviewによって使用されないようにするには、frontmatter ブロックに
excludeAgentキーワードを追加します。"code-review"または"cloud-agent"を使用します。たとえば、次のファイルは Copilot cloud agentによってのみ読み取られます。
---
applyTo: "**"
excludeAgent: "code-review"
---
excludeAgent キーワードが front matterblock に含まれていない場合は、Copilot code reviewとCopilot cloud agentの両方で指示が使用されます。
- Markdown 形式を使い、自然言語でカスタム指示を追加します。 指示と指示の間の空白は無視されます。このため複数の指示を 1 段落に記述することも、1 行に 1 つずつ記述することもできます。あるいは、読みやすくするために空白行で区切ることもできます。
使用中のカスタム手順
ファイル内の手順は、ファイルを保存するとすぐに Copilot で使用できます。 手順は、 Copilotに送信した要求に自動的に追加されます。
カスタム指示はチャット ビューやインライン チャットには表示されませんが、チャット ビューで応答の参照リストを確認することで、それらが Copilot によって使われていることを確認できます。 モデルに送信されたプロンプトにカスタム指示が追加されると、.github/copilot-instructions.md ファイルが参照として一覧表示されます。 参照をクリックしてファイルを開くことができます。

リポジトリのカスタム命令の有効化または無効化
Copilot でリポジトリベースのカスタム指示を使うかどうかを選択できます。
Copilot Chat のカスタム指示を有効または無効にする
カスタム指示は、Copilot Chat に対して既定で有効になっていますが、いつでも無効にしたり、再度有効にしたりすることができます。 これは、Copilot Chat の個人の使用に適用され、他のユーザーには影響しません。
- Open the Setting editor by using the keyboard shortcut Command+, (Mac) / Ctrl+, (Linux/Windows).
- Type
instruction filein the search box. - Select or clear the checkbox under Code Generation: Use Instruction Files.
Copilot code review のカスタム命令を有効または無効にする
カスタム命令は既定で Copilot code review に対して有効になっていますが、 GitHub.comのリポジトリ設定で無効にしたり、再度有効にしたりできます。 これは、 Copilotがこのリポジトリで実行するすべてのコード レビューに対するカスタム命令の使用に適用されます。
-
GitHub で、リポジトリのメイン ページに移動します。
-
リポジトリ名の下にある [Settings] をクリックします。 [設定] タブが表示されない場合は、 [] ドロップダウン メニューを選び、 [設定] をクリックします。
![タブを示すリポジトリ ヘッダーのスクリーンショット。 [設定] タブが濃いオレンジ色の枠線で強調表示されています。](/assets/cb-28260/images/help/repository/repo-actions-settings.png)
-
サイドバーの [Code, planning, and automation](コード、計画、自動化) の下で、 [ Copilot]、[ コード レビュー] の順にクリックします。
-
「プル リクエストのレビュー時にカスタム指示を使用する」オプションを有効または無効にします。
![タブを示すリポジトリ ヘッダーのスクリーンショット。 [設定] タブが濃いオレンジ色の枠線で強調表示されています。](/assets/cb-28260/mw-1440/images/help/repository/repo-actions-settings.webp)
Enabling and using prompt files
メモ
* Copilot プロンプト ファイルはパブリック プレビューにあり、変更される可能性があります。 プロンプト ファイルは、VS Code、Visual Studio、および JetBrains IDE でのみ使用できます。 「AUTOTITLE」を参照してください。
- コミュニティが提供する特定の言語とシナリオのプロンプト ファイルの例については、「 Awesome GitHub Copilot Customizations 」サイトを参照してください。
Prompt files let you build and share reusable prompt instructions with additional context. A prompt file is a Markdown file, stored in your workspace, that mimics the existing format of writing prompts in Copilot Chat (for example, Rewrite #file:x.ts). You can have multiple prompt files in your workspace, each of which defines a prompt for a different purpose.
Enabling prompt files
To enable prompt files, configure the workspace settings.
- Open the command palette by pressing Ctrl+Shift+P (Windows/Linux) / Command+Shift+P (Mac).
- Type "Open Workspace Settings (JSON)" and select the option that's displayed.
- In the
settings.jsonfile, add"chat.promptFiles": trueto enable the.github/promptsfolder as the location for prompt files. This folder will be created if it does not already exist.
Creating prompt files
-
Open the command palette by pressing Ctrl+Shift+P (Windows/Linux) / Command+Shift+P (Mac).
-
Type "prompt" and select Chat: Create Prompt.
-
Enter a name for the prompt file, excluding the
.prompt.mdfile name extension. The name can contain alphanumeric characters and spaces and should describe the purpose of the prompt information the file will contain. -
Write the prompt instructions, using Markdown formatting.
You can reference other files in the workspace by using Markdown links—for example,
[index](../../web/index.ts)—or by using the#file:../../web/index.tssyntax. Paths are relative to the prompt file. Referencing other files allows you to provide additional context, such as API specifications or product documentation.
Using prompt files
-
At the bottom of the Copilot Chat view, click the Attach context icon ().
-
In the dropdown menu, click Prompt... and choose the prompt file you want to use.
-
Optionally, attach additional files, including prompt files, to provide more context.
-
Optionally, type additional information in the chat prompt box.
Whether you need to do this or not depends on the contents of the prompt you are using.
-
Submit the chat prompt.
For more information about prompt files, see Use prompt files in Visual Studio Code in the Visual Studio Code documentation.
Further reading
- さまざまな種類のカスタム命令のサポート
- カスタマイズ ライブラリ—a curated collection of examples
- カスタム命令を使用してCopilotのコードレビュー機能を引き出す
This version of this article is for using repository custom instructions and prompt files in Visual Studio. Click the tabs above for instructions on using custom instructions in other environments.
イントロダクション
リポジトリ カスタム指示を使うと、Copilot にリポジトリ固有のガイダンスとユーザー設定を提供できます。 詳しくは、「GitHub Copilotの応答をカスタマイズする方法」をご覧ください。
リポジトリ カスタム指示の前提条件
-
カスタム指示ファイルが必要です (後述する手順を参照してください)。
-
The Enable custom instructions... option must be enabled in your settings. This is enabled by default. See Enabling or disabling repository custom instructions later in this article.
Creating custom instructions
Visual Studio supports two types of custom instructions. For details of which GitHub Copilot features support these types of instructions, see GitHub Copilotの応答をカスタマイズする方法.
-
Repository-wide custom instructions, which apply to all requests made in the context of a repository.
These are specified in a
copilot-instructions.mdfile in the.githubdirectory of the repository. See Creating repository-wide custom instructions. -
Path-specific custom instructions, which apply to requests made in the context of files that match a specified path.
These are specified in one or more
NAME.instructions.mdfiles within or below the.github/instructionsdirectory in the repository. See Creating path-specific custom instructions.If the path you specify matches a file that Copilot is working on, and a repository-wide custom instructions file also exists, then the instructions from both files are used.
Creating repository-wide custom instructions
-
In the root of your repository, create a file named
.github/copilot-instructions.md.Create the
.githubdirectory if it does not already exist. -
Add natural language instructions to the file, in Markdown format.
Whitespace between instructions is ignored, so the instructions can be written as a single paragraph, each on a new line, or separated by blank lines for legibility.
Creating path-specific custom instructions
-
.github/instructionsディレクトリがまだ存在しない場合は作成します。 -
必要に応じて、
.github/instructionsのサブディレクトリを作成して命令ファイルを整理します。 -
1 つ以上の
NAME.instructions.mdファイルを作成します。ここで、NAMEは指示の目的を示します。 ファイル名は.instructions.mdで終わる必要があります。 -
ファイルの先頭に、
applyToキーワードを含む frontmatter ブロックを作成します。 glob 構文を使用して、指示が適用されるファイルまたはディレクトリを指定します。次に例を示します。
---
applyTo: "app/models/**/*.rb"
---
複数のパターンをコンマで区切って指定できます。 たとえば、リポジトリ内のすべての TypeScript ファイルに指示を適用するには、次の frontmatter ブロックを使用できます。
---
applyTo: "**/*.ts,**/*.tsx"
---
Glob の例:
*- 現在のディレクトリ内のすべてのファイルと一致します。**または**/*- すべてのディレクトリ内のすべてのファイルと一致します。*.py- 現在のディレクトリ内のすべての.pyファイルと一致します。**/*.py- すべてのディレクトリ内のすべての.pyファイルと再帰的に一致します。src/*.py-.pyディレクトリ内のすべてのsrcファイルと一致します。 たとえば、src/foo.pyとsrc/bar.pyしかし_ではない_src/foo/bar.py。src/**/*.py-.pyディレクトリ内のすべてのsrcファイルと再帰的に一致します。 たとえば、src/foo.py、src/foo/bar.py、src/foo/bar/baz.pyなどです。**/subdir/**/*.py- 任意の.pyディレクトリ内のすべてのsubdirファイルを任意の深さで再帰的に照合します。 たとえば、subdir/foo.py、subdir/nested/bar.py、parent/subdir/baz.py、deep/parent/subdir/nested/qux.pyは使用できますが、__ ディレクトリを含まないパスではfoo.py``subdir。
-
必要に応じて、ファイルが Copilot cloud agent または Copilot code reviewによって使用されないようにするには、frontmatter ブロックに
excludeAgentキーワードを追加します。"code-review"または"cloud-agent"を使用します。たとえば、次のファイルは Copilot cloud agentによってのみ読み取られます。
---
applyTo: "**"
excludeAgent: "code-review"
---
excludeAgent キーワードが front matterblock に含まれていない場合は、Copilot code reviewとCopilot cloud agentの両方で指示が使用されます。
- Markdown 形式を使い、自然言語でカスタム指示を追加します。 指示と指示の間の空白は無視されます。このため複数の指示を 1 段落に記述することも、1 行に 1 つずつ記述することもできます。あるいは、読みやすくするために空白行で区切ることもできます。
使用中のカスタム手順
ファイル内の手順は、ファイルを保存するとすぐに Copilot で使用できます。 手順は、 Copilotに送信した要求に自動的に追加されます。
カスタム指示はチャット ビューやインライン チャットには表示されませんが、チャット ビューで応答の参照リストを確認することで、それらが Copilot によって使われていることを確認できます。 モデルに送信されたプロンプトにカスタム指示が追加されると、.github/copilot-instructions.md ファイルが参照として一覧表示されます。 参照をクリックしてファイルを開くことができます。

リポジトリのカスタム命令の有効化または無効化
Copilot でリポジトリベースのカスタム指示を使うかどうかを選択できます。
Copilot Chat のカスタム指示を有効または無効にする
カスタム指示は、Copilot Chat に対して既定で有効になっていますが、いつでも無効にしたり、再度有効にしたりすることができます。 これは、Copilot Chat の個人の使用に適用され、他のユーザーには影響しません。
-
In the Visual Studio menu bar, under Tools, click Options.
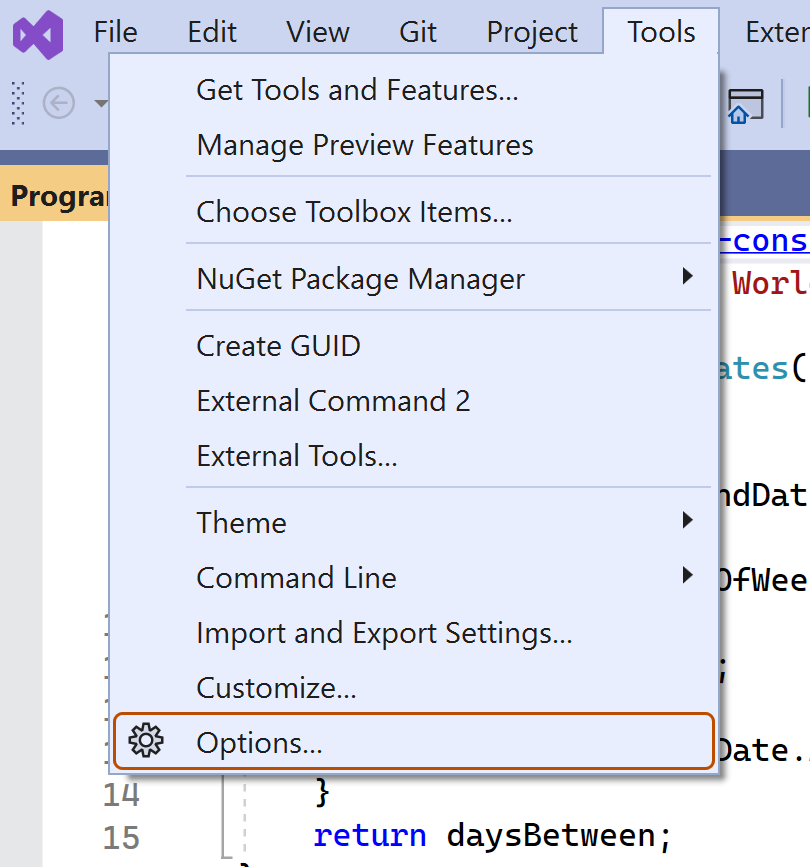
-
In the "Options" dialog, type
custom instructionsin the search box, then click Copilot. -
Select or clear the checkbox for Enable custom instructions to be loaded from .github/copilot-instructions.md files and added to requests.
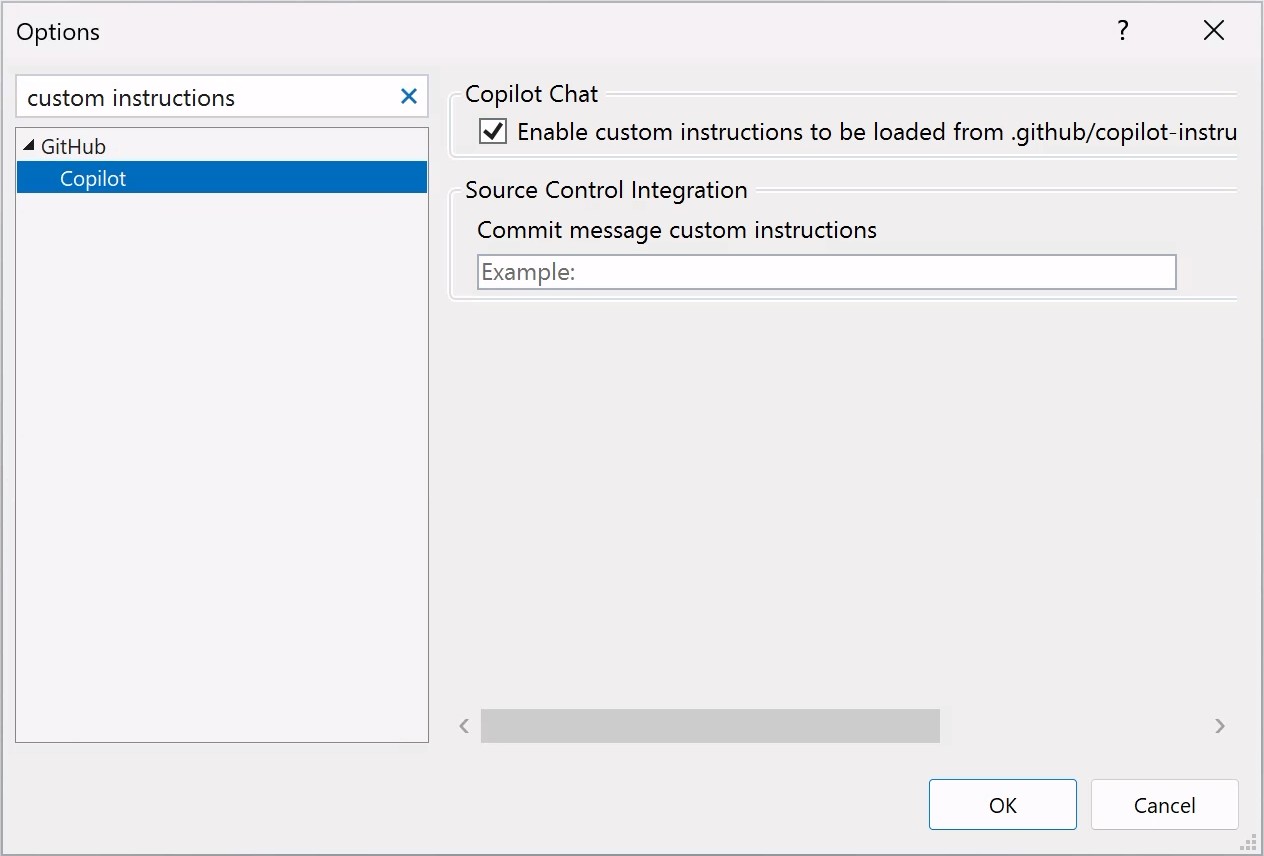


Copilot code review のカスタム命令を有効または無効にする
カスタム命令は既定で Copilot code review に対して有効になっていますが、 GitHub.comのリポジトリ設定で無効にしたり、再度有効にしたりできます。 これは、 Copilotがこのリポジトリで実行するすべてのコード レビューに対するカスタム命令の使用に適用されます。
-
GitHub で、リポジトリのメイン ページに移動します。
-
リポジトリ名の下にある [Settings] をクリックします。 [設定] タブが表示されない場合は、 [] ドロップダウン メニューを選び、 [設定] をクリックします。
-
サイドバーの [Code, planning, and automation](コード、計画、自動化) の下で、 [ Copilot]、[ コード レビュー] の順にクリックします。
-
「プル リクエストのレビュー時にカスタム指示を使用する」オプションを有効または無効にします。
Using prompt files
メモ
* Copilot プロンプト ファイルはパブリック プレビューにあり、変更される可能性があります。 プロンプト ファイルは、VS Code、Visual Studio、および JetBrains IDE でのみ使用できます。 「AUTOTITLE」を参照してください。
- コミュニティが提供する特定の言語とシナリオのプロンプト ファイルの例については、「 Awesome GitHub Copilot Customizations 」サイトを参照してください。
Prompt files let you build and share reusable prompt instructions with additional context. A prompt file is a Markdown file, stored in your workspace, that mimics the existing format of writing prompts in Copilot Chat (for example, Rewrite #file:x.ts). You can have multiple prompt files in your workspace, each of which defines a prompt for a different purpose.
Creating prompt files
-
Add a prompt file, including the
.prompt.mdfile name extension inside the.github/promptsfolder in the root of the repository. The name can contain alphanumeric characters and spaces and should describe the purpose of the prompt information the file will contain. -
Write the prompt instructions, using Markdown formatting.
You can reference other files in the workspace by using Markdown links—for example,
[index](../../web/index.ts)—or by using the#file:'../../web/index.ts'syntax. Paths are relative to the prompt file. Referencing other files allows you to provide additional context, such as API specifications or product documentation.
For more information about prompt files, see Use prompt files in Visual Studio in the Visual Studio documentation.
Further reading
- さまざまな種類のカスタム命令のサポート
- カスタマイズ ライブラリ—a curated collection of examples
- カスタム命令を使用してCopilotのコードレビュー機能を引き出す
This version of this article is for using repository custom instructions in JetBrains IDEs. Click the tabs above for instructions on using custom instructions in other environments.
イントロダクション
リポジトリ カスタム指示を使うと、Copilot にリポジトリ固有のガイダンスとユーザー設定を提供できます。 詳しくは、「GitHub Copilotの応答をカスタマイズする方法」をご覧ください。
リポジトリ カスタム指示の前提条件
-
カスタム指示ファイルが必要です (後述する手順を参照してください)。
-
The latest version of the Copilot extension must be installed in your JetBrains IDE.
Creating custom instructions
JetBrains IDEs support a single .github/copilot-instructions.md custom instructions file stored in the repository, and a locally stored global-copilot-instructions.md file.
You can create the .github/copilot-instructions.md file in your repository using the Copilot settings page, or you can create the file manually.
Whitespace between instructions is ignored, so the instructions can be written as a single paragraph, each on a new line, or separated by blank lines for legibility.
Using the settings page
- JetBrains IDE で、ファイル メニュー (Windows) またはメニュー バー (macOS) のアプリケーションの名前をクリックし、設定 をクリックします。
- 左側のサイドバーで[ツール]をクリックし、[GitHub Copilot]をクリックします。, then click Customizations.
- Under "Copilot Instructions", click Workspace or Global to choose whether the custom instructions apply to the current workspace or all workspaces.
Manually creating a workspace custom instructions file
-
In the root of your repository, create a file named
.github/copilot-instructions.md.Create the
.githubdirectory if it does not already exist. -
Add natural language instructions to the file, in Markdown format.
Once saved, these instructions will apply to the current workspace in JetBrains IDEs that you open with Copilot enabled.
Manually creating a global custom instructions file
To apply the same instructions across all workspaces in JetBrains IDEs, you can create a global custom instructions file on your local machine.
-
Open your file explorer or terminal.
-
Navigate to the appropriate location for your operating system:
- macOS:
/Users/YOUR-USERNAME/.config/github-copilot/intellij/ - Windows:
C:\Users\YOUR-USERNAME\AppData\Local\github-copilot\intellij\
- macOS:
-
Create a file named
global-copilot-instructions.mdin that directory. -
Add your custom instructions in natural language, using Markdown format.
Once saved, these instructions will apply globally across all workspaces in JetBrains IDEs that you open with Copilot enabled.
使用中のカスタム手順
ファイル内の手順は、ファイルを保存するとすぐに Copilot で使用できます。 手順は、 Copilotに送信した要求に自動的に追加されます。
カスタム指示はチャット ビューやインライン チャットには表示されませんが、チャット ビューで応答の参照リストを確認することで、それらが Copilot によって使われていることを確認できます。 モデルに送信されたプロンプトにカスタム指示が追加されると、.github/copilot-instructions.md ファイルが参照として一覧表示されます。 参照をクリックしてファイルを開くことができます。
Using prompt files
メモ
* Copilot プロンプト ファイルはパブリック プレビューにあり、変更される可能性があります。 プロンプト ファイルは、VS Code、Visual Studio、および JetBrains IDE でのみ使用できます。 「AUTOTITLE」を参照してください。
- コミュニティが提供する特定の言語とシナリオのプロンプト ファイルの例については、「 Awesome GitHub Copilot Customizations 」サイトを参照してください。
Prompt files let you build and share reusable prompt instructions with additional context. A prompt file is a Markdown file, stored in your workspace, that mimics the existing format of writing prompts in Copilot Chat (for example, Rewrite #file:x.ts). You can have multiple prompt files in your workspace, each of which defines a prompt for a different purpose.
When writing prompt instructions, you can reference other files in the workspace by using Markdown links—for example, [index](../../web/index.ts)—or by using the #file:../../web/index.ts syntax. Paths are relative to the prompt file. Referencing other files allows you to provide additional context, such as API specifications or product documentation.
Once prompt files are saved, their instructions will apply to the current workspace in JetBrains IDEs that you open with Copilot enabled.
Creating prompt files using the command line
- Create the
.github/promptsdirectory if it doesn't already exist in your workspace. This directory will be the location for your prompt files. - Create a prompt file in the
.github/promptsdirectory. The prompt file name can contain alphanumeric characters and spaces and should describe the purpose of the prompt information the file will contain. The file name must end with the.prompt.mdfile name extension, for exampleTESTPROMPT.prompt.md. - Write the prompt instructions using Markdown formatting, and save the file.
Creating prompt files using the settings page
- JetBrains IDE で、ファイル メニュー (Windows) またはメニュー バー (macOS) のアプリケーションの名前をクリックし、設定 をクリックします。
- Under Tools, under GitHub Copilot, click Edit Settings.
- Under "Settings Categories", click Customizations.
- Under "Prompt Files", click Workspace, to create a prompt file in your workspace.
- Enter a name for the prompt file, excluding the
.prompt.mdfile name extension. The prompt file name can contain alphanumeric characters and spaces and should describe the purpose of the prompt information the file will contain. - Click Ok to save the prompt file name.
- Write the prompt instructions using Markdown formatting, and save the file.
Using prompt files
-
In the chat input box, type
/followed by the name of the prompt file. For example,/TESTPROMPT. -
Optionally, attach additional files, to provide more context.
-
Optionally, type additional information in the chat prompt box.
Whether you need to do this or not depends on the contents of the prompt you are using.
-
Submit the chat prompt.
Further reading
- さまざまな種類のカスタム命令のサポート
- カスタマイズ ライブラリ—a curated collection of examples
- カスタム命令を使用してCopilotのコードレビュー機能を引き出す
This version of this article is for using repository custom instructions in Xcode. Click the tabs above for instructions on using custom instructions in other environments.
イントロダクション
リポジトリ カスタム指示を使うと、Copilot にリポジトリ固有のガイダンスとユーザー設定を提供できます。 詳しくは、「GitHub Copilotの応答をカスタマイズする方法」をご覧ください。
リポジトリ カスタム指示の前提条件
-
カスタム指示ファイルが必要です (後述する手順を参照してください)。
-
The latest version of the Copilot extension must be installed in Xcode.
Creating custom instructions
Xcode supports a single .github/copilot-instructions.md custom instructions file stored in the repository.
You can create a custom instructions file in your repository via the Copilot settings page.
Whitespace between instructions is ignored, so the instructions can be written as a single paragraph, each on a new line, or separated by blank lines for legibility.
- Open the GitHub Copilot for Xcode application.
- At the top of the application window, under Settings, click Advanced.
- To the right of "Custom Instructions", click Current Workspace or Global to choose whether the custom instructions apply to the current workspace or all workspaces.
使用中のカスタム手順
ファイル内の手順は、ファイルを保存するとすぐに Copilot で使用できます。 手順は、 Copilotに送信した要求に自動的に追加されます。
カスタム指示はチャット ビューやインライン チャットには表示されませんが、チャット ビューで応答の参照リストを確認することで、それらが Copilot によって使われていることを確認できます。 モデルに送信されたプロンプトにカスタム指示が追加されると、.github/copilot-instructions.md ファイルが参照として一覧表示されます。 参照をクリックしてファイルを開くことができます。
Further reading
- さまざまな種類のカスタム命令のサポート
- カスタム指示—a curated collection of examples
- カスタム命令を使用してCopilotのコードレビュー機能を引き出す
メモ
This feature is currently in パブリック プレビュー and is subject to change.
This version of this article is for using repository custom instructions in Eclipse. Click the tabs above for instructions on using custom instructions in other environments.
イントロダクション
リポジトリ カスタム指示を使うと、Copilot にリポジトリ固有のガイダンスとユーザー設定を提供できます。 詳しくは、「GitHub Copilotの応答をカスタマイズする方法」をご覧ください。
リポジトリ カスタム指示の前提条件
-
カスタム指示ファイルが必要です (後述する手順を参照してください)。
-
The latest version of the Copilot extension must be installed in Eclipse.
Creating custom instructions
Eclipse supports two types of repository custom instructions: workspace and project custom instructions.
To create a workspace custom instructions file, you can use the Copilot settings page. To create a project custom instructions file, you can create the file manually in the project directory.
Whitespace between instructions is ignored, so the instructions can be written as a single paragraph, each on a new line, or separated by blank lines for legibility.
Creating a workspace custom instructions file
- To open the Copilot Chat panel, click the Copilot icon () in the status bar at the bottom of Eclipse.
- From the menu, select "Edit preferences".
- In the left pane, expand GitHub Copilot and click Custom Instructions.
- Select Enable workspace instructions.
- In the "Workspace" section, under "Set custom instructions to guide Copilot's code suggestions in this workspace", add natural language instructions to the file, in Markdown format.
Creating a project custom instructions file
- In the root of your project directory, create a file named
.github/copilot-instructions.md. - Add your custom instructions in natural language, using Markdown format.
Once saved, these instructions will apply to the current project in Eclipse that you open with Copilot enabled.
使用中のカスタム手順
ファイル内の手順は、ファイルを保存するとすぐに Copilot で使用できます。 手順は、 Copilotに送信した要求に自動的に追加されます。
Further reading
- さまざまな種類のカスタム命令のサポート
- カスタム指示—a curated collection of examples