This version of this article is for using repository custom instructions and prompt files in VS Code. Click the tabs above for instructions on using custom instructions in other environments.
Introdução
As instruções personalizadas de repositório permitem fornecer orientações e preferências específicas do repositório ao Copilot. Para saber mais, confira Sobre a personalização das respostas do GitHub Copilot.
Pré-requisitos para instruções personalizadas de repositório
-
Você deve ter um arquivo de instruções personalizado (confira as instruções abaixo).
-
Custom instructions must be enabled. This feature is enabled by default. See Enabling or disabling repository custom instructions later in this article.
Creating custom instructions
VS Code supports three types of repository custom instructions. For details of which GitHub Copilot features support these types of instructions, see Sobre a personalização das respostas do GitHub Copilot.
-
Repository-wide custom instructions, which apply to all requests made in the context of a repository.
These are specified in a
copilot-instructions.mdfile in the.githubdirectory of the repository. See Creating repository-wide custom instructions. -
Path-specific custom instructions, which apply to requests made in the context of files that match a specified path.
These are specified in one or more
NAME.instructions.mdfiles within or below the.github/instructionsdirectory in the repository. See Creating path-specific custom instructions.If the path you specify matches a file that Copilot is working on, and a repository-wide custom instructions file also exists, then the instructions from both files are used.
-
Agent instructions are used by AI agents.
Você pode criar um ou mais arquivos
AGENTS.mdarmazenados em qualquer lugar no repositório. Quando Copilot estiver funcionando, o arquivo mais próximoAGENTS.mdna árvore de diretório terá precedência. Para obter mais informações, consulte o repositório agentsmd/agents.md.Observação
Support of
AGENTS.mdfiles outside of the workspace root is currently turned off by default. For details of how to enable this feature, see Use custom instructions in VS Code in the VS Code documentation.
Creating repository-wide custom instructions
-
In the root of your repository, create a file named
.github/copilot-instructions.md.Create the
.githubdirectory if it does not already exist. -
Add natural language instructions to the file, in Markdown format.
Whitespace between instructions is ignored, so the instructions can be written as a single paragraph, each on a new line, or separated by blank lines for legibility.
Creating path-specific custom instructions
-
Crie o diretório
.github/instructionsse ele ainda não existir. -
Opcionalmente, crie subdiretórios de
.github/instructionspara organizar seus arquivos de instrução. -
Crie um ou mais arquivos
NAME.instructions.md, em queNAMEindica a finalidade das instruções. O nome do arquivo deve terminar com.instructions.md. -
No início do arquivo, crie um bloco frontmatter contendo a palavra-chave
applyTo. Use a sintaxe glob para especificar a quais arquivos ou diretórios as instruções se aplicam.Por exemplo:
---
applyTo: "app/models/**/*.rb"
---
Você pode especificar vários padrões separando-os com vírgulas. Por exemplo, para aplicar as instruções a todos os arquivos TypeScript no repositório, você pode usar o seguinte bloco frontmatter:
---
applyTo: "**/*.ts,**/*.tsx"
---
Exemplos do Glob:
*– corresponderá a todos os arquivos no diretório atual.**ou**/*– todos corresponderão a todos os arquivos em todos os diretórios.*.py– corresponderá a todos os.pyarquivos no diretório atual.**/*.py– corresponderá recursivamente a todos os.pyarquivos em todos os diretórios.src/*.py– corresponderá a todos os.pyarquivos nosrcdiretório. Por exemplo,src/foo.pymassrc/bar.pynãosrc/foo/bar.py.src/**/*.py– corresponderá recursivamente a todos os.pyarquivos nosrcdiretório. Por exemplo,src/foo.py,src/foo/bar.pyesrc/foo/bar/baz.py.**/subdir/**/*.py– fará a correspondência recursiva de todos os arquivos.pyem qualquer diretóriosubdirem qualquer profundidade. Por exemplo,subdir/foo.py,subdir/nested/bar.py,parent/subdir/baz.pyedeep/parent/subdir/nested/qux.py, mas nãofoo.pyem um caminho que não contém umsubdirdiretório.
-
Opcionalmente, para impedir que o arquivo seja usado por Copilot cloud agent ou Copilot code review, adicione a palavra-chave
excludeAgentao bloco de frontmatter. Use"code-review"ou"cloud-agent".Por exemplo, o arquivo a seguir será lido apenas por Copilot cloud agent.
---
applyTo: "**"
excludeAgent: "code-review"
---
Se a palavra-chave
excludeAgentnão estiver incluída no bloco front-matter, tanto o Copilot code review quanto o Copilot cloud agent usarão suas instruções. -
Adicione suas instruções personalizadas em linguagem natural usando o formato Markdown. O espaço em branco entre as instruções é ignorado, de modo que as instruções podem ser escritas como um só parágrafo, cada uma em uma nova linha ou separadas por linhas em branco para facilitar a leitura.
Instruções personalizadas em uso
As instruções no(s) arquivo(s) estarão disponíveis para uso por Copilot quando você salvar o(s) arquivo(s). As instruções são adicionadas automaticamente às solicitações que você envia para Copilot.
As instruções personalizadas não ficam visíveis na exibição do Chat ou no chat embutido, mas você pode verificar se elas estão sendo usadas pelo Copilot observando a lista Referências de uma resposta na exibição do Chat. Se foram adicionadas instruções personalizadas à solicitação que foi enviada para o modelo, o arquivo .github/copilot-instructions.md será listado como uma referência. Selecione a referência para abrir o arquivo.

Habilitando ou desabilitando instruções personalizadas de repositório
Você pode escolher se quer ou não que o Copilot use instruções personalizadas baseadas em repositório.
Habilitar ou desabilitar instruções personalizadas para o Copilot Chat
As instruções personalizadas são habilitadas para o Copilot Chat por padrão, mas você pode desabilitá-las ou reabilitá-las a qualquer momento. Isso se aplica ao seu próprio uso do Copilot Chat e não afeta outros usuários.
- Open the Setting editor by using the keyboard shortcut Command+, (Mac) / Ctrl+, (Linux/Windows).
- Type
instruction filein the search box. - Select or clear the checkbox under Code Generation: Use Instruction Files.
Habilitar ou desabilitar instruções personalizadas para Copilot code review
As instruções personalizadas são ativadas por padrão para Copilot code review, mas você pode desativá-las ou reativá-las nas configurações do repositório em GitHub.com. Isso se aplica ao Copilotuso de instruções personalizadas para todas as revisões de código executadas neste repositório.
-
Em GitHub, acesse a página principal do repositório.
-
No nome do repositório, clique em Settings. Caso não consiga ver a guia "Configurações", selecione o menu suspenso , clique em Configurações.

-
Na barra lateral, em "Código, planejamento e automação", clique Copilot e, em seguida, revisão de código.
-
Ative ou desative a opção "Usar instruções personalizadas ao revisar pull requests".

Enabling and using prompt files
Observação
* Copilot os arquivos de prompt estão em prévia pública e estão sujeitos a alterações. Os arquivos de prompt só estão disponíveis em VS Code, Visual Studio e IDEs JetBrains. Consulte Sobre a personalização das respostas do GitHub Copilot.
- Para obter exemplos de arquivos de prompt com contribuição da comunidade para idiomas e cenários específicos, consulte o site personalizações incríveisGitHub Copilot.
Prompt files let you build and share reusable prompt instructions with additional context. A prompt file is a Markdown file, stored in your workspace, that mimics the existing format of writing prompts in Copilot Chat (for example, Rewrite #file:x.ts). You can have multiple prompt files in your workspace, each of which defines a prompt for a different purpose.
Enabling prompt files
To enable prompt files, configure the workspace settings.
- Open the command palette by pressing Ctrl+Shift+P (Windows/Linux) / Command+Shift+P (Mac).
- Type "Open Workspace Settings (JSON)" and select the option that's displayed.
- In the
settings.jsonfile, add"chat.promptFiles": trueto enable the.github/promptsfolder as the location for prompt files. This folder will be created if it does not already exist.
Creating prompt files
-
Open the command palette by pressing Ctrl+Shift+P (Windows/Linux) / Command+Shift+P (Mac).
-
Type "prompt" and select Chat: Create Prompt.
-
Enter a name for the prompt file, excluding the
.prompt.mdfile name extension. The name can contain alphanumeric characters and spaces and should describe the purpose of the prompt information the file will contain. -
Write the prompt instructions, using Markdown formatting.
You can reference other files in the workspace by using Markdown links—for example,
[index](../../web/index.ts)—or by using the#file:../../web/index.tssyntax. Paths are relative to the prompt file. Referencing other files allows you to provide additional context, such as API specifications or product documentation.
Using prompt files
-
At the bottom of the Copilot Chat view, click the Attach context icon ().
-
In the dropdown menu, click Prompt... and choose the prompt file you want to use.
-
Optionally, attach additional files, including prompt files, to provide more context.
-
Optionally, type additional information in the chat prompt box.
Whether you need to do this or not depends on the contents of the prompt you are using.
-
Submit the chat prompt.
For more information about prompt files, see Use prompt files in Visual Studio Code in the Visual Studio Code documentation.
Further reading
This version of this article is for using repository custom instructions and prompt files in Visual Studio. Click the tabs above for instructions on using custom instructions in other environments.
Introdução
As instruções personalizadas de repositório permitem fornecer orientações e preferências específicas do repositório ao Copilot. Para saber mais, confira Sobre a personalização das respostas do GitHub Copilot.
Pré-requisitos para instruções personalizadas de repositório
-
Você deve ter um arquivo de instruções personalizado (confira as instruções abaixo).
-
The Enable custom instructions... option must be enabled in your settings. This is enabled by default. See Enabling or disabling repository custom instructions later in this article.
Creating custom instructions
Visual Studio supports two types of custom instructions. For details of which GitHub Copilot features support these types of instructions, see Sobre a personalização das respostas do GitHub Copilot.
-
Repository-wide custom instructions, which apply to all requests made in the context of a repository.
These are specified in a
copilot-instructions.mdfile in the.githubdirectory of the repository. See Creating repository-wide custom instructions. -
Path-specific custom instructions, which apply to requests made in the context of files that match a specified path.
These are specified in one or more
NAME.instructions.mdfiles within or below the.github/instructionsdirectory in the repository. See Creating path-specific custom instructions.If the path you specify matches a file that Copilot is working on, and a repository-wide custom instructions file also exists, then the instructions from both files are used.
Creating repository-wide custom instructions
-
In the root of your repository, create a file named
.github/copilot-instructions.md.Create the
.githubdirectory if it does not already exist. -
Add natural language instructions to the file, in Markdown format.
Whitespace between instructions is ignored, so the instructions can be written as a single paragraph, each on a new line, or separated by blank lines for legibility.
Creating path-specific custom instructions
-
Crie o diretório
.github/instructionsse ele ainda não existir. -
Opcionalmente, crie subdiretórios de
.github/instructionspara organizar seus arquivos de instrução. -
Crie um ou mais arquivos
NAME.instructions.md, em queNAMEindica a finalidade das instruções. O nome do arquivo deve terminar com.instructions.md. -
No início do arquivo, crie um bloco frontmatter contendo a palavra-chave
applyTo. Use a sintaxe glob para especificar a quais arquivos ou diretórios as instruções se aplicam.Por exemplo:
---
applyTo: "app/models/**/*.rb"
---
Você pode especificar vários padrões separando-os com vírgulas. Por exemplo, para aplicar as instruções a todos os arquivos TypeScript no repositório, você pode usar o seguinte bloco frontmatter:
---
applyTo: "**/*.ts,**/*.tsx"
---
Exemplos do Glob:
*– corresponderá a todos os arquivos no diretório atual.**ou**/*– todos corresponderão a todos os arquivos em todos os diretórios.*.py– corresponderá a todos os.pyarquivos no diretório atual.**/*.py– corresponderá recursivamente a todos os.pyarquivos em todos os diretórios.src/*.py– corresponderá a todos os.pyarquivos nosrcdiretório. Por exemplo,src/foo.pymassrc/bar.pynãosrc/foo/bar.py.src/**/*.py– corresponderá recursivamente a todos os.pyarquivos nosrcdiretório. Por exemplo,src/foo.py,src/foo/bar.pyesrc/foo/bar/baz.py.**/subdir/**/*.py– fará a correspondência recursiva de todos os arquivos.pyem qualquer diretóriosubdirem qualquer profundidade. Por exemplo,subdir/foo.py,subdir/nested/bar.py,parent/subdir/baz.pyedeep/parent/subdir/nested/qux.py, mas nãofoo.pyem um caminho que não contém umsubdirdiretório.
-
Opcionalmente, para impedir que o arquivo seja usado por Copilot cloud agent ou Copilot code review, adicione a palavra-chave
excludeAgentao bloco de frontmatter. Use"code-review"ou"cloud-agent".Por exemplo, o arquivo a seguir será lido apenas por Copilot cloud agent.
---
applyTo: "**"
excludeAgent: "code-review"
---
Se a palavra-chave
excludeAgentnão estiver incluída no bloco front-matter, tanto o Copilot code review quanto o Copilot cloud agent usarão suas instruções. -
Adicione suas instruções personalizadas em linguagem natural usando o formato Markdown. O espaço em branco entre as instruções é ignorado, de modo que as instruções podem ser escritas como um só parágrafo, cada uma em uma nova linha ou separadas por linhas em branco para facilitar a leitura.
Instruções personalizadas em uso
As instruções no(s) arquivo(s) estarão disponíveis para uso por Copilot quando você salvar o(s) arquivo(s). As instruções são adicionadas automaticamente às solicitações que você envia para Copilot.
As instruções personalizadas não ficam visíveis na exibição do Chat ou no chat embutido, mas você pode verificar se elas estão sendo usadas pelo Copilot observando a lista Referências de uma resposta na exibição do Chat. Se foram adicionadas instruções personalizadas à solicitação que foi enviada para o modelo, o arquivo .github/copilot-instructions.md será listado como uma referência. Selecione a referência para abrir o arquivo.

Habilitando ou desabilitando instruções personalizadas de repositório
Você pode escolher se quer ou não que o Copilot use instruções personalizadas baseadas em repositório.
Habilitar ou desabilitar instruções personalizadas para o Copilot Chat
As instruções personalizadas são habilitadas para o Copilot Chat por padrão, mas você pode desabilitá-las ou reabilitá-las a qualquer momento. Isso se aplica ao seu próprio uso do Copilot Chat e não afeta outros usuários.
-
In the Visual Studio menu bar, under Tools, click Options.
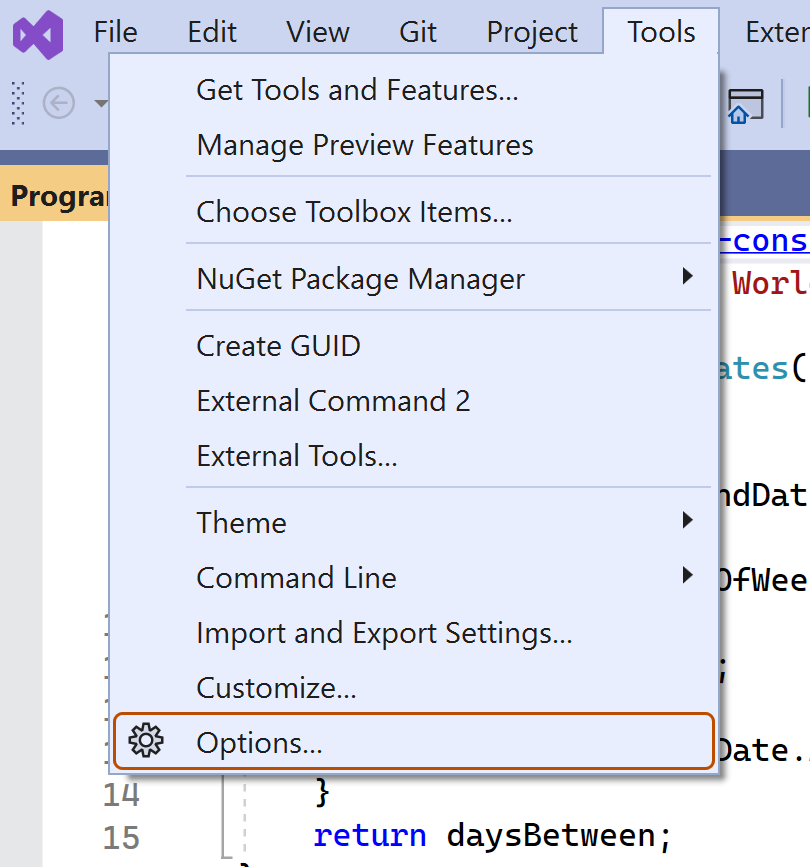
-
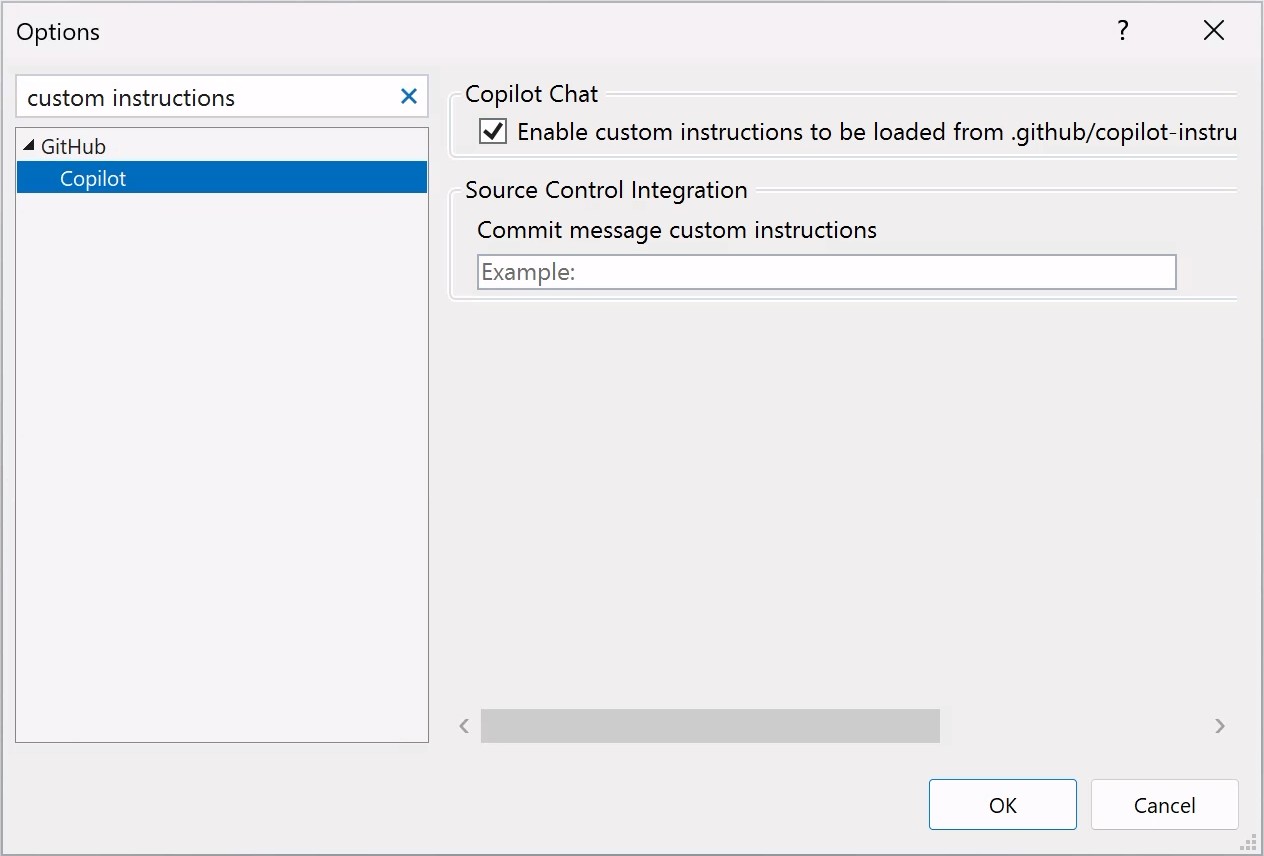
In the "Options" dialog, type
custom instructionsin the search box, then click Copilot. -
Select or clear the checkbox for Enable custom instructions to be loaded from .github/copilot-instructions.md files and added to requests.


Habilitar ou desabilitar instruções personalizadas para Copilot code review
As instruções personalizadas são ativadas por padrão para Copilot code review, mas você pode desativá-las ou reativá-las nas configurações do repositório em GitHub.com. Isso se aplica ao Copilotuso de instruções personalizadas para todas as revisões de código executadas neste repositório.
-
Em GitHub, acesse a página principal do repositório.
-
No nome do repositório, clique em Settings. Caso não consiga ver a guia "Configurações", selecione o menu suspenso , clique em Configurações.
-
Na barra lateral, em "Código, planejamento e automação", clique Copilot e, em seguida, revisão de código.
-
Ative ou desative a opção "Usar instruções personalizadas ao revisar pull requests".
Using prompt files
Observação
* Copilot os arquivos de prompt estão em prévia pública e estão sujeitos a alterações. Os arquivos de prompt só estão disponíveis em VS Code, Visual Studio e IDEs JetBrains. Consulte Sobre a personalização das respostas do GitHub Copilot.
- Para obter exemplos de arquivos de prompt com contribuição da comunidade para idiomas e cenários específicos, consulte o site personalizações incríveisGitHub Copilot.
Prompt files let you build and share reusable prompt instructions with additional context. A prompt file is a Markdown file, stored in your workspace, that mimics the existing format of writing prompts in Copilot Chat (for example, Rewrite #file:x.ts). You can have multiple prompt files in your workspace, each of which defines a prompt for a different purpose.
Creating prompt files
-
Add a prompt file, including the
.prompt.mdfile name extension inside the.github/promptsfolder in the root of the repository. The name can contain alphanumeric characters and spaces and should describe the purpose of the prompt information the file will contain. -
Write the prompt instructions, using Markdown formatting.
You can reference other files in the workspace by using Markdown links—for example,
[index](../../web/index.ts)—or by using the#file:'../../web/index.ts'syntax. Paths are relative to the prompt file. Referencing other files allows you to provide additional context, such as API specifications or product documentation.
For more information about prompt files, see Use prompt files in Visual Studio in the Visual Studio documentation.
Further reading
This version of this article is for using repository custom instructions in JetBrains IDEs. Click the tabs above for instructions on using custom instructions in other environments.
Introdução
As instruções personalizadas de repositório permitem fornecer orientações e preferências específicas do repositório ao Copilot. Para saber mais, confira Sobre a personalização das respostas do GitHub Copilot.
Pré-requisitos para instruções personalizadas de repositório
-
Você deve ter um arquivo de instruções personalizado (confira as instruções abaixo).
-
The latest version of the Copilot extension must be installed in your JetBrains IDE.
Creating custom instructions
JetBrains IDEs support a single .github/copilot-instructions.md custom instructions file stored in the repository, and a locally stored global-copilot-instructions.md file.
You can create the .github/copilot-instructions.md file in your repository using the Copilot settings page, or you can create the file manually.
Whitespace between instructions is ignored, so the instructions can be written as a single paragraph, each on a new line, or separated by blank lines for legibility.
Using the settings page
- No seu IDE JetBrains, clique no menu Arquivo (Windows) ou no nome do aplicativo na barra de menus (macOS) e clique em Configurações.
- Na barra lateral esquerda, clique em Ferramentas, clique em GitHub Copilot, then click Customizations.
- Under "Copilot Instructions", click Workspace or Global to choose whether the custom instructions apply to the current workspace or all workspaces.
Manually creating a workspace custom instructions file
-
In the root of your repository, create a file named
.github/copilot-instructions.md.Create the
.githubdirectory if it does not already exist. -
Add natural language instructions to the file, in Markdown format.
Once saved, these instructions will apply to the current workspace in JetBrains IDEs that you open with Copilot enabled.
Manually creating a global custom instructions file
To apply the same instructions across all workspaces in JetBrains IDEs, you can create a global custom instructions file on your local machine.
-
Open your file explorer or terminal.
-
Navigate to the appropriate location for your operating system:
- macOS:
/Users/YOUR-USERNAME/.config/github-copilot/intellij/ - Windows:
C:\Users\YOUR-USERNAME\AppData\Local\github-copilot\intellij\
- macOS:
-
Create a file named
global-copilot-instructions.mdin that directory. -
Add your custom instructions in natural language, using Markdown format.
Once saved, these instructions will apply globally across all workspaces in JetBrains IDEs that you open with Copilot enabled.
Instruções personalizadas em uso
As instruções no(s) arquivo(s) estarão disponíveis para uso por Copilot quando você salvar o(s) arquivo(s). As instruções são adicionadas automaticamente às solicitações que você envia para Copilot.
As instruções personalizadas não ficam visíveis na exibição do Chat ou no chat embutido, mas você pode verificar se elas estão sendo usadas pelo Copilot observando a lista Referências de uma resposta na exibição do Chat. Se foram adicionadas instruções personalizadas à solicitação que foi enviada para o modelo, o arquivo .github/copilot-instructions.md será listado como uma referência. Selecione a referência para abrir o arquivo.
Using prompt files
Observação
* Copilot os arquivos de prompt estão em prévia pública e estão sujeitos a alterações. Os arquivos de prompt só estão disponíveis em VS Code, Visual Studio e IDEs JetBrains. Consulte Sobre a personalização das respostas do GitHub Copilot.
- Para obter exemplos de arquivos de prompt com contribuição da comunidade para idiomas e cenários específicos, consulte o site personalizações incríveisGitHub Copilot.
Prompt files let you build and share reusable prompt instructions with additional context. A prompt file is a Markdown file, stored in your workspace, that mimics the existing format of writing prompts in Copilot Chat (for example, Rewrite #file:x.ts). You can have multiple prompt files in your workspace, each of which defines a prompt for a different purpose.
When writing prompt instructions, you can reference other files in the workspace by using Markdown links—for example, [index](../../web/index.ts)—or by using the #file:../../web/index.ts syntax. Paths are relative to the prompt file. Referencing other files allows you to provide additional context, such as API specifications or product documentation.
Once prompt files are saved, their instructions will apply to the current workspace in JetBrains IDEs that you open with Copilot enabled.
Creating prompt files using the command line
- Create the
.github/promptsdirectory if it doesn't already exist in your workspace. This directory will be the location for your prompt files. - Create a prompt file in the
.github/promptsdirectory. The prompt file name can contain alphanumeric characters and spaces and should describe the purpose of the prompt information the file will contain. The file name must end with the.prompt.mdfile name extension, for exampleTESTPROMPT.prompt.md. - Write the prompt instructions using Markdown formatting, and save the file.
Creating prompt files using the settings page
- No seu IDE JetBrains, clique no menu Arquivo (Windows) ou no nome do aplicativo na barra de menus (macOS) e clique em Configurações.
- Under Tools, under GitHub Copilot, click Edit Settings.
- Under "Settings Categories", click Customizations.
- Under "Prompt Files", click Workspace, to create a prompt file in your workspace.
- Enter a name for the prompt file, excluding the
.prompt.mdfile name extension. The prompt file name can contain alphanumeric characters and spaces and should describe the purpose of the prompt information the file will contain. - Click Ok to save the prompt file name.
- Write the prompt instructions using Markdown formatting, and save the file.
Using prompt files
-
In the chat input box, type
/followed by the name of the prompt file. For example,/TESTPROMPT. -
Optionally, attach additional files, to provide more context.
-
Optionally, type additional information in the chat prompt box.
Whether you need to do this or not depends on the contents of the prompt you are using.
-
Submit the chat prompt.
Further reading
This version of this article is for using repository custom instructions in Xcode. Click the tabs above for instructions on using custom instructions in other environments.
Introdução
As instruções personalizadas de repositório permitem fornecer orientações e preferências específicas do repositório ao Copilot. Para saber mais, confira Sobre a personalização das respostas do GitHub Copilot.
Pré-requisitos para instruções personalizadas de repositório
-
Você deve ter um arquivo de instruções personalizado (confira as instruções abaixo).
-
The latest version of the Copilot extension must be installed in Xcode.
Creating custom instructions
Xcode supports a single .github/copilot-instructions.md custom instructions file stored in the repository.
You can create a custom instructions file in your repository via the Copilot settings page.
Whitespace between instructions is ignored, so the instructions can be written as a single paragraph, each on a new line, or separated by blank lines for legibility.
- Open the GitHub Copilot for Xcode application.
- At the top of the application window, under Settings, click Advanced.
- To the right of "Custom Instructions", click Current Workspace or Global to choose whether the custom instructions apply to the current workspace or all workspaces.
Instruções personalizadas em uso
As instruções no(s) arquivo(s) estarão disponíveis para uso por Copilot quando você salvar o(s) arquivo(s). As instruções são adicionadas automaticamente às solicitações que você envia para Copilot.
As instruções personalizadas não ficam visíveis na exibição do Chat ou no chat embutido, mas você pode verificar se elas estão sendo usadas pelo Copilot observando a lista Referências de uma resposta na exibição do Chat. Se foram adicionadas instruções personalizadas à solicitação que foi enviada para o modelo, o arquivo .github/copilot-instructions.md será listado como uma referência. Selecione a referência para abrir o arquivo.
Further reading
Observação
This feature is currently in prévia pública and is subject to change.
This version of this article is for using repository custom instructions in Eclipse. Click the tabs above for instructions on using custom instructions in other environments.
Introdução
As instruções personalizadas de repositório permitem fornecer orientações e preferências específicas do repositório ao Copilot. Para saber mais, confira Sobre a personalização das respostas do GitHub Copilot.
Pré-requisitos para instruções personalizadas de repositório
-
Você deve ter um arquivo de instruções personalizado (confira as instruções abaixo).
-
The latest version of the Copilot extension must be installed in Eclipse.
Creating custom instructions
Eclipse supports two types of repository custom instructions: workspace and project custom instructions.
To create a workspace custom instructions file, you can use the Copilot settings page. To create a project custom instructions file, you can create the file manually in the project directory.
Whitespace between instructions is ignored, so the instructions can be written as a single paragraph, each on a new line, or separated by blank lines for legibility.
Creating a workspace custom instructions file
- To open the Copilot Chat panel, click the Copilot icon () in the status bar at the bottom of Eclipse.
- From the menu, select "Edit preferences".
- In the left pane, expand GitHub Copilot and click Custom Instructions.
- Select Enable workspace instructions.
- In the "Workspace" section, under "Set custom instructions to guide Copilot's code suggestions in this workspace", add natural language instructions to the file, in Markdown format.
Creating a project custom instructions file
- In the root of your project directory, create a file named
.github/copilot-instructions.md. - Add your custom instructions in natural language, using Markdown format.
Once saved, these instructions will apply to the current project in Eclipse that you open with Copilot enabled.
Instruções personalizadas em uso
As instruções no(s) arquivo(s) estarão disponíveis para uso por Copilot quando você salvar o(s) arquivo(s). As instruções são adicionadas automaticamente às solicitações que você envia para Copilot.
Further reading
- Suporte para diferentes tipos de instruções personalizadas
- Instruções personalizadas—a curated collection of examples