This version of this article is for using repository custom instructions and prompt files in VS Code. Click the tabs above for instructions on using custom instructions in other environments.
Введение
Пользовательские инструкции репозитория позволяют предоставлять Copilot с рекомендациями и предпочтениями для конкретного репозитория. Дополнительные сведения см. в разделе О кастомизации ответов GitHub Copilot.
Предварительные требования для пользовательских инструкций репозитория
-
У вас должен быть пользовательский файл инструкций (см. приведенные ниже инструкции).
-
Custom instructions must be enabled. This feature is enabled by default. See Enabling or disabling repository custom instructions later in this article.
Creating custom instructions
VS Code supports three types of repository custom instructions. For details of which GitHub Copilot features support these types of instructions, see О кастомизации ответов GitHub Copilot.
-
Repository-wide custom instructions, which apply to all requests made in the context of a repository.
These are specified in a
copilot-instructions.mdfile in the.githubdirectory of the repository. See Creating repository-wide custom instructions. -
Path-specific custom instructions, which apply to requests made in the context of files that match a specified path.
These are specified in one or more
NAME.instructions.mdfiles within or below the.github/instructionsdirectory in the repository. See Creating path-specific custom instructions.If the path you specify matches a file that Copilot is working on, and a repository-wide custom instructions file also exists, then the instructions from both files are used.
-
Agent instructions are used by AI agents.
Вы можете создать один или несколько
AGENTS.mdфайлов, хранящихся в любом месте репозитория. Когда Copilot работает, приоритет будет иметь ближайшийAGENTS.mdфайл в дереве каталогов. Для получения дополнительной информации смотрите репозиторий agentsmd/agents.md.Примечание.
Support of
AGENTS.mdfiles outside of the workspace root is currently turned off by default. For details of how to enable this feature, see Use custom instructions in VS Code in the VS Code documentation.
Creating repository-wide custom instructions
-
In the root of your repository, create a file named
.github/copilot-instructions.md.Create the
.githubdirectory if it does not already exist. -
Add natural language instructions to the file, in Markdown format.
Whitespace between instructions is ignored, so the instructions can be written as a single paragraph, each on a new line, or separated by blank lines for legibility.
Creating path-specific custom instructions
-
Создайте каталог,
.github/instructionsесли он еще не существует. -
По желанию создайте подкаталоги
.github/instructionsдля организации ваших файлов инструкций. -
Создайте один или несколько
NAME.instructions.mdфайлов, гдеNAMEуказывается назначение инструкций. Имя файла должно заканчиваться.instructions.md. -
В начале файла создайте блок frontmatter, содержащий ключевое
applyToслово. Используйте синтаксис glob, чтобы указать, к каким файлам или каталогам применяются инструкции.Например:
---
applyTo: "app/models/**/*.rb"
---
Можно указать несколько шаблонов, разделив их запятыми. Например, чтобы применить инструкции ко всем файлам TypeScript в репозитории, можно использовать следующий блок frontmatter:
---
applyTo: "**/*.ts,**/*.tsx"
---
Примеры Glob:
*- все будут совпадать со всеми файлами текущей директории.**или**/*— все совпадут со всеми файлами во всех каталогах.*.py- будет совпадать со всеми.pyфайлами текущей папки.**/*.py- будет рекурсивно совпадать со всеми.pyфайлами во всех каталогах.src/*.py- будет.pyсовпадать со всемиsrcфайлами в каталоге. Напримерsrc/foo.py, иsrc/bar.pyнетsrc/foo/bar.py.src/**/*.py- будет рекурсивно совпадать со всеми.pyфайлами вsrcкаталоге. Например,src/foo.py,src/foo/bar.pyиsrc/foo/bar/baz.py.**/subdir/**/*.py- будет рекурсивно совпадать со всеми.pyфайлами в любойsubdirпапке на любой глубине. Например,subdir/foo.py,subdir/nested/bar.py,parent/subdir/baz.py, иdeep/parent/subdir/nested/qux.py, но неfoo.pyна пути, не содержащем каталогаsubdir.
-
Опционально, чтобы предотвратить использование файла либо Copilot cloud agent одним из вариантов Copilot code review, добавьте
excludeAgentключевое слово в блок фронтматтера. Используйте либо или"code-review"``"cloud-agent".Например, следующий файл будет читаться только .Copilot cloud agent
---
applyTo: "**"
excludeAgent: "code-review"
---
Если ключевое
excludeAgentслово не включено в передний блок Matterblock, оба Copilot code review и Copilot cloud agent будут использовать ваши инструкции. -
Добавьте пользовательские инструкции на естественном языке с помощью формата Markdown. Пробелы между инструкциями игнорируются, поэтому инструкции могут быть написаны как один абзац, каждый из которых находится на новой строке или разделен пустыми строками для удобочитаемости.
Пользуемые инструкции
Инструкции в файлах доступны для использования Copilot сразу после сохранения файла(ов). Инструкции автоматически добавляются к запросам, которые вы отправляете в Copilot.
Пользовательские инструкции не отображаются в представлении чата или встроенном чате, но вы можете убедиться, что они используются Copilot с помощью списка ссылок ответа в представлении чата. Если пользовательские инструкции были добавлены в запрос, отправленный в модель, .github/copilot-instructions.md файл будет указан в виде ссылки. Чтобы открыть файл, щелкните ссылку.

Включение или отключение пользовательских инструкций репозитория
Вы можете выбрать, хотите ли Copilot использовать пользовательские инструкции на основе репозитория.
Включение или отключение пользовательских инструкций для Copilot Chat
Пользовательские инструкции включены для Copilot Chat по умолчанию, но вы можете отключить или повторно включить их в любое время. Это относится к собственному использованию данных Copilot Chat и не влияет на других пользователей.
- Open the Setting editor by using the keyboard shortcut Command+, (Mac) / Ctrl+, (Linux/Windows).
- Type
instruction filein the search box. - Select or clear the checkbox under Code Generation: Use Instruction Files.
Включение или отключение пользовательских инструкций для Copilot code review
Пользовательские инструкции включены Copilot code review по умолчанию, но их можно отключить или повторно включить в параметрах GitHub.comрепозитория. Это относится к Copilotиспользованию пользовательских инструкций для всех проверок кода, которые он выполняет в этом репозитории.
-
На GitHubперейдите на главную страницу репозитория.
-
Под именем репозитория щелкните Settings. Если вкладка "Параметры" не отображается, выберите раскрывающееся меню и нажмите кнопку "Параметры".

-
На боковой панели в разделе "Код, планирование и автоматизация", Щелкните Copilot, а затем проверьте код.
-
Переключите параметр "Использовать пользовательские инструкции при проверке запросов на вытягивание" включено или выключение.

Enabling and using prompt files
Примечание.
* Copilot Файлы с подсказками находятся Публичный предварительный просмотр и могут измениться. Файлы запросов доступны только в IDE VS Code, Visual Studio и JetBrains. См. О кастомизации ответов GitHub Copilot.
- Для примеров файлов запросов, подготовленных сообществом, для конкретных языков и сценариев смотрите сайт Awesome GitHub Copilot Customizations .
Prompt files let you build and share reusable prompt instructions with additional context. A prompt file is a Markdown file, stored in your workspace, that mimics the existing format of writing prompts in Copilot Chat (for example, Rewrite #file:x.ts). You can have multiple prompt files in your workspace, each of which defines a prompt for a different purpose.
Enabling prompt files
To enable prompt files, configure the workspace settings.
- Open the command palette by pressing Ctrl+Shift+P (Windows/Linux) / Command+Shift+P (Mac).
- Type "Open Workspace Settings (JSON)" and select the option that's displayed.
- In the
settings.jsonfile, add"chat.promptFiles": trueto enable the.github/promptsfolder as the location for prompt files. This folder will be created if it does not already exist.
Creating prompt files
-
Open the command palette by pressing Ctrl+Shift+P (Windows/Linux) / Command+Shift+P (Mac).
-
Type "prompt" and select Chat: Create Prompt.
-
Enter a name for the prompt file, excluding the
.prompt.mdfile name extension. The name can contain alphanumeric characters and spaces and should describe the purpose of the prompt information the file will contain. -
Write the prompt instructions, using Markdown formatting.
You can reference other files in the workspace by using Markdown links—for example,
[index](../../web/index.ts)—or by using the#file:../../web/index.tssyntax. Paths are relative to the prompt file. Referencing other files allows you to provide additional context, such as API specifications or product documentation.
Using prompt files
-
At the bottom of the Copilot Chat view, click the Attach context icon ().
-
In the dropdown menu, click Prompt... and choose the prompt file you want to use.
-
Optionally, attach additional files, including prompt files, to provide more context.
-
Optionally, type additional information in the chat prompt box.
Whether you need to do this or not depends on the contents of the prompt you are using.
-
Submit the chat prompt.
For more information about prompt files, see Use prompt files in Visual Studio Code in the Visual Studio Code documentation.
Further reading
This version of this article is for using repository custom instructions and prompt files in Visual Studio. Click the tabs above for instructions on using custom instructions in other environments.
Введение
Пользовательские инструкции репозитория позволяют предоставлять Copilot с рекомендациями и предпочтениями для конкретного репозитория. Дополнительные сведения см. в разделе О кастомизации ответов GitHub Copilot.
Предварительные требования для пользовательских инструкций репозитория
-
У вас должен быть пользовательский файл инструкций (см. приведенные ниже инструкции).
-
The Enable custom instructions... option must be enabled in your settings. This is enabled by default. See Enabling or disabling repository custom instructions later in this article.
Creating custom instructions
Visual Studio supports two types of custom instructions. For details of which GitHub Copilot features support these types of instructions, see О кастомизации ответов GitHub Copilot.
-
Repository-wide custom instructions, which apply to all requests made in the context of a repository.
These are specified in a
copilot-instructions.mdfile in the.githubdirectory of the repository. See Creating repository-wide custom instructions. -
Path-specific custom instructions, which apply to requests made in the context of files that match a specified path.
These are specified in one or more
NAME.instructions.mdfiles within or below the.github/instructionsdirectory in the repository. See Creating path-specific custom instructions.If the path you specify matches a file that Copilot is working on, and a repository-wide custom instructions file also exists, then the instructions from both files are used.
Creating repository-wide custom instructions
-
In the root of your repository, create a file named
.github/copilot-instructions.md.Create the
.githubdirectory if it does not already exist. -
Add natural language instructions to the file, in Markdown format.
Whitespace between instructions is ignored, so the instructions can be written as a single paragraph, each on a new line, or separated by blank lines for legibility.
Creating path-specific custom instructions
-
Создайте каталог,
.github/instructionsесли он еще не существует. -
По желанию создайте подкаталоги
.github/instructionsдля организации ваших файлов инструкций. -
Создайте один или несколько
NAME.instructions.mdфайлов, гдеNAMEуказывается назначение инструкций. Имя файла должно заканчиваться.instructions.md. -
В начале файла создайте блок frontmatter, содержащий ключевое
applyToслово. Используйте синтаксис glob, чтобы указать, к каким файлам или каталогам применяются инструкции.Например:
---
applyTo: "app/models/**/*.rb"
---
Можно указать несколько шаблонов, разделив их запятыми. Например, чтобы применить инструкции ко всем файлам TypeScript в репозитории, можно использовать следующий блок frontmatter:
---
applyTo: "**/*.ts,**/*.tsx"
---
Примеры Glob:
*- все будут совпадать со всеми файлами текущей директории.**или**/*— все совпадут со всеми файлами во всех каталогах.*.py- будет совпадать со всеми.pyфайлами текущей папки.**/*.py- будет рекурсивно совпадать со всеми.pyфайлами во всех каталогах.src/*.py- будет.pyсовпадать со всемиsrcфайлами в каталоге. Напримерsrc/foo.py, иsrc/bar.pyнетsrc/foo/bar.py.src/**/*.py- будет рекурсивно совпадать со всеми.pyфайлами вsrcкаталоге. Например,src/foo.py,src/foo/bar.pyиsrc/foo/bar/baz.py.**/subdir/**/*.py- будет рекурсивно совпадать со всеми.pyфайлами в любойsubdirпапке на любой глубине. Например,subdir/foo.py,subdir/nested/bar.py,parent/subdir/baz.py, иdeep/parent/subdir/nested/qux.py, но неfoo.pyна пути, не содержащем каталогаsubdir.
-
Опционально, чтобы предотвратить использование файла либо Copilot cloud agent одним из вариантов Copilot code review, добавьте
excludeAgentключевое слово в блок фронтматтера. Используйте либо или"code-review"``"cloud-agent".Например, следующий файл будет читаться только .Copilot cloud agent
---
applyTo: "**"
excludeAgent: "code-review"
---
Если ключевое
excludeAgentслово не включено в передний блок Matterblock, оба Copilot code review и Copilot cloud agent будут использовать ваши инструкции. -
Добавьте пользовательские инструкции на естественном языке с помощью формата Markdown. Пробелы между инструкциями игнорируются, поэтому инструкции могут быть написаны как один абзац, каждый из которых находится на новой строке или разделен пустыми строками для удобочитаемости.
Пользуемые инструкции
Инструкции в файлах доступны для использования Copilot сразу после сохранения файла(ов). Инструкции автоматически добавляются к запросам, которые вы отправляете в Copilot.
Пользовательские инструкции не отображаются в представлении чата или встроенном чате, но вы можете убедиться, что они используются Copilot с помощью списка ссылок ответа в представлении чата. Если пользовательские инструкции были добавлены в запрос, отправленный в модель, .github/copilot-instructions.md файл будет указан в виде ссылки. Чтобы открыть файл, щелкните ссылку.

Включение или отключение пользовательских инструкций репозитория
Вы можете выбрать, хотите ли Copilot использовать пользовательские инструкции на основе репозитория.
Включение или отключение пользовательских инструкций для Copilot Chat
Пользовательские инструкции включены для Copilot Chat по умолчанию, но вы можете отключить или повторно включить их в любое время. Это относится к собственному использованию данных Copilot Chat и не влияет на других пользователей.
-
In the Visual Studio menu bar, under Tools, click Options.
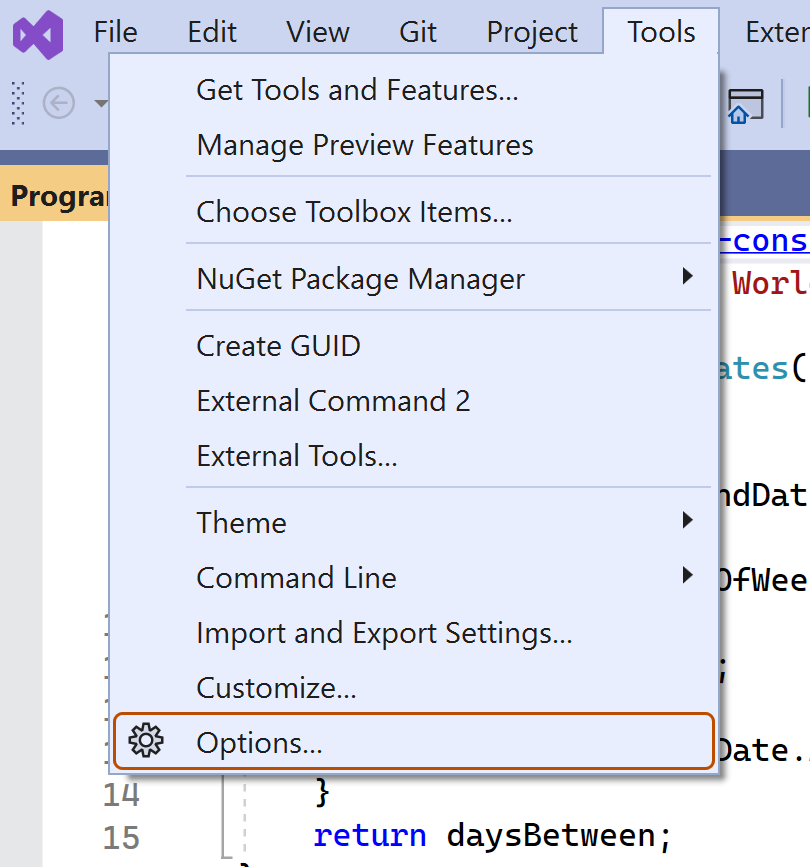
-
In the "Options" dialog, type
custom instructionsin the search box, then click Copilot. -
Select or clear the checkbox for Enable custom instructions to be loaded from .github/copilot-instructions.md files and added to requests.
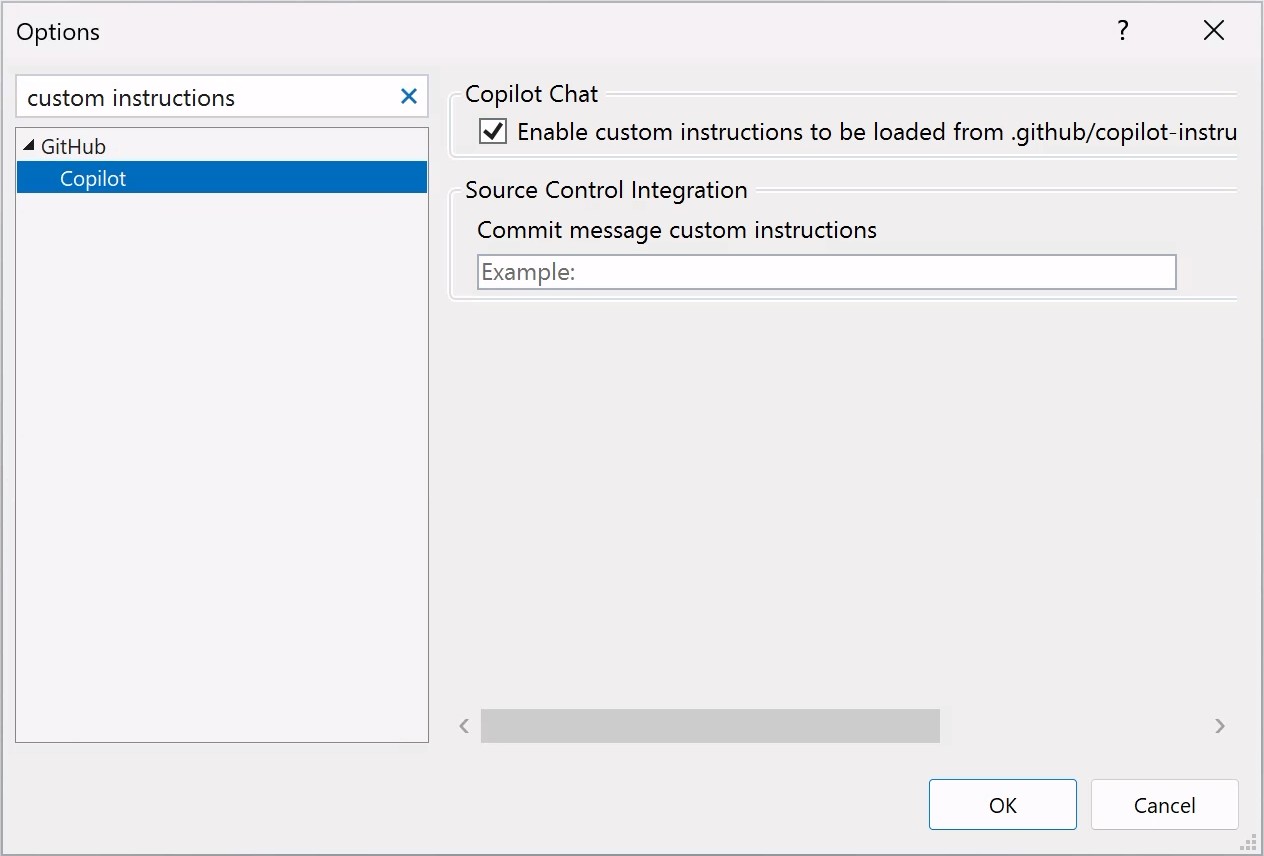


Включение или отключение пользовательских инструкций для Copilot code review
Пользовательские инструкции включены Copilot code review по умолчанию, но их можно отключить или повторно включить в параметрах GitHub.comрепозитория. Это относится к Copilotиспользованию пользовательских инструкций для всех проверок кода, которые он выполняет в этом репозитории.
-
На GitHubперейдите на главную страницу репозитория.
-
Под именем репозитория щелкните Settings. Если вкладка "Параметры" не отображается, выберите раскрывающееся меню и нажмите кнопку "Параметры".
-
На боковой панели в разделе "Код, планирование и автоматизация", Щелкните Copilot, а затем проверьте код.
-
Переключите параметр "Использовать пользовательские инструкции при проверке запросов на вытягивание" включено или выключение.
Using prompt files
Примечание.
* Copilot Файлы с подсказками находятся Публичный предварительный просмотр и могут измениться. Файлы запросов доступны только в IDE VS Code, Visual Studio и JetBrains. См. О кастомизации ответов GitHub Copilot.
- Для примеров файлов запросов, подготовленных сообществом, для конкретных языков и сценариев смотрите сайт Awesome GitHub Copilot Customizations .
Prompt files let you build and share reusable prompt instructions with additional context. A prompt file is a Markdown file, stored in your workspace, that mimics the existing format of writing prompts in Copilot Chat (for example, Rewrite #file:x.ts). You can have multiple prompt files in your workspace, each of which defines a prompt for a different purpose.
Creating prompt files
-
Add a prompt file, including the
.prompt.mdfile name extension inside the.github/promptsfolder in the root of the repository. The name can contain alphanumeric characters and spaces and should describe the purpose of the prompt information the file will contain. -
Write the prompt instructions, using Markdown formatting.
You can reference other files in the workspace by using Markdown links—for example,
[index](../../web/index.ts)—or by using the#file:'../../web/index.ts'syntax. Paths are relative to the prompt file. Referencing other files allows you to provide additional context, such as API specifications or product documentation.
For more information about prompt files, see Use prompt files in Visual Studio in the Visual Studio documentation.
Further reading
This version of this article is for using repository custom instructions in JetBrains IDEs. Click the tabs above for instructions on using custom instructions in other environments.
Введение
Пользовательские инструкции репозитория позволяют предоставлять Copilot с рекомендациями и предпочтениями для конкретного репозитория. Дополнительные сведения см. в разделе О кастомизации ответов GitHub Copilot.
Предварительные требования для пользовательских инструкций репозитория
-
У вас должен быть пользовательский файл инструкций (см. приведенные ниже инструкции).
-
The latest version of the Copilot extension must be installed in your JetBrains IDE.
Creating custom instructions
JetBrains IDEs support a single .github/copilot-instructions.md custom instructions file stored in the repository, and a locally stored global-copilot-instructions.md file.
You can create the .github/copilot-instructions.md file in your repository using the Copilot settings page, or you can create the file manually.
Whitespace between instructions is ignored, so the instructions can be written as a single paragraph, each on a new line, or separated by blank lines for legibility.
Using the settings page
- В интегрированной среде разработки JetBrains выберите меню "Файл " (Windows) или имя приложения в строке меню (macOS), а затем нажмите кнопку "Параметры".
- В левой боковой панели нажмите «Инструменты», нажмите GitHub Copilot., then click Customizations.
- Under "Copilot Instructions", click Workspace or Global to choose whether the custom instructions apply to the current workspace or all workspaces.
Manually creating a workspace custom instructions file
-
In the root of your repository, create a file named
.github/copilot-instructions.md.Create the
.githubdirectory if it does not already exist. -
Add natural language instructions to the file, in Markdown format.
Once saved, these instructions will apply to the current workspace in JetBrains IDEs that you open with Copilot enabled.
Manually creating a global custom instructions file
To apply the same instructions across all workspaces in JetBrains IDEs, you can create a global custom instructions file on your local machine.
-
Open your file explorer or terminal.
-
Navigate to the appropriate location for your operating system:
- macOS:
/Users/YOUR-USERNAME/.config/github-copilot/intellij/ - Windows:
C:\Users\YOUR-USERNAME\AppData\Local\github-copilot\intellij\
- macOS:
-
Create a file named
global-copilot-instructions.mdin that directory. -
Add your custom instructions in natural language, using Markdown format.
Once saved, these instructions will apply globally across all workspaces in JetBrains IDEs that you open with Copilot enabled.
Пользуемые инструкции
Инструкции в файлах доступны для использования Copilot сразу после сохранения файла(ов). Инструкции автоматически добавляются к запросам, которые вы отправляете в Copilot.
Пользовательские инструкции не отображаются в представлении чата или встроенном чате, но вы можете убедиться, что они используются Copilot с помощью списка ссылок ответа в представлении чата. Если пользовательские инструкции были добавлены в запрос, отправленный в модель, .github/copilot-instructions.md файл будет указан в виде ссылки. Чтобы открыть файл, щелкните ссылку.
Using prompt files
Примечание.
* Copilot Файлы с подсказками находятся Публичный предварительный просмотр и могут измениться. Файлы запросов доступны только в IDE VS Code, Visual Studio и JetBrains. См. О кастомизации ответов GitHub Copilot.
- Для примеров файлов запросов, подготовленных сообществом, для конкретных языков и сценариев смотрите сайт Awesome GitHub Copilot Customizations .
Prompt files let you build and share reusable prompt instructions with additional context. A prompt file is a Markdown file, stored in your workspace, that mimics the existing format of writing prompts in Copilot Chat (for example, Rewrite #file:x.ts). You can have multiple prompt files in your workspace, each of which defines a prompt for a different purpose.
When writing prompt instructions, you can reference other files in the workspace by using Markdown links—for example, [index](../../web/index.ts)—or by using the #file:../../web/index.ts syntax. Paths are relative to the prompt file. Referencing other files allows you to provide additional context, such as API specifications or product documentation.
Once prompt files are saved, their instructions will apply to the current workspace in JetBrains IDEs that you open with Copilot enabled.
Creating prompt files using the command line
- Create the
.github/promptsdirectory if it doesn't already exist in your workspace. This directory will be the location for your prompt files. - Create a prompt file in the
.github/promptsdirectory. The prompt file name can contain alphanumeric characters and spaces and should describe the purpose of the prompt information the file will contain. The file name must end with the.prompt.mdfile name extension, for exampleTESTPROMPT.prompt.md. - Write the prompt instructions using Markdown formatting, and save the file.
Creating prompt files using the settings page
- В интегрированной среде разработки JetBrains выберите меню "Файл " (Windows) или имя приложения в строке меню (macOS), а затем нажмите кнопку "Параметры".
- Under Tools, under GitHub Copilot, click Edit Settings.
- Under "Settings Categories", click Customizations.
- Under "Prompt Files", click Workspace, to create a prompt file in your workspace.
- Enter a name for the prompt file, excluding the
.prompt.mdfile name extension. The prompt file name can contain alphanumeric characters and spaces and should describe the purpose of the prompt information the file will contain. - Click Ok to save the prompt file name.
- Write the prompt instructions using Markdown formatting, and save the file.
Using prompt files
-
In the chat input box, type
/followed by the name of the prompt file. For example,/TESTPROMPT. -
Optionally, attach additional files, to provide more context.
-
Optionally, type additional information in the chat prompt box.
Whether you need to do this or not depends on the contents of the prompt you are using.
-
Submit the chat prompt.
Further reading
This version of this article is for using repository custom instructions in Xcode. Click the tabs above for instructions on using custom instructions in other environments.
Введение
Пользовательские инструкции репозитория позволяют предоставлять Copilot с рекомендациями и предпочтениями для конкретного репозитория. Дополнительные сведения см. в разделе О кастомизации ответов GitHub Copilot.
Предварительные требования для пользовательских инструкций репозитория
-
У вас должен быть пользовательский файл инструкций (см. приведенные ниже инструкции).
-
The latest version of the Copilot extension must be installed in Xcode.
Creating custom instructions
Xcode supports a single .github/copilot-instructions.md custom instructions file stored in the repository.
You can create a custom instructions file in your repository via the Copilot settings page.
Whitespace between instructions is ignored, so the instructions can be written as a single paragraph, each on a new line, or separated by blank lines for legibility.
- Open the GitHub Copilot for Xcode application.
- At the top of the application window, under Settings, click Advanced.
- To the right of "Custom Instructions", click Current Workspace or Global to choose whether the custom instructions apply to the current workspace or all workspaces.
Пользуемые инструкции
Инструкции в файлах доступны для использования Copilot сразу после сохранения файла(ов). Инструкции автоматически добавляются к запросам, которые вы отправляете в Copilot.
Пользовательские инструкции не отображаются в представлении чата или встроенном чате, но вы можете убедиться, что они используются Copilot с помощью списка ссылок ответа в представлении чата. Если пользовательские инструкции были добавлены в запрос, отправленный в модель, .github/copilot-instructions.md файл будет указан в виде ссылки. Чтобы открыть файл, щелкните ссылку.
Further reading
Примечание.
This feature is currently in Публичный предварительный просмотр and is subject to change.
This version of this article is for using repository custom instructions in Eclipse. Click the tabs above for instructions on using custom instructions in other environments.
Введение
Пользовательские инструкции репозитория позволяют предоставлять Copilot с рекомендациями и предпочтениями для конкретного репозитория. Дополнительные сведения см. в разделе О кастомизации ответов GitHub Copilot.
Предварительные требования для пользовательских инструкций репозитория
-
У вас должен быть пользовательский файл инструкций (см. приведенные ниже инструкции).
-
The latest version of the Copilot extension must be installed in Eclipse.
Creating custom instructions
Eclipse supports two types of repository custom instructions: workspace and project custom instructions.
To create a workspace custom instructions file, you can use the Copilot settings page. To create a project custom instructions file, you can create the file manually in the project directory.
Whitespace between instructions is ignored, so the instructions can be written as a single paragraph, each on a new line, or separated by blank lines for legibility.
Creating a workspace custom instructions file
- To open the Copilot Chat panel, click the Copilot icon () in the status bar at the bottom of Eclipse.
- From the menu, select "Edit preferences".
- In the left pane, expand GitHub Copilot and click Custom Instructions.
- Select Enable workspace instructions.
- In the "Workspace" section, under "Set custom instructions to guide Copilot's code suggestions in this workspace", add natural language instructions to the file, in Markdown format.
Creating a project custom instructions file
- In the root of your project directory, create a file named
.github/copilot-instructions.md. - Add your custom instructions in natural language, using Markdown format.
Once saved, these instructions will apply to the current project in Eclipse that you open with Copilot enabled.
Пользуемые инструкции
Инструкции в файлах доступны для использования Copilot сразу после сохранения файла(ов). Инструкции автоматически добавляются к запросам, которые вы отправляете в Copilot.
Further reading
- Поддержка различных типов пользовательских инструкций
- Пользовательские инструкции—a curated collection of examples