Introduction
The Model Context Protocol (MCP) is an open standard that defines how applications share context with large language models (LLMs). For an overview of MCP, see モデル コンテキスト プロトコル (MCP) について.
For a curated list of MCP servers from partners and the community, see the GitHub MCP Registry.
企業と組織は、Copilot ポリシーで MCP サーバーを使用して、組織または企業のメンバーに対して MCP の使用を有効または無効にすることを選択できます。 このポリシーは、既定では無効になっています。 「企業での GitHub Copilot のポリシーと機能の管理」と「組織内のGitHub Copilotのポリシーと機能の管理」を参照してください。 MCP ポリシーは、ポリシーを構成する組織または企業から**** またはCopilot Businessサブスクリプションを持つユーザーCopilot Enterprise適用されます。 Copilot Free、Copilot Pro、Copilot Pro+、またはCopilot Maxは、このポリシーによって管理される MCP アクセス権を持っていません。
Prerequisites
- Access to Copilot. 「GitHub Copilotについて」をご覧ください。
- Visual Studio Code version 1.99 or later. For information on installing Visual Studio Code, see the Visual Studio Code download page.
- Copilot Business または Copilot Enterprise プランを利用する organization または Enterprise のメンバーである場合、Copilot で MCP を使うには、"Copilot の MCP サーバー" ポリシーを有効にする必要があります。
Configuring MCP servers in Visual Studio Code
MCP servers can be configured manually in a configuration file, or through the GitHub MCP Registry. The GitHub MCP Registry provides a curated list of MCP servers that you can easily add to your Visual Studio Code instance.
Using the GitHub MCP Registry
メモ
The GitHub MCP Registry is in パブリック プレビュー and may change.
Only MCP servers listed in the GitHub MCP Registry can be added through the registry. Other servers can be configured manually. See Configuring MCP servers manually.
- In Visual Studio Code, open the extensions panel by clicking the extensions icon in the sidebar or pressing Ctrl+Shift+X (Windows/Linux) / Command+Shift+X (Mac).
- In the extensions search bar, type
@mcpfollowed by the name of the MCP server you want to add. This opens the MCP server gallery and shows matching results. - Select the MCP server from the search results. On the MCP server's details page, click Install.
- When prompted, confirm that you trust the server to start it. VS Code discovers the server's tools and makes them available in chat.
- To verify that the MCP server is configured correctly, open the command palette by pressing Ctrl+Shift+P (Windows/Linux) / Command+Shift+P (Mac).
- Type and select MCP: List Servers. You should see the MCP server listed as a configured server.
Configuring MCP servers manually
To configure MCP servers in Visual Studio Code, you need to set up a configuration script that specifies the details of the MCP servers you want to use. You can configure MCP servers for either:
-
特定のリポジトリ。 これにより、Visual Studio Code でプロジェクトを開いたすべてのユーザーと MCP サーバーを共有できます。 これを行うには、リポジトリのルートに
.vscode/mcp.jsonファイルを作成します。 -
Visual Studio Code の個人インスタンス。 構成した MCP サーバーにアクセスできるのは自分だけです。 これを行うには、Visual Studio Code で
settings.jsonファイルに構成を追加します。 この方法で構成された MCP サーバーは、すべてのワークスペースで使用できます。メモ
We recommend you use only one location per server. Adding the same server to both locations may cause conflicts and unexpected behavior.
The steps below show how to configure the Fetch MCP server in your .vscode/mcp.json file. The Fetch MCP server is a simple MCP server that provides web content fetching capabilities. For more information on the Fetch MCP server, see the Fetch directory in the MCP Server repository.
You can use the same steps to configure MCP servers in your personal Visual Studio Code settings. Details on how to configure other MCP servers are available in the MCP servers repository.
For information on configuring the GitHub MCP server, see Using the GitHub MCP Server in your IDE.
-
Add the following configuration to your
.vscode/mcp.jsonfile:JSON { "inputs": [ // The "inputs" section defines the inputs required for the MCP server configuration. { "type": "promptString" } ], "servers": { // The "servers" section defines the MCP servers you want to use. "fetch": { "command": "uvx", "args": ["mcp-server-fetch"] } } }{ "inputs": [ // The "inputs" section defines the inputs required for the MCP server configuration. { "type": "promptString" } ], "servers": { // The "servers" section defines the MCP servers you want to use. "fetch": { "command": "uvx", "args": ["mcp-server-fetch"] } } } -
Save the
.vscode/mcp.jsonfile. -
A "Start" button will appear in your
.vscode/mcp.jsonfile, at the top of the list of servers. Click the "Start" button to start the MCP servers. This will trigger the input dialog and discover the server tools, which are then stored for later sessions.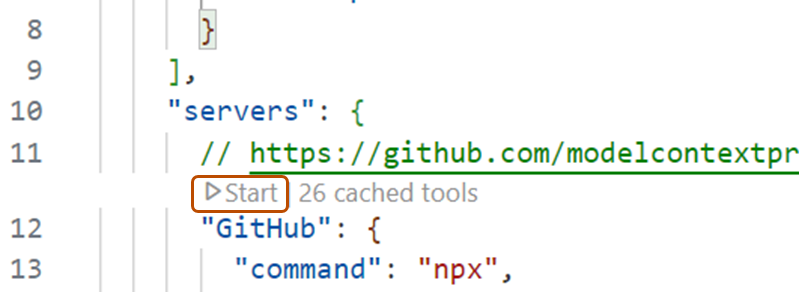
-
Open Copilot Chat by clicking the chat icon in the title bar of Visual Studio Code.
-
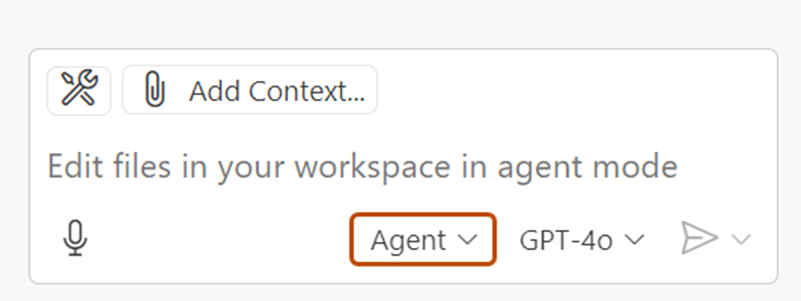
In the Copilot Chat box, select Agent from the popup menu.
-
To view your list of available MCP servers, click the tools icon in the top left corner of the chat box. This will open the MCP server list, where you can see all the MCP servers and associated tools that are currently available in your Visual Studio Code instance.
- Optionally, you can define toolsets, groups of related tools that you can reference in chat. Toolsets make it easier to group related MCP tools together and quickly enable or disable them. For information on how to define and use a toolset, see the VS Code docs.


For more information on configuring MCP servers in Visual Studio Code, see Use MCP servers in Visual Studio Code in the Visual Studio Code documentation.
Using MCP servers in Copilot Chat
Once you have configured your MCP servers, you can use them in Copilot Chat to access a wide range of tools and services. In the example below, we will use the Fetch MCP server to fetch details about a web page.
-
Copilot Chatのタイトル バーにあるチャット アイコンをクリックして、Visual Studio Codeを開きます。
-
Copilot Chat ボックスで、エージェントのドロップダウン メニューから [エージェント] を選択します。
-
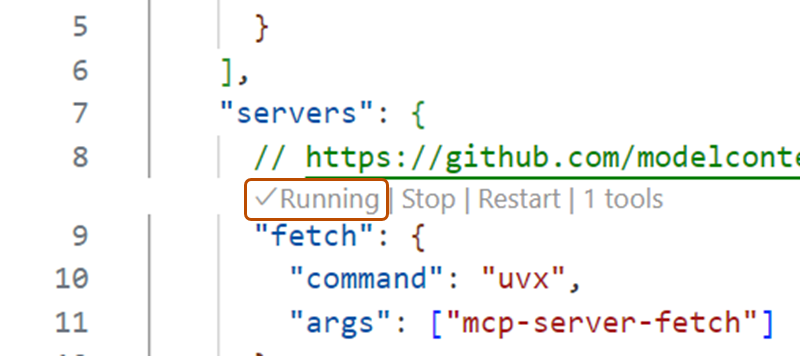
In the file with the MCP configuration, check that the MCP server is running. If it is not running, click the "Start" button to start the MCP server.
-
Ask Copilot Chat to fetch the details of a URL. For example:
Fetch https://github.com/github/docs. -
If Copilot asks you to confirm that you want to proceed, click Continue.
-
Copilot will fetch the details of the URL and display them in the chat box.

Optionally, you can use MCP prompts and resources in VS Code.
- MCP servers can define preconfigured prompts for interacting with their tools. You can access these prompts in chat with slash commands, using the format
/mcp.servername.promptname. - MCP servers provide resources, which are any kind of data that the server wants to make available. For example, the GitHub MCP server provides repository content as a resource. To add resources from an MCP server to your chat context, click Add Context... in the chat box, then click MCP Resources.
For more information on using MCP servers in Visual Studio Code, see Use MCP servers in Visual Studio Code in the Visual Studio Code documentation.
Using existing MCP configurations
If you already have an MCP configuration in Claude Desktop, you can use that configuration in Visual Studio Code to access the same MCP servers. To do this, add the following configuration to your settings.json file in Visual Studio Code:
"chat.mcp.discovery.enabled": true
"chat.mcp.discovery.enabled": true
Visual Studio Code will automatically find your existing configuration and use it in your Visual Studio Code instance.
Prerequisites
- Access to Copilot. 「GitHub Copilotについて」をご覧ください。
- Visual Studio version 17.14 or later. For more information on installing Visual Studio, see the Visual Studio downloads page.
- Sign in to GitHub from Visual Studio.
- Copilot Business または Copilot Enterprise プランを利用する organization または Enterprise のメンバーである場合、Copilot で MCP を使うには、"Copilot の MCP サーバー" ポリシーを有効にする必要があります。
Configuring MCP servers in Visual Studio
-
In the Visual Studio menu bar, click View, then click GitHub Copilot Chat.
-
At the bottom of the chat panel, select Agent from the mode dropdown.
-
In the Copilot Chat window, click the tools icon, then click the plus icon in the tool picker window.
-
In the "Configure MCP server" pop-up window, fill out the fields, including server ID, type, and any additional fields required for the specific MCP server configuration.
Visual Studio supports both remote and local servers. Remote servers, defined with a URL and credentials, are hosted externally for easier setup and sharing, while local servers, defined with command-line invocation, run on your local machine and can access local resources. See example configurations below, using the GitHub MCP server as an example.
-
Click Save.
-
If you are using a remote server with OAuth authentication, in the
mcp.jsonfile, click Auth from the CodeLens above the server to authenticate to the server. A pop-up or new window will appear, allowing you to authenticate with your account. The server will only be able to access the scopes you approve, and that your organization policies allow. -
In the Copilot Chat window, click the tools icon. You should now see additional tools from the MCP server that you configured.
Remote server configuration example with OAuth
-
For "Server ID", type
github. -
For "Type", select "HTTP/SSE" from the dropdown.
-
For "URL", type
https://api.githubcopilot.com/mcp/. -
After clicking Save, the configuration in the
mcp.jsonfile should look like this:JSON { "servers": { "github": { "url": "https://api.githubcopilot.com/mcp/" } } }{ "servers": { "github": { "url": "https://api.githubcopilot.com/mcp/" } } } -
In the
mcp.jsonfile, click Auth from the CodeLens above the server to authenticate to the server. A pop-up will come up allowing you to authenticate with your GitHub account.
Local server configuration example
-
For "Server ID", type
github. -
For "Type", select "stdio" from the dropdown.
-
For "Command (with optional arguments)", type
docker "run", "-i", "--rm", "-e", "GITHUB_PERSONAL_ACCESS_TOKEN", "ghcr.io/github/github-mcp-server" -
Add an environment variable "GITHUB_PERSONAL_ACCESS_TOKEN" set to your personal access token.
-
After clicking Save, the configuration in the
mcp.jsonfile should look like this:JSON { "servers": { "github": { "type": "stdio", "command": "docker", "args": [ "run", "-i", "--rm", "-e", "GITHUB_PERSONAL_ACCESS_TOKEN", "ghcr.io/github/github-mcp-server" ], "env": { "GITHUB_PERSONAL_ACCESS_TOKEN": "YOUR_GITHUB_PAT" } } } }{ "servers": { "github": { "type": "stdio", "command": "docker", "args": [ "run", "-i", "--rm", "-e", "GITHUB_PERSONAL_ACCESS_TOKEN", "ghcr.io/github/github-mcp-server" ], "env": { "GITHUB_PERSONAL_ACCESS_TOKEN": "YOUR_GITHUB_PAT" } } } }
For more information on configuring MCP servers in Visual Studio, see Use MCP servers in Visual Studio (Preview) in the Visual Studio documentation.
Prerequisites
-
Access to Copilot. 「GitHub Copilotについて」をご覧ください。
-
A compatible JetBrains IDE. GitHub Copilot is compatible with the following IDEs:
- IntelliJ IDEA (Ultimate、Community、Educational)
- Android Studio
- CLion
- Code With Me ゲスト
- DataGrip
- DataSpell
- GoLand
- JetBrains クライアント
- MPS
- PhpStorm
- PyCharm (Professional、Community、Educational)
- Rider
- RubyMine
- RustRover
- WebStorm
ダウンロードするには、JetBrains IDE のツール ファインダーを参照してください。
-
Copilot Business または Copilot Enterprise プランを利用する organization または Enterprise のメンバーである場合、Copilot で MCP を使うには、"Copilot の MCP サーバー" ポリシーを有効にする必要があります。
Configuring MCP servers from your MCP registry
- In your JetBrains IDE, open Copilot Chat.
- In the Copilot Chat window, click the MCP icon.
- In the MCP Registry window, find the MCP server(s) you want to add from the list of available servers.
- Next to each MCP server you want to add, click Install.
- When you are finished adding MCP servers, click OK.
- In the Copilot Chat window, click the tools icon. You should now see additional tools from the MCP server(s) that you installed.
Configuring MCP servers manually
- 右下隅にある をクリックします。
- メニューから [Open Chat] を選び、エージェント モードになっていることを確認してから、チャット ウィンドウの下部にあるツール アイコン ("MCP サーバーの構成" と呼ばれます) をクリックします。
- [Add MCP Tools] をクリックします。
- In the
mcp.jsonfile, define your MCP servers. JetBrains IDEs support both remote and local servers. Remote servers are hosted externally for easier setup and sharing, while local servers run on your local machine and can access local resources.
You can use the following configurations as examples:
Remote server configuration example with PAT
{
    "servers": {
        "github": {
            "url": "https://api.githubcopilot.com/mcp/",
            "requestInit": {
                "headers": {
                    "Authorization": "Bearer YOUR_PAT_HERE"
                }
            }
        }
    }
  }
{
    "servers": {
        "github": {
            "url": "https://api.githubcopilot.com/mcp/",
            "requestInit": {
                "headers": {
                    "Authorization": "Bearer YOUR_PAT_HERE"
                }
            }
        }
    }
  }
Local server configuration example
{
  "servers": {
    "memory": {
      "command": "npx",
      "args": [
        "-y",
        "@modelcontextprotocol/server-memory"
      ]
    }
  }
}
{
  "servers": {
    "memory": {
      "command": "npx",
      "args": [
        "-y",
        "@modelcontextprotocol/server-memory"
      ]
    }
  }
}
Prerequisites
- Access to Copilot. 「GitHub Copilotについて」をご覧ください。
- GitHub Copilot for Xcode extension. See Installing the GitHub Copilot extension in your environment.
- Copilot Business または Copilot Enterprise プランを利用する organization または Enterprise のメンバーである場合、Copilot で MCP を使うには、"Copilot の MCP サーバー" ポリシーを有効にする必要があります。
Configuring MCP servers from your MCP registry
- In Xcode, open Copilot Chat.
- In the Copilot Chat window, click the icon to open settings.
- In the settings window, select the Tools tab.
- Next to MCP Registry URL (Optional), click Browse MCP Servers.
- In the MCP Registry window, find the MCP server(s) you want to add from the list of available servers.
- Next to each MCP server you want to add, click Install.
- When you are finished adding MCP servers, close the MCP Servers Marketplace window.
- In the settings window, under Available MCP Tools, click the > icon to expand the list of available MCP tools. You should now see additional tools from the MCP server(s) that you installed.
Configuring MCP servers manually
- Xcode 用 GitHub Copilot 拡張機能を開いて [Settings] に移動します。
- または、アクティブな Xcode ワークスペースで、メニュー バーの [Editor] をクリックし、[GitHub Copilot] を選んでから、[Open GitHub Copilot for Xcode Settings] をクリックして、設定を見つけることもできます。
- [MCP] タブを選んでから、[Edit Config] をクリックします。
- Define your MCP servers, editing
mcp.json. Xcode supports both remote and local servers. Remote servers are hosted externally for easier setup and sharing, while local servers run on your local machine and can access local resources.
You can use the following configurations as examples:
Remote server configuration example with PAT
{
    "servers": {
        "github": {
            "url": "https://api.githubcopilot.com/mcp/",
            "requestInit": {
                "headers": {
                    "Authorization": "Bearer YOUR_PAT_HERE"
                }
            }
        }
    }
  }
{
    "servers": {
        "github": {
            "url": "https://api.githubcopilot.com/mcp/",
            "requestInit": {
                "headers": {
                    "Authorization": "Bearer YOUR_PAT_HERE"
                }
            }
        }
    }
  }
Local server configuration example
{
  "servers": {
    "memory": {
      "command": "npx",
      "args": [
        "-y",
        "@modelcontextprotocol/server-memory"
      ]
    }
  }
}
{
  "servers": {
    "memory": {
      "command": "npx",
      "args": [
        "-y",
        "@modelcontextprotocol/server-memory"
      ]
    }
  }
}
Prerequisites
- Copilot へのアクセス権。 「GitHub Copilotについて」をご覧ください。
- Eclipse の互換バージョン。 GitHub Copilot 拡張機能を使うには、Eclipse バージョン 2024-09 以降が必要です。 Eclipse のダウンロード ページを参照してください。
- Copilot Business または Copilot Enterprise プランを利用する organization または Enterprise のメンバーである場合、Copilot で MCP を使うには、"Copilot の MCP サーバー" ポリシーを有効にする必要があります。
Configuring MCP servers from your MCP registry
- In Eclipse, open Copilot Chat.
- In the Copilot Chat window, click the MCP icon.
- In the MCP Registry window, find the MCP server(s) you want to add from the list of available servers.
- Next to each MCP server you want to add, click Install.
- When you are finished adding MCP servers, click Close.
- In the Copilot Chat window, click the tools icon. You should now see additional tools from the MCP server(s) that you installed.
Configuring MCP servers manually
- Eclipse の下部にあるステータス バーの Copilot アイコン () をクリックします。
- メニューから [Open Chat] を選び、チャット ウィンドウで [Configure Tools...] アイコンをクリックします。
- または、[Edit preferences] を選んでから、左側のペインで GitHub Copilot を展開して [MCP] をクリックしてもかまいません。
- Under "Server Configurations", define your MCP servers. Eclipse supports both remote and local servers. Remote servers are hosted externally for easier setup and sharing, while local servers run on your local machine and can access local resources.
You can use the following configurations as examples:
Remote server configuration example with PAT
{
    "servers": {
        "github": {
            "url": "https://api.githubcopilot.com/mcp/",
            "requestInit": {
                "headers": {
                    "Authorization": "Bearer YOUR_PAT_HERE"
                }
            }
        }
    }
  }
{
    "servers": {
        "github": {
            "url": "https://api.githubcopilot.com/mcp/",
            "requestInit": {
                "headers": {
                    "Authorization": "Bearer YOUR_PAT_HERE"
                }
            }
        }
    }
  }
Local server configuration example
{
  "servers": {
    "memory": {
      "command": "npx",
      "args": [
        "-y",
        "@modelcontextprotocol/server-memory"
      ]
    }
  }
}
{
  "servers": {
    "memory": {
      "command": "npx",
      "args": [
        "-y",
        "@modelcontextprotocol/server-memory"
      ]
    }
  }
}
Creating a new MCP server
You can create a new MCP server to fulfill your specific needs, and then integrate it with Copilot Chat. For example, you can create an MCP server that connects to a database or a web service, and then use that server in Copilot Chat to perform tasks on that database or web service.
For more information on creating and configuring your own MCP servers, see the official MCP documentation.