Introduction
This guide describes how to use Copilot Chat and agents to automate coding tasks by breaking them into steps, using tools to read files, edit code, and run commands, and self-correcting when something goes wrong. You can also ask general questions about software development, or specific questions about the code in your project. For more information, see GitHub 코필로트 채팅 정보.
To learn how to use Copilot for agent-driven workflows in a desktop app, see GitHub Copilot 앱 시작.
Prerequisites
- Access to GitHub Copilot. GitHub Copilot 소개을(를) 참조하세요.
- 최신 버전의 Visual Studio Code. Visual Studio Code 다운로드 페이지를 참조하세요.
- GitHub에서 Visual Studio Code에 로그인합니다. 인증에 문제가 있는 경우 GitHub Copilot 관련된 일반적인 문제 해결을(를) 참조하세요.
조직GitHub Copilot 또는 엔터프라이즈에 액세스할 수 있는 경우, 조직 소유자GitHub Copilot Chat 또는 엔터프라이즈 관리자을 사용할 수 없습니다. 조직의 GitHub Copilot 대한 정책 및 기능 관리을(를) 참조하세요.
Chat modes
You can use Copilot Chat in the following modes:
- Ask mode: to get answers to coding questions and get Copilot to provide code suggestions.
- Agent mode: to get Copilot to autonomously accomplish a set task. See Using agent mode in your IDE.
- Plan mode: to get Copilot to create detailed implementation plans to ensure all requirements are met. See Using plan mode in your IDE.
To switch between modes, use the agents dropdown at the bottom of the chat view.
참고
If you don’t see the Agent option in the mode selector, your enterprise or organization administrator may have disabled agent mode for your IDE.
Using ask mode
Ask mode is optimized for answering questions about your codebase, coding, and general technology concepts. Use ask mode when you want to understand how something works, explore ideas, or get help with coding tasks.
To use ask mode, select Ask from the agents dropdown at the bottom of the chat view, then submit a prompt as described below.
Submitting prompts
You can give the agent a high-level description of what you want to build and it gets to work. Each task runs inside an agent session, a persistent conversation you can track, pause, resume, or hand off to another agent.
-
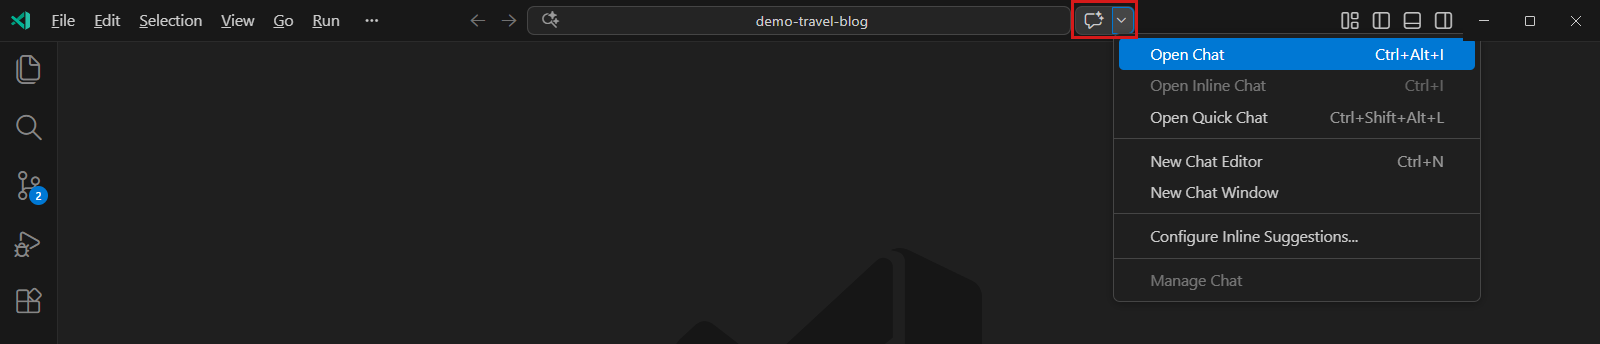
To open the chat view, click the chat icon in the title bar of Visual Studio Code. If the chat icon is not displayed, right-click the title bar and make sure that Command Center is selected.
-
Enter a prompt in the prompt box. For an introduction to the kinds of prompts you can use, see Getting started with prompts for GitHub Copilot Chat in your IDE.
-
Evaluate Copilot's response, and make a follow-up request if needed.
The response may contain text, code blocks, buttons, images, URIs, and file trees. The response often includes interactive elements. For example, the response may include a menu to insert a code block, or a button to invoke a Visual Studio Code command.
To see the files that Copilot Chat used to generate the response, select the Used n references dropdown at the top of the response. The references may include a link to a custom instructions file for your repository. This file contains additional information that is automatically added to all of your chat questions to improve the quality of the responses. For more information, see GitHub Copilot 대한 리포지토리 사용자 지정 지침 추가.

Using keywords in your prompt
You can use special keywords to help Copilot understand your prompt. For examples, see Getting started with prompts for GitHub Copilot Chat in your IDE.
Chat participants
Chat participants are like domain experts who have a specialty that they can help you with.
Copilot Chat can infer relevant chat participants based on your natural language prompt, improving discovery of advanced capabilities without you having to explicitly specify the participant you want to use in your prompt.
참고
Automatic inference for chat participants is currently in 공개 미리 보기 and is subject to change.
Alternatively, you can manually specify a chat participant to scope your prompt to a specific domain. To do this, type @ in the chat prompt box, followed by a chat participant name.
For a list of available chat participants, type @ in the chat prompt box. See also GitHub 코파일럿 챗 치트 시트 or Chat participants in the Visual Studio Code documentation.
Slash commands
Use slash commands to avoid writing complex prompts for common scenarios. To use a slash command, type / in the chat prompt box, followed by a command.
To see all available slash commands, type / in the chat prompt box. See also GitHub 코파일럿 챗 치트 시트 or Slash commands in the Visual Studio Code documentation.
Chat variables
Use chat variables to include specific context in your prompt. To use a chat variable, type # in the chat prompt box, followed by a chat variable.
To see all available chat variables, type # in the chat prompt box. See also GitHub 코파일럿 챗 치트 시트.
Using GitHub skills for Copilot
Copilot의 GitHub 특정 기술은 Copilot에서 제공할 수 있는 정보 유형을 확장합니다. Copilot Chat에서 이러한 기술에 액세스하려면 질문에 @github를 포함하세요.
질문에 @github를 추가하면 Copilot는 질문의 내용에 따라 적절한 기술을 동적으로 선택합니다. Copilot Chat에게 특정 기술을 사용하도록 명시적으로 요청할 수도 있습니다. 이 작업은
- 자연어를 사용하여 Copilot Chat에 기술을 사용하도록 요청합니다. 예를 들어
@github Search the web to find the latest GPT model from OpenAI. - 웹 검색을 구체적으로 호출하려면 질문에
#web변수를 포함하면 됩니다. 예를 들어@github #web What is the latest LTS of Node.js?
Copilot을(를) 요청하여 현재 사용 가능한 기술 목록을 생성할 수 있습니다. @github What skills are available?
Using Model Context Protocol (MCP) servers
MCP를 사용하면 다양한 기존 도구 및 서비스와 통합하여 Copilot Chat의 기능을 확장할 수 있습니다. 자세한 내용은 모델 컨텍스트 프로토콜(MCP) 정보을(를) 참조하세요.
AI models for Copilot Chat
응답을 생성하는 데 사용하는 모델을 Copilot 변경할 수 있습니다. 질문 유형에 따라 다른 모델이 더 잘 수행되거나 더 유용한 응답을 제공할 수 있습니다. 옵션으로는 고급 기능을 갖춘 프리미엄 모델이 있습니다.
Additional ways to access Copilot Chat
In addition to submitting prompts through the chat view, you can submit prompts in other ways:
- Quick chat: To open the quick chat dropdown, enter Shift+Option+Command+L (Mac) / Ctrl+Shift+Alt+L (Windows/Linux).
- Inline: To start an inline chat directly in the editor or integrated terminal, enter Command+i (Mac) / Ctrl+i (Windows/Linux).
- Smart actions: To submit prompts via the context menu, right click in your editor, select Copilot in the menu that appears, then select one of the actions. Smart actions can also be accessed via the sparkle icon that sometimes appears when you select a line of code.
See inline chat, quick chat, and chat smart actions in the Visual Studio Code documentation for more details.
Using images in Copilot Chat
이미지 입력을 지원하는 모델을 사용할 때 프롬프트에 이미지 및 PDF를 연결할 수 있습니다.
Copilot 에서는 다음 파일 형식을 지원합니다.
- JPEG(
.jpg,.jpeg) - PNG(
.png) - GIF(
.gif) - WEBP(
.webp) - PDF(
.pdf) - HEIC(
.heic) - HEIF(
.heif)
예를 들어 다음을 첨부할 수 있습니다.
- 코드 조각의 스크린샷 및 코드 설명 요청 Copilot
- 애플리케이션에 대한 사용자 인터페이스의 모형이며 코드를 생성하도록 요청 Copilot 합니다.
- 순서도이며 이미지에 표시된 프로세스를 설명하도록 요청 Copilot 합니다.
- 웹 페이지의 스크린샷과 유사한 페이지에 대한 HTML을 생성하도록 요청 Copilot 합니다.
이미지 및 PDF 첨부 파일은 모든 Copilot 계획에서 사용할 수 있으며 기능을 켜거나 끄는 데 필요한 정책 없이 기본적으로 사용하도록 설정됩니다.
Attaching images to your chat prompt
-
Do one of the following:
- Copy an image and paste it into the chat view.
- Drag and drop one or more image file from your operating system's file explorer—or from the Explorer in VS Code—into the chat view.
- Right-click an image file in the VS Code Explorer and click Copilot then Add File to Chat.
-
채팅 보기에 프롬프트를 입력하여 이미지와 함께 표시합니다. 예:
explain this diagram,describe each of these images in detail,what does this error message mean.
Sharing feedback
To indicate whether a response was helpful, use the thumbs up and thumbs down icons that appear next to the response.
To leave feedback about the GitHub Copilot Chat extension, open an issue in the microsoft/vscode-copilot-release repository.
Further reading
Prerequisites
-
Access to GitHub Copilot. GitHub Copilot 소개을(를) 참조하세요.
-
Visual Studio 2022 version 17.8 or later. See Install Visual Studio in the Visual Studio documentation.
- For Visual Studio 17.8 and 17.9:
- GitHub Copilot extension. See Install GitHub Copilot in Visual Studio in the Visual Studio documentation.
- GitHub Copilot Chat extension. See Install GitHub Copilot in Visual Studio in the Visual Studio documentation.
Visual Studio 17.10 and later have the GitHub Copilot and GitHub Copilot Chat extensions built in. You don't need to install them separately.
- For Visual Studio 17.8 and 17.9:
-
Sign in to GitHub in Visual Studio. If you experience authentication issues, see GitHub Copilot 관련된 일반적인 문제 해결.
조직GitHub Copilot 또는 엔터프라이즈에 액세스할 수 있는 경우, 조직 소유자GitHub Copilot Chat 또는 엔터프라이즈 관리자을 사용할 수 없습니다. 조직의 GitHub Copilot 대한 정책 및 기능 관리을(를) 참조하세요.
Chat modes
Visual Studio supports the following chat modes:
- Ask mode: Get answers and guidance without making changes to your code.
- Agent mode: Give Copilot a high-level task and allow it to edit code, run commands, and iterate on the results. See Using agent mode in your IDE.
To switch between modes, use the mode dropdown at the bottom of the chat panel. Chat modes are available in Visual Studio 17.14 and later.
Using ask mode
Use ask mode when you want Copilot to explain code, answer a question, or suggest an approach without modifying your project.
To use ask mode, select Ask from the mode dropdown at the bottom of the chat panel, then submit a prompt as described below.
Submitting prompts
You can ask Copilot Chat to give you code suggestions, explain code, generate unit tests, and suggest code fixes.
-
In the Visual Studio menu bar, click View, then click GitHub Copilot Chat.
-
In the Copilot Chat window, enter a prompt, then press Enter. For example prompts, see Getting started with prompts for GitHub Copilot Chat in your IDE.
-
Evaluate Copilot's response, and submit a follow up prompt if needed.
The response often includes interactive elements. For example, the response may include buttons to copy, insert, or preview the result of a code block.
To see the files that Copilot Chat used to generate the response, click the References link below the response. The references may include a link to a custom instructions file for your repository. This file contains additional information that is automatically added to all of your chat questions to improve the quality of the responses. For more information, see GitHub Copilot 대한 리포지토리 사용자 지정 지침 추가.
Using keywords in your prompt
You can use special keywords to help Copilot understand your prompt.
Slash commands
Use slash commands to avoid writing complex prompts for common scenarios. To use a slash command, type / in the chat prompt box, followed by a command.
To see all available slash commands, type / in the chat prompt box. See also GitHub 코파일럿 챗 치트 시트 or Slash commands in the Visual Studio documentation.
References
By default, Copilot Chat will reference the file that you have open or the code that you have selected. You can also use # followed by a file name, file name and line numbers, or solution to reference a specific file, lines, or solution.
See also GitHub 코파일럿 챗 치트 시트 or Reference in the Visual Studio documentation.
Using GitHub skills for Copilot (preview)
참고
The @github chat participant is currently in preview, and only available in Visual Studio 2022 Preview 2 onwards.
Copilot's GitHub-specific skills expand the type of information Copilot can provide. To access these skills in Copilot Chat in Visual Studio, include @github in your question.
When you add @github to a question, Copilot dynamically selects an appropriate skill, based on the content of your question. You can also explicitly ask Copilot Chat to use a particular skill. For example, @github Search the web to find the latest GPT4 model from OpenAI.
You can generate a list of currently available skills by asking Copilot: @github What skills are available?
Using Model Context Protocol (MCP) servers
MCP를 사용하면 다양한 기존 도구 및 서비스와 통합하여 Copilot Chat의 기능을 확장할 수 있습니다. 자세한 내용은 모델 컨텍스트 프로토콜(MCP) 정보을(를) 참조하세요.
AI models for Copilot Chat
응답을 생성하는 데 사용하는 모델을 Copilot 변경할 수 있습니다. 질문 유형에 따라 다른 모델이 더 잘 수행되거나 더 유용한 응답을 제공할 수 있습니다. 옵션으로는 고급 기능을 갖춘 프리미엄 모델이 있습니다.
Additional ways to access Copilot Chat
In addition to submitting prompts through the chat window, you can submit prompts inline. To start an inline chat, right click in your editor window and select Ask Copilot.
See Ask questions in the inline chat view in the Visual Studio documentation for more details.
Using images in Copilot Chat
이미지 입력을 지원하는 모델을 사용할 때 프롬프트에 이미지 및 PDF를 연결할 수 있습니다.
Copilot 에서는 다음 파일 형식을 지원합니다.
- JPEG(
.jpg,.jpeg) - PNG(
.png) - GIF(
.gif) - WEBP(
.webp) - PDF(
.pdf) - HEIC(
.heic) - HEIF(
.heif)
예를 들어 다음을 첨부할 수 있습니다.
- 코드 조각의 스크린샷 및 코드 설명 요청 Copilot
- 애플리케이션에 대한 사용자 인터페이스의 모형이며 코드를 생성하도록 요청 Copilot 합니다.
- 순서도이며 이미지에 표시된 프로세스를 설명하도록 요청 Copilot 합니다.
- 웹 페이지의 스크린샷과 유사한 페이지에 대한 HTML을 생성하도록 요청 Copilot 합니다.
이미지 및 PDF 첨부 파일은 모든 Copilot 계획에서 사용할 수 있으며 기능을 켜거나 끄는 데 필요한 정책 없이 기본적으로 사용하도록 설정됩니다.
Attaching images to your chat prompt
-
If you see the AI model picker at the bottom right of the chat view, select one of the models that supports adding images to prompts:
-
Do one of the following:
- Copy an image and paste it into the chat view.
- Click the paperclip icon at the bottom right of the chat view, click Upload Image, browse to the image file you want to attach, select it and click Open.
You can add multiple images if required.
-
Type your prompt into the chat view to accompany the image. For example,
explain this image, ordescribe each of these images in detail.
Sharing feedback
To share feedback about Copilot Chat, you can use the Send feedback button in Visual Studio. For more information on providing feedback for Visual Studio, see the Visual Studio Feedback documentation.
-
In the top right corner of the Visual Studio window, click the Send feedback button.
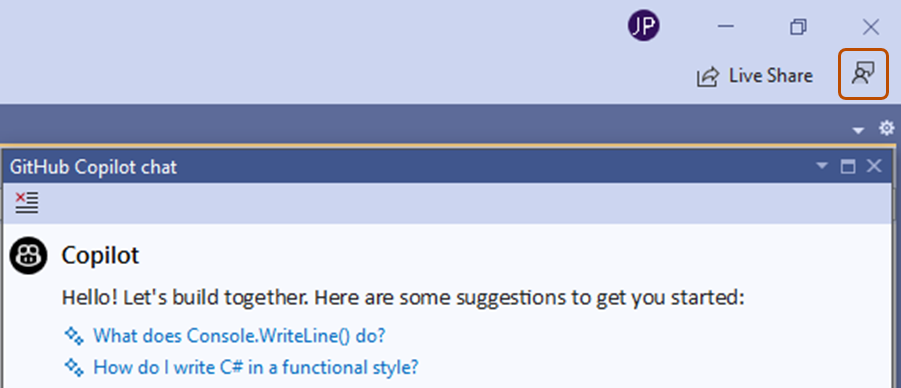
-
Choose the option that best describes your feedback.
- To report a bug, click Report a problem.
- To request a feature, click Suggest a feature.

Further reading
- GitHub Copilot 채팅에 대한 프롬프트 엔지니어링
- Using GitHub Copilot Chat in Visual Studio in the Microsoft Learn documentation
- Tips to improve GitHub Copilot Chat results in the Microsoft Learn documentation
- GitHub에서 GitHub Copilot에 질문하기
- 애플리케이션 카드: GitHub Copilot Chat
- GitHub 추가 제품 및 기능 약관
- GitHub Copilot Trust Center
- GitHub Copilot FAQ
Prerequisites
-
Access to GitHub Copilot. GitHub Copilot 소개을(를) 참조하세요.
-
Compatible JetBrains IDE. GitHub Copilot is compatible with the following IDEs:
- IntelliJ IDEA(Ultimate, Community, Educational)
- Android Studio
- CLion
- Code With Me 게스트
- DataGrip
- DataSpell
- GoLand
- JetBrains 클라이언트
- MPS
- PhpStorm
- PyCharm(Professional, Community, Educational)
- Rider
- RubyMine
- RustRover
- WebStorm
다운로드할 JetBrains IDE 도구 찾기를 참조하세요.
-
확장의 최신 버전입니다GitHub Copilot. JetBrains Marketplace의 플러그 인을 참조하세요.GitHub Copilot 설치 지침은 Installing the GitHub Copilot extension in your environment을(를) 참조하세요.
-
GitHub JetBrains IDE에 로그인합니다. 인증 지침은 Installing the GitHub Copilot extension in your environment을(를) 참조하세요.
조직GitHub Copilot 또는 엔터프라이즈에 액세스할 수 있는 경우, 조직 소유자GitHub Copilot Chat 또는 엔터프라이즈 관리자을 사용할 수 없습니다. 조직의 GitHub Copilot 대한 정책 및 기능 관리을(를) 참조하세요.
Chat modes
The agent picker in the Copilot Chat panel lets you choose which agent drives your conversation. To switch agents, use the Agents dropdown at the bottom of the chat panel.
The following agents are available:
- Agent mode (default): Full agentic experience with autonomous task execution. See Using agent mode in your IDE.
- Ask mode: Get quick answers and assistance without making code changes.
- Plan mode: Collaborate on planning before implementation—Copilot analyzes your request and builds a structured plan for your review. See Using plan mode in your IDE.
- Edit mode: Make controlled edits across multiple files that you review and accept individually.
- Copilot CLI: Runs Copilot through Copilot CLI, providing a terminal-first agentic experience with support for multiple isolation modes, live session progress, and tool call visibility. For more information, see GitHub Copilot CLI 정보.
- Custom agents: Use personalized agents tailored to your specific needs. See Using custom agents in your IDE.
Copilot Edits lets you make changes across multiple files directly from a single Copilot Chat prompt, using edit mode and agent mode.
팁
You can also access Copilot from JetBrains AI Assistant without installing the Copilot plugin. For more information, see JetBrains IDE에서 GitHub Copilot 사용.
Using edit mode
편집 모드는 Visual Studio Code 및 JetBrains IDE에서만 사용할 수 있습니다.
Copilot에서 제안하는 편집 내용을 보다 세부적으로 제어하려면 편집 모드를 사용합니다. 편집 모드에서는 Copilot이 변경할 수 있는 파일을 선택하고, 반복할 때마다 Copilot에 컨텍스트를 제공하고, 각 차례 후에 제안된 편집 내용을 수락할지 여부를 결정합니다.
편집 모드는 다음과 같은 경우에 사용하기 가장 적합합니다.
- 정의된 파일 집합을 빠르고 구체적으로 업데이트하려는 경우.
- Copilot에서 사용하는 LLM 요청의 수를 완전히 제어하려는 경우.
- To start an edit session, click Copilot in the menu bar, then select Open GitHub Copilot Chat.
- At the top of the chat panel, click Copilot Edits.
- Add relevant files to the working set to indicate to GitHub Copilot which files you want to work on. You can add all open files by clicking Add all open files or individually search for single files.
- Submit a prompt. In response to your prompt, Copilot Edits determines which files in your working set to change and adds a short description of the change.
- Review the changes and Accept or Discard the edits for each file.
Submitting prompts
You can ask Copilot Chat to give you code suggestions, explain code, generate unit tests, and suggest code fixes.
-
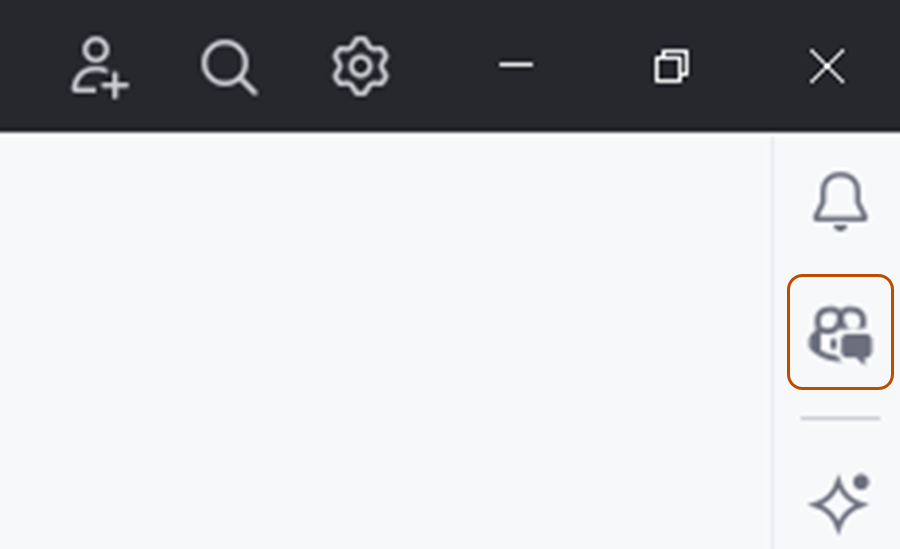
Open the Copilot Chat window by clicking the GitHub Copilot Chat icon at the right side of the JetBrains IDE window.
-
Enter a prompt in the prompt box. For example prompts, see Getting started with prompts for GitHub Copilot Chat in your IDE.
-
Evaluate Copilot's response, and submit a follow up prompt if needed.
The response often includes interactive elements. For example, the response may include buttons to copy or insert a code block.
To see the files that Copilot Chat used to generate the response, click the References link below the response. The references may include a link to a custom instructions file for your repository. This file contains additional information that is automatically added to all of your chat questions to improve the quality of the responses. For more information, see GitHub Copilot 대한 리포지토리 사용자 지정 지침 추가.

Supplementing your prompt
You can use slash commands and file references to help Copilot understand your what you are asking it to do.
Slash commands
Use slash commands to avoid writing complex prompts for common scenarios. To use a slash command, type / in the chat prompt box, followed by a command.
To see all available slash commands, type / in the chat prompt box. See also GitHub 코파일럿 챗 치트 시트.
File references
By default, Copilot Chat will reference the file that you have open or the code that you have selected. You can also tell Copilot Chat which files to reference by dragging a file into the chat prompt box. Alternatively, you can right click on a file, select GitHub Copilot, then select Reference File in Chat.
Using GitHub skills for Copilot
Copilot의 GitHub 특정 기술은 Copilot에서 제공할 수 있는 정보 유형을 확장합니다. Copilot Chat에서 이러한 기술에 액세스하려면 질문에 @github를 포함하세요.
질문에 @github를 추가하면 Copilot는 질문의 내용에 따라 적절한 기술을 동적으로 선택합니다. Copilot Chat에게 특정 기술을 사용하도록 명시적으로 요청할 수도 있습니다. 이 작업은
- 자연어를 사용하여 Copilot Chat에 기술을 사용하도록 요청합니다. 예를 들어
@github Search the web to find the latest GPT model from OpenAI. - 웹 검색을 구체적으로 호출하려면 질문에
#web변수를 포함하면 됩니다. 예를 들어@github #web What is the latest LTS of Node.js?
Copilot을(를) 요청하여 현재 사용 가능한 기술 목록을 생성할 수 있습니다. @github What skills are available?
Using Model Context Protocol (MCP) servers
MCP를 사용하면 다양한 기존 도구 및 서비스와 통합하여 Copilot Chat의 기능을 확장할 수 있습니다. 자세한 내용은 모델 컨텍스트 프로토콜(MCP) 정보을(를) 참조하세요.
AI models for Copilot Chat
응답을 생성하는 데 사용하는 모델을 Copilot 변경할 수 있습니다. 질문 유형에 따라 다른 모델이 더 잘 수행되거나 더 유용한 응답을 제공할 수 있습니다. 옵션으로는 고급 기능을 갖춘 프리미엄 모델이 있습니다.
Additional ways to access Copilot Chat
- Built-in requests. In addition to submitting prompts through the chat window, you can submit built-in requests by right clicking in a file, selecting GitHub Copilot, then selecting one of the options.
- Inline. You can submit a chat prompt inline, and scope it to a highlighted code block or your current file.
- To start an inline chat, right click on a code block or anywhere in your current file, hover over GitHub Copilot, then select Copilot: Inline Chat, or enter Ctrl+Shift+I.
Sharing feedback
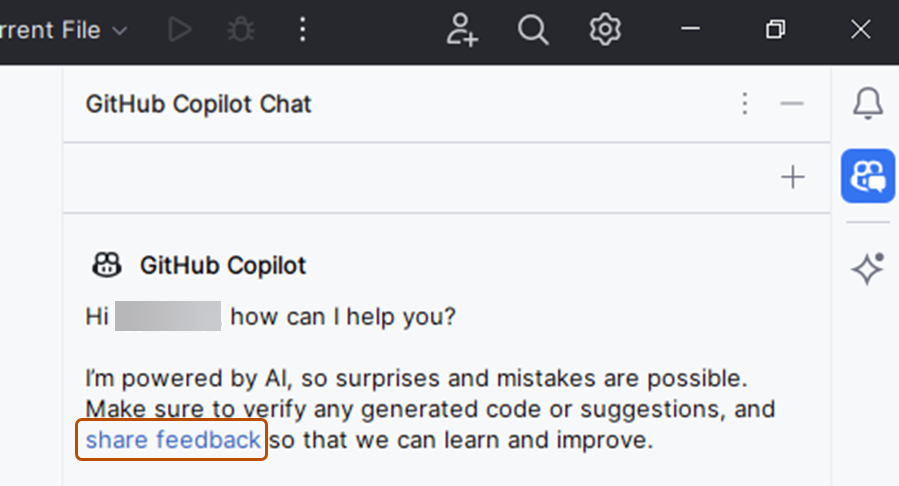
To share feedback about Copilot Chat, you can use the share feedback link in JetBrains.
-
At the right side of the JetBrains IDE window, click the Copilot Chat icon to open the Copilot Chat window.
-
At the top of the Copilot Chat window, click the share feedback link.

Further reading
Prerequisites
- Access to GitHub Copilot. GitHub Copilot 소개을(를) 참조하세요.
- Latest version of the GitHub Copilot extension. For installation instructions, see Installing the GitHub Copilot extension in your environment.
- Sign in to GitHub in Xcode.
조직GitHub Copilot 또는 엔터프라이즈에 액세스할 수 있는 경우, 조직 소유자GitHub Copilot Chat 또는 엔터프라이즈 관리자을 사용할 수 없습니다. 조직의 GitHub Copilot 대한 정책 및 기능 관리을(를) 참조하세요.
Chat modes
You can use Copilot Chat in agent mode to autonomously accomplish a set task, or in plan mode to draft an implementation plan before any code changes are made. To switch between modes, use the agents dropdown at the bottom of the chat window.
- For agent mode, see Using agent mode in your IDE.
- For plan mode, see Using plan mode in your IDE.
Submitting prompts
You can ask Copilot Chat to give you code suggestions, explain code, generate unit tests, and suggest code fixes.
-
To open the chat window, click Editor in the menu bar, then click GitHub Copilot then Open Chat. Copilot Chat opens in a new window.
-
Enter a prompt in the prompt box. For example prompts, see Getting started with prompts for GitHub Copilot Chat in your IDE.
-
Evaluate Copilot's response, and submit a follow up prompt if needed.
The response often includes interactive elements. For example, the response may include buttons to copy or insert a code block.
To see the files that Copilot Chat used to generate the response, click the References link below the response. The references may include a link to a custom instructions file for your repository. This file contains additional information that is automatically added to all of your chat questions to improve the quality of the responses. For more information, see GitHub Copilot 대한 리포지토리 사용자 지정 지침 추가.
Using Model Context Protocol (MCP) servers
MCP를 사용하면 다양한 기존 도구 및 서비스와 통합하여 Copilot Chat의 기능을 확장할 수 있습니다. 자세한 내용은 모델 컨텍스트 프로토콜(MCP) 정보을(를) 참조하세요.
AI models for Copilot Chat
응답을 생성하는 데 사용하는 모델을 Copilot 변경할 수 있습니다. 질문 유형에 따라 다른 모델이 더 잘 수행되거나 더 유용한 응답을 제공할 수 있습니다. 옵션으로는 고급 기능을 갖춘 프리미엄 모델이 있습니다.
Using keywords in your prompt
You can use special keywords to help Copilot understand your prompt.
Slash commands
Use slash commands to avoid writing complex prompts for common scenarios. To use a slash command, type / in the chat prompt box, followed by a command.
To see all available slash commands, type / in the chat prompt box. For more information, see GitHub 코파일럿 챗 치트 시트.
File references
By default, Copilot Chat will reference the file that you have open or the code that you have selected. To attach a specific file as reference, click in the chat prompt box.
Chat management
You can open a conversation thread for each Xcode IDE to keep discussions organized across different contexts. You can also revisit previous conversations and reference past suggestions through the chat history.
Sharing feedback
To indicate whether a response was helpful, use or that appear next to the response.
Further reading
Prerequisites
- Copilot에 액세스합니다. GitHub Copilot 소개을(를) 참조하세요.
- Eclipse의 호환 버전. GitHub Copilot 확장을 사용하려면 Eclipse 버전 2024-09 이상이 필요합니다. Eclipse 다운로드 페이지를 참조하세요.
- Copilot Business 또는 Copilot Enterprise 플랜을 사용하는 조직이나 엔터프라이즈의 구성원인 경우, Copilot에서 MCP를 사용하려면 "Copilot의 MCP 서버" 정책을 활성화해야 합니다.
- Latest version of the GitHub Copilot extension. Download this from the Eclipse Marketplace. For more information, see Installing the GitHub Copilot extension in your environment.
- Sign in to GitHub in Eclipse.
조직GitHub Copilot 또는 엔터프라이즈에 액세스할 수 있는 경우, 조직 소유자GitHub Copilot Chat 또는 엔터프라이즈 관리자을 사용할 수 없습니다. 조직의 GitHub Copilot 대한 정책 및 기능 관리을(를) 참조하세요.
Chat modes
You can use Copilot Chat in agent mode to autonomously accomplish a set task, or in plan mode to draft an implementation plan before any code changes are made. To switch between modes, use the agents dropdown at the bottom of the chat panel.
- For agent mode, see Using agent mode in your IDE.
- For plan mode, see Using plan mode in your IDE.
Submitting prompts
You can ask Copilot Chat to give you code suggestions, explain code, generate unit tests, and suggest code fixes.
-
To open the Copilot Chat panel, click the Copilot icon () in the status bar at the bottom of Eclipse, then click Open Chat.
-
Enter a prompt in the prompt box, then press Enter.
For an introduction to the kinds of prompts you can use, see Getting started with prompts for GitHub Copilot Chat in your IDE.
-
Evaluate Copilot's response, and make a follow up request if needed.
Using keywords in your prompt
You can use special keywords to help Copilot understand your prompt. For examples, see Getting started with prompts for GitHub Copilot Chat in your IDE.
Slash commands
Use slash commands to avoid writing complex prompts for common scenarios. To use a slash command, type / in the chat prompt box, followed by a command. For example, use /explain to ask Copilot to explain the code in the file currently displayed in the editor.
To see all available slash commands, type / in the chat prompt box.
Using Model Context Protocol (MCP) servers
MCP를 사용하면 다양한 기존 도구 및 서비스와 통합하여 Copilot Chat의 기능을 확장할 수 있습니다. 자세한 내용은 모델 컨텍스트 프로토콜(MCP) 정보을(를) 참조하세요.
AI models for Copilot Chat
응답을 생성하는 데 사용하는 모델을 Copilot 변경할 수 있습니다. 질문 유형에 따라 다른 모델이 더 잘 수행되거나 더 유용한 응답을 제공할 수 있습니다. 옵션으로는 고급 기능을 갖춘 프리미엄 모델이 있습니다.