Introduction
The Model Context Protocol (MCP) is an open standard that defines how applications share context with large language models (LLMs). For an overview of MCP, see Sobre o Protocolo de Contexto de Modelo (MCP).
For a curated list of MCP servers from partners and the community, see the GitHub MCP Registry.
Empresas e organizações podem optar por habilitar ou desabilitar o uso do MCP para membros de sua organização ou empresa com os servidores MCP na Copilot política. A política está desabilitada por padrão. Confira Gerenciando políticas e recursos para GitHub Copilot em sua empresa e Gerenciando políticas e recursos para GitHub Copilot em sua organização. A política MCP só se aplica a usuários que têm uma Copilot Business ou Copilot Enterprise assinatura de uma organização ou empresa que configura a política. Copilot Free, Copilot Pro, Copilot Pro+ ou Copilot Maxnão têm seu acesso ao MCP regulado por esta política.
Prerequisites
- Access to Copilot. Confira Sobre GitHub Copilot.
- Visual Studio Code version 1.99 or later. For information on installing Visual Studio Code, see the Visual Studio Code download page.
- Se você for membro de uma organização ou empresa com um plano Copilot Business ou Copilot Enterprise, a política "Servidores MCP no Copilot" deverá ser habilitada para usar o MCP com o Copilot.
Configuring MCP servers in Visual Studio Code
MCP servers can be configured manually in a configuration file, or through the GitHub MCP Registry. The GitHub MCP Registry provides a curated list of MCP servers that you can easily add to your Visual Studio Code instance.
Using the GitHub MCP Registry
Observação
The GitHub MCP Registry is in prévia pública and may change.
Only MCP servers listed in the GitHub MCP Registry can be added through the registry. Other servers can be configured manually. See Configuring MCP servers manually.
- In Visual Studio Code, open the extensions panel by clicking the extensions icon in the sidebar or pressing Ctrl+Shift+X (Windows/Linux) / Command+Shift+X (Mac).
- In the extensions search bar, type
@mcpfollowed by the name of the MCP server you want to add. This opens the MCP server gallery and shows matching results. - Select the MCP server from the search results. On the MCP server's details page, click Install.
- When prompted, confirm that you trust the server to start it. VS Code discovers the server's tools and makes them available in chat.
- To verify that the MCP server is configured correctly, open the command palette by pressing Ctrl+Shift+P (Windows/Linux) / Command+Shift+P (Mac).
- Type and select MCP: List Servers. You should see the MCP server listed as a configured server.
Configuring MCP servers manually
To configure MCP servers in Visual Studio Code, you need to set up a configuration script that specifies the details of the MCP servers you want to use. You can configure MCP servers for either:
-
Um repositório específico. Isso permite que você compartilhe servidores de MCP com qualquer pessoa que abra o projeto no Visual Studio Code. Para fazer isso, crie um arquivo
.vscode/mcp.jsonna raiz do repositório. -
Sua instância pessoal do Visual Studio Code. Você será a única pessoa que terá acesso a servidores MCP configurados. Para fazer isso, adicione a configuração ao arquivo
settings.jsonno Visual Studio Code. Os servidores de MCP configurados dessa forma ficarão disponíveis em todos os workspaces.Observação
We recommend you use only one location per server. Adding the same server to both locations may cause conflicts and unexpected behavior.
The steps below show how to configure the Fetch MCP server in your .vscode/mcp.json file. The Fetch MCP server is a simple MCP server that provides web content fetching capabilities. For more information on the Fetch MCP server, see the Fetch directory in the MCP Server repository.
You can use the same steps to configure MCP servers in your personal Visual Studio Code settings. Details on how to configure other MCP servers are available in the MCP servers repository.
For information on configuring the GitHub MCP server, see Using the GitHub MCP Server in your IDE.
-
Add the following configuration to your
.vscode/mcp.jsonfile:JSON { "inputs": [ // The "inputs" section defines the inputs required for the MCP server configuration. { "type": "promptString" } ], "servers": { // The "servers" section defines the MCP servers you want to use. "fetch": { "command": "uvx", "args": ["mcp-server-fetch"] } } }{ "inputs": [ // The "inputs" section defines the inputs required for the MCP server configuration. { "type": "promptString" } ], "servers": { // The "servers" section defines the MCP servers you want to use. "fetch": { "command": "uvx", "args": ["mcp-server-fetch"] } } } -
Save the
.vscode/mcp.jsonfile. -
A "Start" button will appear in your
.vscode/mcp.jsonfile, at the top of the list of servers. Click the "Start" button to start the MCP servers. This will trigger the input dialog and discover the server tools, which are then stored for later sessions.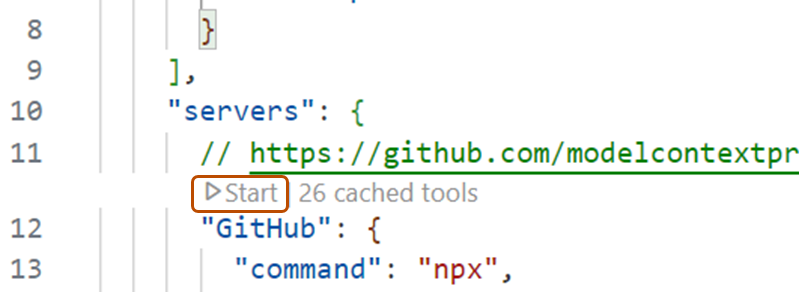
-
Open Copilot Chat by clicking the chat icon in the title bar of Visual Studio Code.
-
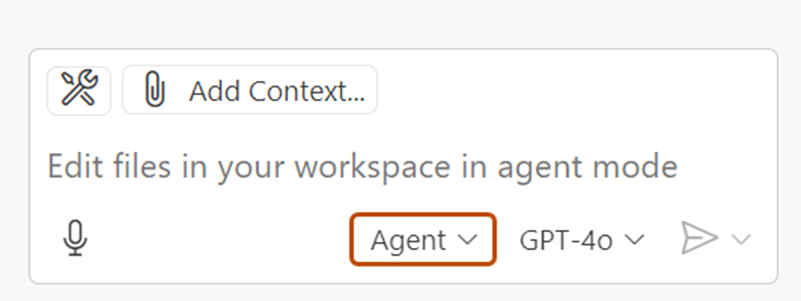
In the Copilot Chat box, select Agent from the popup menu.
-
To view your list of available MCP servers, click the tools icon in the top left corner of the chat box. This will open the MCP server list, where you can see all the MCP servers and associated tools that are currently available in your Visual Studio Code instance.
- Optionally, you can define toolsets, groups of related tools that you can reference in chat. Toolsets make it easier to group related MCP tools together and quickly enable or disable them. For information on how to define and use a toolset, see the VS Code docs.


For more information on configuring MCP servers in Visual Studio Code, see Use MCP servers in Visual Studio Code in the Visual Studio Code documentation.
Using MCP servers in Copilot Chat
Once you have configured your MCP servers, you can use them in Copilot Chat to access a wide range of tools and services. In the example below, we will use the Fetch MCP server to fetch details about a web page.
-
Abra Copilot Chat clicando no ícone de chat na barra de título de Visual Studio Code.
-
Na caixa Copilot Chat, selecione Agente no menu suspenso do agente.
-
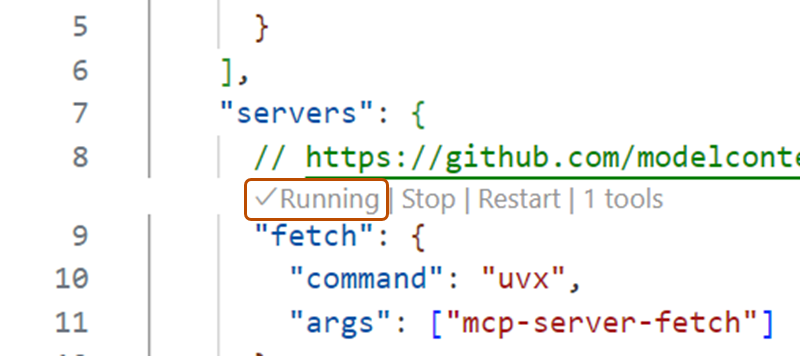
In the file with the MCP configuration, check that the MCP server is running. If it is not running, click the "Start" button to start the MCP server.
-
Ask Copilot Chat to fetch the details of a URL. For example:
Fetch https://github.com/github/docs. -
If Copilot asks you to confirm that you want to proceed, click Continue.
-
Copilot will fetch the details of the URL and display them in the chat box.

Optionally, you can use MCP prompts and resources in VS Code.
- MCP servers can define preconfigured prompts for interacting with their tools. You can access these prompts in chat with slash commands, using the format
/mcp.servername.promptname. - MCP servers provide resources, which are any kind of data that the server wants to make available. For example, the GitHub MCP server provides repository content as a resource. To add resources from an MCP server to your chat context, click Add Context... in the chat box, then click MCP Resources.
For more information on using MCP servers in Visual Studio Code, see Use MCP servers in Visual Studio Code in the Visual Studio Code documentation.
Using existing MCP configurations
If you already have an MCP configuration in Claude Desktop, you can use that configuration in Visual Studio Code to access the same MCP servers. To do this, add the following configuration to your settings.json file in Visual Studio Code:
"chat.mcp.discovery.enabled": true
"chat.mcp.discovery.enabled": true
Visual Studio Code will automatically find your existing configuration and use it in your Visual Studio Code instance.
Prerequisites
- Access to Copilot. Confira Sobre GitHub Copilot.
- Visual Studio version 17.14 or later. For more information on installing Visual Studio, see the Visual Studio downloads page.
- Sign in to GitHub from Visual Studio.
- Se você for membro de uma organização ou empresa com um plano Copilot Business ou Copilot Enterprise, a política "Servidores MCP no Copilot" deverá ser habilitada para usar o MCP com o Copilot.
Configuring MCP servers in Visual Studio
-
In the Visual Studio menu bar, click View, then click GitHub Copilot Chat.
-
At the bottom of the chat panel, select Agent from the mode dropdown.
-
In the Copilot Chat window, click the tools icon, then click the plus icon in the tool picker window.
-
In the "Configure MCP server" pop-up window, fill out the fields, including server ID, type, and any additional fields required for the specific MCP server configuration.
Visual Studio supports both remote and local servers. Remote servers, defined with a URL and credentials, are hosted externally for easier setup and sharing, while local servers, defined with command-line invocation, run on your local machine and can access local resources. See example configurations below, using the GitHub MCP server as an example.
-
Click Save.
-
If you are using a remote server with OAuth authentication, in the
mcp.jsonfile, click Auth from the CodeLens above the server to authenticate to the server. A pop-up or new window will appear, allowing you to authenticate with your account. The server will only be able to access the scopes you approve, and that your organization policies allow. -
In the Copilot Chat window, click the tools icon. You should now see additional tools from the MCP server that you configured.
Remote server configuration example with OAuth
-
For "Server ID", type
github. -
For "Type", select "HTTP/SSE" from the dropdown.
-
For "URL", type
https://api.githubcopilot.com/mcp/. -
After clicking Save, the configuration in the
mcp.jsonfile should look like this:JSON { "servers": { "github": { "url": "https://api.githubcopilot.com/mcp/" } } }{ "servers": { "github": { "url": "https://api.githubcopilot.com/mcp/" } } } -
In the
mcp.jsonfile, click Auth from the CodeLens above the server to authenticate to the server. A pop-up will come up allowing you to authenticate with your GitHub account.
Local server configuration example
-
For "Server ID", type
github. -
For "Type", select "stdio" from the dropdown.
-
For "Command (with optional arguments)", type
docker "run", "-i", "--rm", "-e", "GITHUB_PERSONAL_ACCESS_TOKEN", "ghcr.io/github/github-mcp-server" -
Add an environment variable "GITHUB_PERSONAL_ACCESS_TOKEN" set to your personal access token.
-
After clicking Save, the configuration in the
mcp.jsonfile should look like this:JSON { "servers": { "github": { "type": "stdio", "command": "docker", "args": [ "run", "-i", "--rm", "-e", "GITHUB_PERSONAL_ACCESS_TOKEN", "ghcr.io/github/github-mcp-server" ], "env": { "GITHUB_PERSONAL_ACCESS_TOKEN": "YOUR_GITHUB_PAT" } } } }{ "servers": { "github": { "type": "stdio", "command": "docker", "args": [ "run", "-i", "--rm", "-e", "GITHUB_PERSONAL_ACCESS_TOKEN", "ghcr.io/github/github-mcp-server" ], "env": { "GITHUB_PERSONAL_ACCESS_TOKEN": "YOUR_GITHUB_PAT" } } } }
For more information on configuring MCP servers in Visual Studio, see Use MCP servers in Visual Studio (Preview) in the Visual Studio documentation.
Prerequisites
-
Access to Copilot. Confira Sobre GitHub Copilot.
-
A compatible JetBrains IDE. GitHub Copilot is compatible with the following IDEs:
- IntelliJ IDEA (Ultimate, Community, Educational)
- Android Studio
- CLion
- Convidado do Code With Me
- DataGrip
- DataSpell
- GoLand
- Cliente JetBrains
- MPS
- PhpStorm
- PyCharm (Profissional, Comunidade, Educacional)
- Rider
- RubyMine
- RustRover
- WebStorm
Consulte o localizador de ferramentas JetBrains IDEs para fazer o download.
-
Se você for membro de uma organização ou empresa com um plano Copilot Business ou Copilot Enterprise, a política "Servidores MCP no Copilot" deverá ser habilitada para usar o MCP com o Copilot.
Configuring MCP servers from your MCP registry
- In your JetBrains IDE, open Copilot Chat.
- In the Copilot Chat window, click the MCP icon.
- In the MCP Registry window, find the MCP server(s) you want to add from the list of available servers.
- Next to each MCP server you want to add, click Install.
- When you are finished adding MCP servers, click OK.
- In the Copilot Chat window, click the tools icon. You should now see additional tools from the MCP server(s) that you installed.
Configuring MCP servers manually
- No canto inferior direito, clique em .
- No menu, selecione "Open Chat", verifique se você está no modo agente e clique no ícone de ferramentas (chamado "Configure your MCP server") na parte inferior da janela de chat.
- Clique em Add MCP Tools.
- In the
mcp.jsonfile, define your MCP servers. JetBrains IDEs support both remote and local servers. Remote servers are hosted externally for easier setup and sharing, while local servers run on your local machine and can access local resources.
You can use the following configurations as examples:
Remote server configuration example with PAT
{
    "servers": {
        "github": {
            "url": "https://api.githubcopilot.com/mcp/",
            "requestInit": {
                "headers": {
                    "Authorization": "Bearer YOUR_PAT_HERE"
                }
            }
        }
    }
  }
{
    "servers": {
        "github": {
            "url": "https://api.githubcopilot.com/mcp/",
            "requestInit": {
                "headers": {
                    "Authorization": "Bearer YOUR_PAT_HERE"
                }
            }
        }
    }
  }
Local server configuration example
{
  "servers": {
    "memory": {
      "command": "npx",
      "args": [
        "-y",
        "@modelcontextprotocol/server-memory"
      ]
    }
  }
}
{
  "servers": {
    "memory": {
      "command": "npx",
      "args": [
        "-y",
        "@modelcontextprotocol/server-memory"
      ]
    }
  }
}
Prerequisites
- Access to Copilot. Confira Sobre GitHub Copilot.
- GitHub Copilot for Xcode extension. See Installing the GitHub Copilot extension in your environment.
- Se você for membro de uma organização ou empresa com um plano Copilot Business ou Copilot Enterprise, a política "Servidores MCP no Copilot" deverá ser habilitada para usar o MCP com o Copilot.
Configuring MCP servers from your MCP registry
- In Xcode, open Copilot Chat.
- In the Copilot Chat window, click the icon to open settings.
- In the settings window, select the Tools tab.
- Next to MCP Registry URL (Optional), click Browse MCP Servers.
- In the MCP Registry window, find the MCP server(s) you want to add from the list of available servers.
- Next to each MCP server you want to add, click Install.
- When you are finished adding MCP servers, close the MCP Servers Marketplace window.
- In the settings window, under Available MCP Tools, click the > icon to expand the list of available MCP tools. You should now see additional tools from the MCP server(s) that you installed.
Configuring MCP servers manually
- Abra o GitHub Copilot para a extensão do Xcode e acesse "Configurações".
- Como alternativa, em um workspace ativo do Xcode, você pode encontrar as configurações clicando em Editor na barra de menus, selecionando GitHub Copilot e clicando em Abrir GitHub Copilot para Configurações do Xcode.
- Selecione a guia MCP e clique em Editar Configuração.
- Define your MCP servers, editing
mcp.json. Xcode supports both remote and local servers. Remote servers are hosted externally for easier setup and sharing, while local servers run on your local machine and can access local resources.
You can use the following configurations as examples:
Remote server configuration example with PAT
{
    "servers": {
        "github": {
            "url": "https://api.githubcopilot.com/mcp/",
            "requestInit": {
                "headers": {
                    "Authorization": "Bearer YOUR_PAT_HERE"
                }
            }
        }
    }
  }
{
    "servers": {
        "github": {
            "url": "https://api.githubcopilot.com/mcp/",
            "requestInit": {
                "headers": {
                    "Authorization": "Bearer YOUR_PAT_HERE"
                }
            }
        }
    }
  }
Local server configuration example
{
  "servers": {
    "memory": {
      "command": "npx",
      "args": [
        "-y",
        "@modelcontextprotocol/server-memory"
      ]
    }
  }
}
{
  "servers": {
    "memory": {
      "command": "npx",
      "args": [
        "-y",
        "@modelcontextprotocol/server-memory"
      ]
    }
  }
}
Prerequisites
- Acesso ao Copilot. Confira Sobre GitHub Copilot.
- Versão compatível do Eclipse. Para usar a extensão do GitHub Copilot, você precisa ter o Eclipse versão 2024-09 ou superior. Consulte a página de download do Eclipse.
- Se você for membro de uma organização ou empresa com um plano Copilot Business ou Copilot Enterprise, a política "Servidores MCP no Copilot" deverá ser habilitada para usar o MCP com o Copilot.
Configuring MCP servers from your MCP registry
- In Eclipse, open Copilot Chat.
- In the Copilot Chat window, click the MCP icon.
- In the MCP Registry window, find the MCP server(s) you want to add from the list of available servers.
- Next to each MCP server you want to add, click Install.
- When you are finished adding MCP servers, click Close.
- In the Copilot Chat window, click the tools icon. You should now see additional tools from the MCP server(s) that you installed.
Configuring MCP servers manually
- Clique no ícone Copilot () na barra de status na parte inferior do Eclipse.
- No menu, selecione Abrir Chat e, na janela de chat, clique no ícone "Configurar Ferramentas...".
- Como alternativa, você pode selecionar Editar preferências e, em seguida, no painel à esquerda, expandir GitHub Copilot e clicar em MCP.
- Under "Server Configurations", define your MCP servers. Eclipse supports both remote and local servers. Remote servers are hosted externally for easier setup and sharing, while local servers run on your local machine and can access local resources.
You can use the following configurations as examples:
Remote server configuration example with PAT
{
    "servers": {
        "github": {
            "url": "https://api.githubcopilot.com/mcp/",
            "requestInit": {
                "headers": {
                    "Authorization": "Bearer YOUR_PAT_HERE"
                }
            }
        }
    }
  }
{
    "servers": {
        "github": {
            "url": "https://api.githubcopilot.com/mcp/",
            "requestInit": {
                "headers": {
                    "Authorization": "Bearer YOUR_PAT_HERE"
                }
            }
        }
    }
  }
Local server configuration example
{
  "servers": {
    "memory": {
      "command": "npx",
      "args": [
        "-y",
        "@modelcontextprotocol/server-memory"
      ]
    }
  }
}
{
  "servers": {
    "memory": {
      "command": "npx",
      "args": [
        "-y",
        "@modelcontextprotocol/server-memory"
      ]
    }
  }
}
Creating a new MCP server
You can create a new MCP server to fulfill your specific needs, and then integrate it with Copilot Chat. For example, you can create an MCP server that connects to a database or a web service, and then use that server in Copilot Chat to perform tasks on that database or web service.
For more information on creating and configuring your own MCP servers, see the official MCP documentation.