Introduction
The Model Context Protocol (MCP) is an open standard that defines how applications share context with large language models (LLMs). For an overview of MCP, see 关于模型上下文协议 (MCP).
For a curated list of MCP servers from partners and the community, see the GitHub MCP Registry.
企业和组织可以通过 Copilot 中的 MCP 服务器 策略,选择为其组织或企业中的成员启用或禁用 MCP 的使用。 该策略默认处于禁用状态。 请参阅“管理企业中 GitHub Copilot 的策略和功能”和“管理组织中GitHub Copilot的策略和功能”。 MCP 策略 仅适用于 从配置策略的组织或企业拥有 Copilot Business 或 Copilot Enterprise 订阅的用户。 Copilot Free、 Copilot Pro、 Copilot Pro+或 Copilot Max没有 受此策略约束的 MCP 访问权限。
Prerequisites
- Access to Copilot. 请参阅“关于GitHub Copilot”。
- Visual Studio Code version 1.99 or later. For information on installing Visual Studio Code, see the Visual Studio Code download page.
- 如果你是具有 Copilot Business 或 Copilot Enterprise 计划的组织或企业的成员,则必须启用“MCP servers in Copilot”策略才能将 MCP 与 Copilot 配合使用。
Configuring MCP servers in Visual Studio Code
MCP servers can be configured manually in a configuration file, or through the GitHub MCP Registry. The GitHub MCP Registry provides a curated list of MCP servers that you can easily add to your Visual Studio Code instance.
Using the GitHub MCP Registry
注意
The GitHub MCP Registry is in 公开预览 and may change.
Only MCP servers listed in the GitHub MCP Registry can be added through the registry. Other servers can be configured manually. See Configuring MCP servers manually.
- In Visual Studio Code, open the extensions panel by clicking the extensions icon in the sidebar or pressing Ctrl+Shift+X (Windows/Linux) / Command+Shift+X (Mac).
- In the extensions search bar, type
@mcpfollowed by the name of the MCP server you want to add. This opens the MCP server gallery and shows matching results. - Select the MCP server from the search results. On the MCP server's details page, click Install.
- When prompted, confirm that you trust the server to start it. VS Code discovers the server's tools and makes them available in chat.
- To verify that the MCP server is configured correctly, open the command palette by pressing Ctrl+Shift+P (Windows/Linux) / Command+Shift+P (Mac).
- Type and select MCP: List Servers. You should see the MCP server listed as a configured server.
Configuring MCP servers manually
To configure MCP servers in Visual Studio Code, you need to set up a configuration script that specifies the details of the MCP servers you want to use. You can configure MCP servers for either:
-
特定仓库。 这使你能够将 MCP 服务器共享给任何在 Visual Studio Code 中打开该项目的人。 为此,请在仓库的根目录中,创建
.vscode/mcp.json文件。 -
Visual Studio Code 的个人实例。 你将是唯一有权访问已配置的 MCP 服务器的人员。 为此,请将配置添加到 Visual Studio Code 中的
settings.json文件。 以这种方式配置的 MCP 服务器将在所有工作区中可用。注意
We recommend you use only one location per server. Adding the same server to both locations may cause conflicts and unexpected behavior.
The steps below show how to configure the Fetch MCP server in your .vscode/mcp.json file. The Fetch MCP server is a simple MCP server that provides web content fetching capabilities. For more information on the Fetch MCP server, see the Fetch directory in the MCP Server repository.
You can use the same steps to configure MCP servers in your personal Visual Studio Code settings. Details on how to configure other MCP servers are available in the MCP servers repository.
For information on configuring the GitHub MCP server, see Using the GitHub MCP Server in your IDE.
-
Add the following configuration to your
.vscode/mcp.jsonfile:JSON { "inputs": [ // The "inputs" section defines the inputs required for the MCP server configuration. { "type": "promptString" } ], "servers": { // The "servers" section defines the MCP servers you want to use. "fetch": { "command": "uvx", "args": ["mcp-server-fetch"] } } }{ "inputs": [ // The "inputs" section defines the inputs required for the MCP server configuration. { "type": "promptString" } ], "servers": { // The "servers" section defines the MCP servers you want to use. "fetch": { "command": "uvx", "args": ["mcp-server-fetch"] } } } -
Save the
.vscode/mcp.jsonfile. -
A "Start" button will appear in your
.vscode/mcp.jsonfile, at the top of the list of servers. Click the "Start" button to start the MCP servers. This will trigger the input dialog and discover the server tools, which are then stored for later sessions.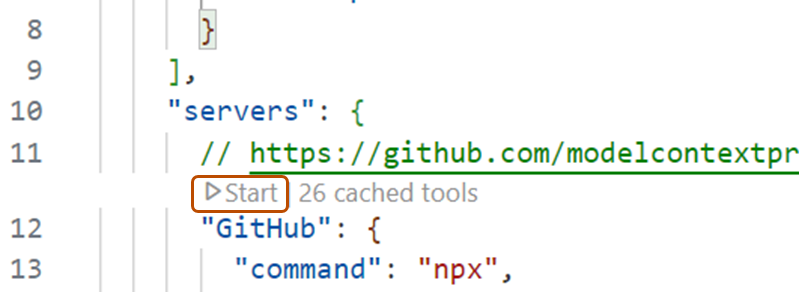
-
Open Copilot Chat by clicking the chat icon in the title bar of Visual Studio Code.
-
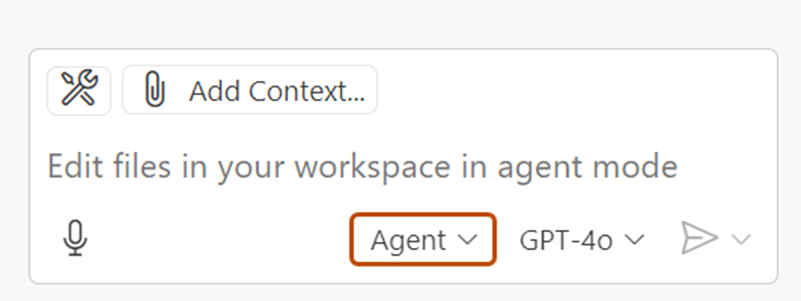
In the Copilot Chat box, select Agent from the popup menu.
-
To view your list of available MCP servers, click the tools icon in the top left corner of the chat box. This will open the MCP server list, where you can see all the MCP servers and associated tools that are currently available in your Visual Studio Code instance.
- Optionally, you can define toolsets, groups of related tools that you can reference in chat. Toolsets make it easier to group related MCP tools together and quickly enable or disable them. For information on how to define and use a toolset, see the VS Code docs.


For more information on configuring MCP servers in Visual Studio Code, see Use MCP servers in Visual Studio Code in the Visual Studio Code documentation.
Using MCP servers in Copilot Chat
Once you have configured your MCP servers, you can use them in Copilot Chat to access a wide range of tools and services. In the example below, we will use the Fetch MCP server to fetch details about a web page.
-
单击标题栏中的Copilot Chat聊天图标打开Visual Studio Code。
-
在 Copilot Chat 框中,从代理下拉菜单中选择 “代理 ”。
-
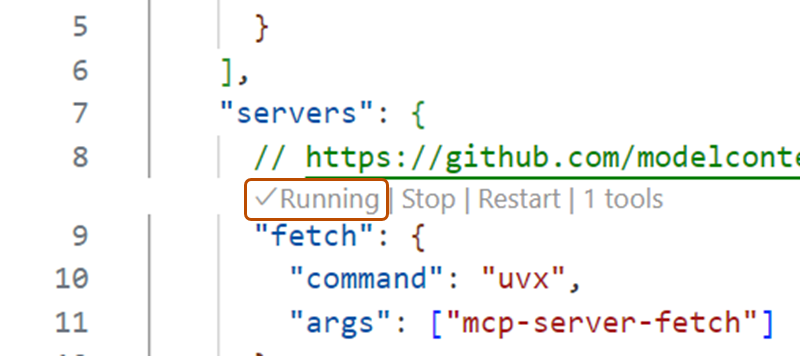
In the file with the MCP configuration, check that the MCP server is running. If it is not running, click the "Start" button to start the MCP server.
-
Ask Copilot Chat to fetch the details of a URL. For example:
Fetch https://github.com/github/docs. -
If Copilot asks you to confirm that you want to proceed, click Continue.
-
Copilot will fetch the details of the URL and display them in the chat box.

Optionally, you can use MCP prompts and resources in VS Code.
- MCP servers can define preconfigured prompts for interacting with their tools. You can access these prompts in chat with slash commands, using the format
/mcp.servername.promptname. - MCP servers provide resources, which are any kind of data that the server wants to make available. For example, the GitHub MCP server provides repository content as a resource. To add resources from an MCP server to your chat context, click Add Context... in the chat box, then click MCP Resources.
For more information on using MCP servers in Visual Studio Code, see Use MCP servers in Visual Studio Code in the Visual Studio Code documentation.
Using existing MCP configurations
If you already have an MCP configuration in Claude Desktop, you can use that configuration in Visual Studio Code to access the same MCP servers. To do this, add the following configuration to your settings.json file in Visual Studio Code:
"chat.mcp.discovery.enabled": true
"chat.mcp.discovery.enabled": true
Visual Studio Code will automatically find your existing configuration and use it in your Visual Studio Code instance.
Prerequisites
- Access to Copilot. 请参阅“关于GitHub Copilot”。
- Visual Studio version 17.14 or later. For more information on installing Visual Studio, see the Visual Studio downloads page.
- Sign in to GitHub from Visual Studio.
- 如果你是具有 Copilot Business 或 Copilot Enterprise 计划的组织或企业的成员,则必须启用“MCP servers in Copilot”策略才能将 MCP 与 Copilot 配合使用。
Configuring MCP servers in Visual Studio
-
In the Visual Studio menu bar, click View, then click GitHub Copilot Chat.
-
At the bottom of the chat panel, select Agent from the mode dropdown.
-
In the Copilot Chat window, click the tools icon, then click the plus icon in the tool picker window.
-
In the "Configure MCP server" pop-up window, fill out the fields, including server ID, type, and any additional fields required for the specific MCP server configuration.
Visual Studio supports both remote and local servers. Remote servers, defined with a URL and credentials, are hosted externally for easier setup and sharing, while local servers, defined with command-line invocation, run on your local machine and can access local resources. See example configurations below, using the GitHub MCP server as an example.
-
Click Save.
-
If you are using a remote server with OAuth authentication, in the
mcp.jsonfile, click Auth from the CodeLens above the server to authenticate to the server. A pop-up or new window will appear, allowing you to authenticate with your account. The server will only be able to access the scopes you approve, and that your organization policies allow. -
In the Copilot Chat window, click the tools icon. You should now see additional tools from the MCP server that you configured.
Remote server configuration example with OAuth
-
For "Server ID", type
github. -
For "Type", select "HTTP/SSE" from the dropdown.
-
For "URL", type
https://api.githubcopilot.com/mcp/. -
After clicking Save, the configuration in the
mcp.jsonfile should look like this:JSON { "servers": { "github": { "url": "https://api.githubcopilot.com/mcp/" } } }{ "servers": { "github": { "url": "https://api.githubcopilot.com/mcp/" } } } -
In the
mcp.jsonfile, click Auth from the CodeLens above the server to authenticate to the server. A pop-up will come up allowing you to authenticate with your GitHub account.
Local server configuration example
-
For "Server ID", type
github. -
For "Type", select "stdio" from the dropdown.
-
For "Command (with optional arguments)", type
docker "run", "-i", "--rm", "-e", "GITHUB_PERSONAL_ACCESS_TOKEN", "ghcr.io/github/github-mcp-server" -
Add an environment variable "GITHUB_PERSONAL_ACCESS_TOKEN" set to your personal access token.
-
After clicking Save, the configuration in the
mcp.jsonfile should look like this:JSON { "servers": { "github": { "type": "stdio", "command": "docker", "args": [ "run", "-i", "--rm", "-e", "GITHUB_PERSONAL_ACCESS_TOKEN", "ghcr.io/github/github-mcp-server" ], "env": { "GITHUB_PERSONAL_ACCESS_TOKEN": "YOUR_GITHUB_PAT" } } } }{ "servers": { "github": { "type": "stdio", "command": "docker", "args": [ "run", "-i", "--rm", "-e", "GITHUB_PERSONAL_ACCESS_TOKEN", "ghcr.io/github/github-mcp-server" ], "env": { "GITHUB_PERSONAL_ACCESS_TOKEN": "YOUR_GITHUB_PAT" } } } }
For more information on configuring MCP servers in Visual Studio, see Use MCP servers in Visual Studio (Preview) in the Visual Studio documentation.
Prerequisites
-
Access to Copilot. 请参阅“关于GitHub Copilot”。
-
A compatible JetBrains IDE. GitHub Copilot is compatible with the following IDEs:
- IntelliJ IDEA(旗舰版、社区版、教育版)
- Android Studio
- CLion
- Code With Me 来宾
- DataGrip
- DataSpell
- GoLand
- JetBrains 客户端
- MPS
- PhpStorm
- PyCharm(专业版、社区版、教育版)
- Rider
- RubyMine
- RustRover
- WebStorm
请参阅 JetBrains IDE 工具查找器进行下载。
-
如果你是具有 Copilot Business 或 Copilot Enterprise 计划的组织或企业的成员,则必须启用“MCP servers in Copilot”策略才能将 MCP 与 Copilot 配合使用。
Configuring MCP servers from your MCP registry
- In your JetBrains IDE, open Copilot Chat.
- In the Copilot Chat window, click the MCP icon.
- In the MCP Registry window, find the MCP server(s) you want to add from the list of available servers.
- Next to each MCP server you want to add, click Install.
- When you are finished adding MCP servers, click OK.
- In the Copilot Chat window, click the tools icon. You should now see additional tools from the MCP server(s) that you installed.
Configuring MCP servers manually
- 在右下角,单击“”****。
- 在菜单中,选择“Open Chat”,确保处于代理模式,然后单击聊天窗口底部的工具图标(称为“配置 MCP 服务器”)。
- 单击“Add MCP Tools”****。
- In the
mcp.jsonfile, define your MCP servers. JetBrains IDEs support both remote and local servers. Remote servers are hosted externally for easier setup and sharing, while local servers run on your local machine and can access local resources.
You can use the following configurations as examples:
Remote server configuration example with PAT
{
    "servers": {
        "github": {
            "url": "https://api.githubcopilot.com/mcp/",
            "requestInit": {
                "headers": {
                    "Authorization": "Bearer YOUR_PAT_HERE"
                }
            }
        }
    }
  }
{
    "servers": {
        "github": {
            "url": "https://api.githubcopilot.com/mcp/",
            "requestInit": {
                "headers": {
                    "Authorization": "Bearer YOUR_PAT_HERE"
                }
            }
        }
    }
  }
Local server configuration example
{
  "servers": {
    "memory": {
      "command": "npx",
      "args": [
        "-y",
        "@modelcontextprotocol/server-memory"
      ]
    }
  }
}
{
  "servers": {
    "memory": {
      "command": "npx",
      "args": [
        "-y",
        "@modelcontextprotocol/server-memory"
      ]
    }
  }
}
Prerequisites
- Access to Copilot. 请参阅“关于GitHub Copilot”。
- GitHub Copilot for Xcode extension. See Installing the GitHub Copilot extension in your environment.
- 如果你是具有 Copilot Business 或 Copilot Enterprise 计划的组织或企业的成员,则必须启用“MCP servers in Copilot”策略才能将 MCP 与 Copilot 配合使用。
Configuring MCP servers from your MCP registry
- In Xcode, open Copilot Chat.
- In the Copilot Chat window, click the icon to open settings.
- In the settings window, select the Tools tab.
- Next to MCP Registry URL (Optional), click Browse MCP Servers.
- In the MCP Registry window, find the MCP server(s) you want to add from the list of available servers.
- Next to each MCP server you want to add, click Install.
- When you are finished adding MCP servers, close the MCP Servers Marketplace window.
- In the settings window, under Available MCP Tools, click the > icon to expand the list of available MCP tools. You should now see additional tools from the MCP server(s) that you installed.
Configuring MCP servers manually
- 打开适用于 Xcode 的 GitHub Copilot 扩展,并转到“Settings”。
- 或者,可以在活动的 Xcode 工作区中,通过以下方式找到设置:单击菜单栏中的“Editor”,选择“GitHub Copilot”,然后单击“Open GitHub Copilot for Xcode Settings”****。
- 选择“MCP”选项卡,然后单击“Edit Config”********。
- Define your MCP servers, editing
mcp.json. Xcode supports both remote and local servers. Remote servers are hosted externally for easier setup and sharing, while local servers run on your local machine and can access local resources.
You can use the following configurations as examples:
Remote server configuration example with PAT
{
    "servers": {
        "github": {
            "url": "https://api.githubcopilot.com/mcp/",
            "requestInit": {
                "headers": {
                    "Authorization": "Bearer YOUR_PAT_HERE"
                }
            }
        }
    }
  }
{
    "servers": {
        "github": {
            "url": "https://api.githubcopilot.com/mcp/",
            "requestInit": {
                "headers": {
                    "Authorization": "Bearer YOUR_PAT_HERE"
                }
            }
        }
    }
  }
Local server configuration example
{
  "servers": {
    "memory": {
      "command": "npx",
      "args": [
        "-y",
        "@modelcontextprotocol/server-memory"
      ]
    }
  }
}
{
  "servers": {
    "memory": {
      "command": "npx",
      "args": [
        "-y",
        "@modelcontextprotocol/server-memory"
      ]
    }
  }
}
Prerequisites
- 对 Copilot 的访问权限****。 请参阅“关于GitHub Copilot”。
- 兼容的 Eclipse 版本****。 若要使用 GitHub Copilot 扩展,必须拥有 Eclipse 版本 2024-09 或更高版本。 请参阅 Eclipse 下载页。
- 如果你是具有 Copilot Business 或 Copilot Enterprise 计划的组织或企业的成员,则必须启用“MCP servers in Copilot”策略才能将 MCP 与 Copilot 配合使用。
Configuring MCP servers from your MCP registry
- In Eclipse, open Copilot Chat.
- In the Copilot Chat window, click the MCP icon.
- In the MCP Registry window, find the MCP server(s) you want to add from the list of available servers.
- Next to each MCP server you want to add, click Install.
- When you are finished adding MCP servers, click Close.
- In the Copilot Chat window, click the tools icon. You should now see additional tools from the MCP server(s) that you installed.
Configuring MCP servers manually
- 在 Eclipse 底部的状态栏中,单击 Copilot 图标 ()。
- 在菜单中选择“Open Chat”****,然后在聊天窗口中单击“Configure Tools...”图标。
- 或者,可以选择“Edit preferences”,然后在左窗格中展开 GitHub Copilot 并单击“MCP”。
- Under "Server Configurations", define your MCP servers. Eclipse supports both remote and local servers. Remote servers are hosted externally for easier setup and sharing, while local servers run on your local machine and can access local resources.
You can use the following configurations as examples:
Remote server configuration example with PAT
{
    "servers": {
        "github": {
            "url": "https://api.githubcopilot.com/mcp/",
            "requestInit": {
                "headers": {
                    "Authorization": "Bearer YOUR_PAT_HERE"
                }
            }
        }
    }
  }
{
    "servers": {
        "github": {
            "url": "https://api.githubcopilot.com/mcp/",
            "requestInit": {
                "headers": {
                    "Authorization": "Bearer YOUR_PAT_HERE"
                }
            }
        }
    }
  }
Local server configuration example
{
  "servers": {
    "memory": {
      "command": "npx",
      "args": [
        "-y",
        "@modelcontextprotocol/server-memory"
      ]
    }
  }
}
{
  "servers": {
    "memory": {
      "command": "npx",
      "args": [
        "-y",
        "@modelcontextprotocol/server-memory"
      ]
    }
  }
}
Creating a new MCP server
You can create a new MCP server to fulfill your specific needs, and then integrate it with Copilot Chat. For example, you can create an MCP server that connects to a database or a web service, and then use that server in Copilot Chat to perform tasks on that database or web service.
For more information on creating and configuring your own MCP servers, see the official MCP documentation.