This version of this article is for using repository custom instructions and prompt files in VS Code. Click the tabs above for instructions on using custom instructions in other environments.
소개
리포지토리 사용자 지정 지침을 사용하면 Copilot에 리포지토리별 지침 및 기본 설정을 제공할 수 있습니다. 자세한 내용은 GitHub Copilot 응답을 사용자 지정하는 방법에 대한 정보을(를) 참조하세요.
리포지토리 사용자 지정 지침의 필수 조건
-
사용자 지정 지침 파일이 있어야 합니다(아래 지침 참조).
-
Custom instructions must be enabled. This feature is enabled by default. See Enabling or disabling repository custom instructions later in this article.
Creating custom instructions
VS Code supports three types of repository custom instructions. For details of which GitHub Copilot features support these types of instructions, see GitHub Copilot 응답을 사용자 지정하는 방법에 대한 정보.
-
Repository-wide custom instructions, which apply to all requests made in the context of a repository.
These are specified in a
copilot-instructions.mdfile in the.githubdirectory of the repository. See Creating repository-wide custom instructions. -
Path-specific custom instructions, which apply to requests made in the context of files that match a specified path.
These are specified in one or more
NAME.instructions.mdfiles within or below the.github/instructionsdirectory in the repository. See Creating path-specific custom instructions.If the path you specify matches a file that Copilot is working on, and a repository-wide custom instructions file also exists, then the instructions from both files are used.
-
Agent instructions are used by AI agents.
리포지토리 내의 어느 곳에나 저장된 하나 이상의
AGENTS.md파일을 만들 수 있습니다. 작업 중인 경우 Copilot 디렉터리 트리에서 가장AGENTS.md가까운 파일이 우선합니다. 자세한 내용은 agentsmd/agents.md 리포지토리를 참조하세요.참고
Support of
AGENTS.mdfiles outside of the workspace root is currently turned off by default. For details of how to enable this feature, see Use custom instructions in VS Code in the VS Code documentation.
Creating repository-wide custom instructions
-
In the root of your repository, create a file named
.github/copilot-instructions.md.Create the
.githubdirectory if it does not already exist. -
Add natural language instructions to the file, in Markdown format.
Whitespace between instructions is ignored, so the instructions can be written as a single paragraph, each on a new line, or separated by blank lines for legibility.
Creating path-specific custom instructions
-
.github/instructions디렉터리가 아직 없는 경우, 새로 만듭니다. -
필요에 따라
.github/instructions의 하위 디렉터리를 만들어 명령 파일을 체계적으로 정리할 수 있습니다. -
하나 이상의
NAME.instructions.md파일을 만드세요. 여기서NAME은 지침의 목적을 나타냅니다. 파일 이름은.instructions.md로 끝나야 합니다. -
파일의 시작 부분에,
applyTo키워드를 포함하는 프론트매터 블록을 만드세요. glob 구문을 사용하여 지침이 적용될 파일이나 디렉터리를 지정합니다.예시:
---
applyTo: "app/models/**/*.rb"
---
쉼표로 여러 패턴을 구분하여 지정할 수 있습니다. 예를 들어, 리포지토리의 모든 TypeScript 파일에 지침을 적용하려면, 다음과 같은 프론트매터 블록을 사용할 수 있습니다.
---
applyTo: "**/*.ts,**/*.tsx"
---
Glob 예제:
*- 현재 디렉터리의 모든 파일과 일치합니다.**또는**/*- 모든 디렉터리에 있는 모든 파일과 일치합니다.*.py- 현재 디렉터리의 모든.py파일과 일치합니다.**/*.py- 모든 디렉터리에 있는 모든.py파일을 재귀적으로 일치합니다.src/*.py-.py디렉터리 내 모든src파일을 일치시킵니다. 예를 들어,src/foo.py와src/bar.py그러나 아니src/foo/bar.py.src/**/*.py- 디렉터리의 모든.py파일src과 재귀적으로 일치합니다. 예:src/foo.py,src/foo/bar.py및src/foo/bar/baz.py.**/subdir/**/*.py- 모든.py디렉터리의 깊은 곳에 있는 모든subdir파일을 재귀적으로 일치시킵니다. 예를 들어subdir/foo.py,subdir/nested/bar.py,parent/subdir/baz.py,deep/parent/subdir/nested/qux.py와 같은 경우에는 사용되지만, 디렉터리foo.py가 포함되지 않은subdir경로에서는 사용되지 않습니다.
-
파일이 Copilot cloud agent 또는 Copilot code review에 의해 사용되는 것을 방지하려면, 프런트매터 블록의 앞부분에
excludeAgent키워드를 추가하십시오. 또는"code-review"``"cloud-agent".를 사용합니다.예를 들어 다음 파일은 Copilot cloud agent에서만 읽힙니다.
---
applyTo: "**"
excludeAgent: "code-review"
---
키워드가
excludeAgent프론트 머터블록에 포함되지 않은 경우, Copilot code review와 Copilot cloud agent는 둘 다 귀하의 지침을 사용합니다. -
Markdown 형식을 사용하여 자연어로 사용자 지정 지침을 추가합니다. 지침 사이의 공백은 무시되므로 지침을 새 줄에 각각 단일 단락으로 작성하거나 가독성을 위해 빈 줄로 구분할 수 있습니다.
사용 중인 사용자 지정 지침
파일의 지침은 파일을 저장하는 즉시 Copilot가 사용할 수 있습니다. 제출한 요청에 지침이 Copilot자동으로 추가됩니다.
사용자 지정 지침은 채팅 보기 또는 인라인 채팅에 표시되지 않지만 채팅 보기에서 응답의 참조 목록을 확인하여 Copilot에서 이 지침이 사용되고 있는지 여부를 확인할 수 있습니다. 사용자 지정 지침이 모델에 전송된 프롬프트에 추가된 경우 .github/copilot-instructions.md 파일이 참조로 나열됩니다. 참조를 클릭하여 파일을 열 수 있습니다.

리포지토리 사용자 지정 지침 사용 또는 사용 안 함
Copilot에서 리포지토리 기반 사용자 지정 지침을 사용할지 여부를 선택할 수 있습니다.
Copilot Chat에 대한 사용자 지정 지침 사용 또는 사용 안 함
사용자 지정 지침은 기본적으로 Copilot Chat를 사용하도록 설정되어 있지만 언제든지 사용하지 않도록 설정하거나 다시 사용하도록 설정할 수 있습니다. 이는 Copilot Chat를 사용하는 사용자 본인에게만 적용되며 다른 사용자에게는 영향을 주지 않습니다.
- Open the Setting editor by using the keyboard shortcut Command+, (Mac) / Ctrl+, (Linux/Windows).
- Type
instruction filein the search box. - Select or clear the checkbox under Code Generation: Use Instruction Files.
에 대한 사용자 지정 지침 사용 또는 사용 안 함 Copilot code review
사용자 지정 지침은 기본적으로 사용하도록 설정되어 Copilot code review 있지만 리포지토리 설정 GitHub.com에서 사용하지 않도록 설정하거나 다시 사용하도록 설정할 수 있습니다. 이는 이 리포지토리에서 수행하는 모든 코드 검토에 대한 사용자 지정 지침을 사용하는 데 적용됩니다 Copilot.
-
GitHub에서 리포지토리의 기본 페이지로 이동합니다.
-
리포지토리 이름 아래에서 Settings를 클릭합니다. "설정" 탭이 표시되지 않으면 드롭다운 메뉴를 선택한 다음 설정을 클릭합니다.

-
사이드바의 "코드, 계획 및 자동화"에서를 클릭한 다음 Copilot****.
-
“끌어오기 요청을 검토할 때 사용자 지정 지침 사용” 옵션을 켜거나 끕니다.

Enabling and using prompt files
참고
* Copilot에 프롬프트 파일이 있으며 변경될 수 있습니다. 프롬프트 파일은 VS Code, Visual Studio, 그리고 JetBrains IDE에서만 사용할 수 있습니다. GitHub Copilot 응답을 사용자 지정하는 방법에 대한 정보을 참조하세요.
- 특정 언어 및 시나리오에 대한 프롬프트 파일의 커뮤니티 기여 예제는 Awesome GitHub Copilot Customizations 사이트를 참조하세요.
Prompt files let you build and share reusable prompt instructions with additional context. A prompt file is a Markdown file, stored in your workspace, that mimics the existing format of writing prompts in Copilot Chat (for example, Rewrite #file:x.ts). You can have multiple prompt files in your workspace, each of which defines a prompt for a different purpose.
Enabling prompt files
To enable prompt files, configure the workspace settings.
- Open the command palette by pressing Ctrl+Shift+P (Windows/Linux) / Command+Shift+P (Mac).
- Type "Open Workspace Settings (JSON)" and select the option that's displayed.
- In the
settings.jsonfile, add"chat.promptFiles": trueto enable the.github/promptsfolder as the location for prompt files. This folder will be created if it does not already exist.
Creating prompt files
-
Open the command palette by pressing Ctrl+Shift+P (Windows/Linux) / Command+Shift+P (Mac).
-
Type "prompt" and select Chat: Create Prompt.
-
Enter a name for the prompt file, excluding the
.prompt.mdfile name extension. The name can contain alphanumeric characters and spaces and should describe the purpose of the prompt information the file will contain. -
Write the prompt instructions, using Markdown formatting.
You can reference other files in the workspace by using Markdown links—for example,
[index](../../web/index.ts)—or by using the#file:../../web/index.tssyntax. Paths are relative to the prompt file. Referencing other files allows you to provide additional context, such as API specifications or product documentation.
Using prompt files
-
At the bottom of the Copilot Chat view, click the Attach context icon ().
-
In the dropdown menu, click Prompt... and choose the prompt file you want to use.
-
Optionally, attach additional files, including prompt files, to provide more context.
-
Optionally, type additional information in the chat prompt box.
Whether you need to do this or not depends on the contents of the prompt you are using.
-
Submit the chat prompt.
For more information about prompt files, see Use prompt files in Visual Studio Code in the Visual Studio Code documentation.
Further reading
- 다양한 유형의 사용자 지정 지침 지원
- 사용자 지정 라이브러리—a curated collection of examples
- 사용자 지정 지침을 사용하여 Copilot 코드 검토의 기능 잠금 해제
This version of this article is for using repository custom instructions and prompt files in Visual Studio. Click the tabs above for instructions on using custom instructions in other environments.
소개
리포지토리 사용자 지정 지침을 사용하면 Copilot에 리포지토리별 지침 및 기본 설정을 제공할 수 있습니다. 자세한 내용은 GitHub Copilot 응답을 사용자 지정하는 방법에 대한 정보을(를) 참조하세요.
리포지토리 사용자 지정 지침의 필수 조건
-
사용자 지정 지침 파일이 있어야 합니다(아래 지침 참조).
-
The Enable custom instructions... option must be enabled in your settings. This is enabled by default. See Enabling or disabling repository custom instructions later in this article.
Creating custom instructions
Visual Studio supports two types of custom instructions. For details of which GitHub Copilot features support these types of instructions, see GitHub Copilot 응답을 사용자 지정하는 방법에 대한 정보.
-
Repository-wide custom instructions, which apply to all requests made in the context of a repository.
These are specified in a
copilot-instructions.mdfile in the.githubdirectory of the repository. See Creating repository-wide custom instructions. -
Path-specific custom instructions, which apply to requests made in the context of files that match a specified path.
These are specified in one or more
NAME.instructions.mdfiles within or below the.github/instructionsdirectory in the repository. See Creating path-specific custom instructions.If the path you specify matches a file that Copilot is working on, and a repository-wide custom instructions file also exists, then the instructions from both files are used.
Creating repository-wide custom instructions
-
In the root of your repository, create a file named
.github/copilot-instructions.md.Create the
.githubdirectory if it does not already exist. -
Add natural language instructions to the file, in Markdown format.
Whitespace between instructions is ignored, so the instructions can be written as a single paragraph, each on a new line, or separated by blank lines for legibility.
Creating path-specific custom instructions
-
.github/instructions디렉터리가 아직 없는 경우, 새로 만듭니다. -
필요에 따라
.github/instructions의 하위 디렉터리를 만들어 명령 파일을 체계적으로 정리할 수 있습니다. -
하나 이상의
NAME.instructions.md파일을 만드세요. 여기서NAME은 지침의 목적을 나타냅니다. 파일 이름은.instructions.md로 끝나야 합니다. -
파일의 시작 부분에,
applyTo키워드를 포함하는 프론트매터 블록을 만드세요. glob 구문을 사용하여 지침이 적용될 파일이나 디렉터리를 지정합니다.예시:
---
applyTo: "app/models/**/*.rb"
---
쉼표로 여러 패턴을 구분하여 지정할 수 있습니다. 예를 들어, 리포지토리의 모든 TypeScript 파일에 지침을 적용하려면, 다음과 같은 프론트매터 블록을 사용할 수 있습니다.
---
applyTo: "**/*.ts,**/*.tsx"
---
Glob 예제:
*- 현재 디렉터리의 모든 파일과 일치합니다.**또는**/*- 모든 디렉터리에 있는 모든 파일과 일치합니다.*.py- 현재 디렉터리의 모든.py파일과 일치합니다.**/*.py- 모든 디렉터리에 있는 모든.py파일을 재귀적으로 일치합니다.src/*.py-.py디렉터리 내 모든src파일을 일치시킵니다. 예를 들어,src/foo.py와src/bar.py그러나 아니src/foo/bar.py.src/**/*.py- 디렉터리의 모든.py파일src과 재귀적으로 일치합니다. 예:src/foo.py,src/foo/bar.py및src/foo/bar/baz.py.**/subdir/**/*.py- 모든.py디렉터리의 깊은 곳에 있는 모든subdir파일을 재귀적으로 일치시킵니다. 예를 들어subdir/foo.py,subdir/nested/bar.py,parent/subdir/baz.py,deep/parent/subdir/nested/qux.py와 같은 경우에는 사용되지만, 디렉터리foo.py가 포함되지 않은subdir경로에서는 사용되지 않습니다.
-
파일이 Copilot cloud agent 또는 Copilot code review에 의해 사용되는 것을 방지하려면, 프런트매터 블록의 앞부분에
excludeAgent키워드를 추가하십시오. 또는"code-review"``"cloud-agent".를 사용합니다.예를 들어 다음 파일은 Copilot cloud agent에서만 읽힙니다.
---
applyTo: "**"
excludeAgent: "code-review"
---
키워드가
excludeAgent프론트 머터블록에 포함되지 않은 경우, Copilot code review와 Copilot cloud agent는 둘 다 귀하의 지침을 사용합니다. -
Markdown 형식을 사용하여 자연어로 사용자 지정 지침을 추가합니다. 지침 사이의 공백은 무시되므로 지침을 새 줄에 각각 단일 단락으로 작성하거나 가독성을 위해 빈 줄로 구분할 수 있습니다.
사용 중인 사용자 지정 지침
파일의 지침은 파일을 저장하는 즉시 Copilot가 사용할 수 있습니다. 제출한 요청에 지침이 Copilot자동으로 추가됩니다.
사용자 지정 지침은 채팅 보기 또는 인라인 채팅에 표시되지 않지만 채팅 보기에서 응답의 참조 목록을 확인하여 Copilot에서 이 지침이 사용되고 있는지 여부를 확인할 수 있습니다. 사용자 지정 지침이 모델에 전송된 프롬프트에 추가된 경우 .github/copilot-instructions.md 파일이 참조로 나열됩니다. 참조를 클릭하여 파일을 열 수 있습니다.

리포지토리 사용자 지정 지침 사용 또는 사용 안 함
Copilot에서 리포지토리 기반 사용자 지정 지침을 사용할지 여부를 선택할 수 있습니다.
Copilot Chat에 대한 사용자 지정 지침 사용 또는 사용 안 함
사용자 지정 지침은 기본적으로 Copilot Chat를 사용하도록 설정되어 있지만 언제든지 사용하지 않도록 설정하거나 다시 사용하도록 설정할 수 있습니다. 이는 Copilot Chat를 사용하는 사용자 본인에게만 적용되며 다른 사용자에게는 영향을 주지 않습니다.
-
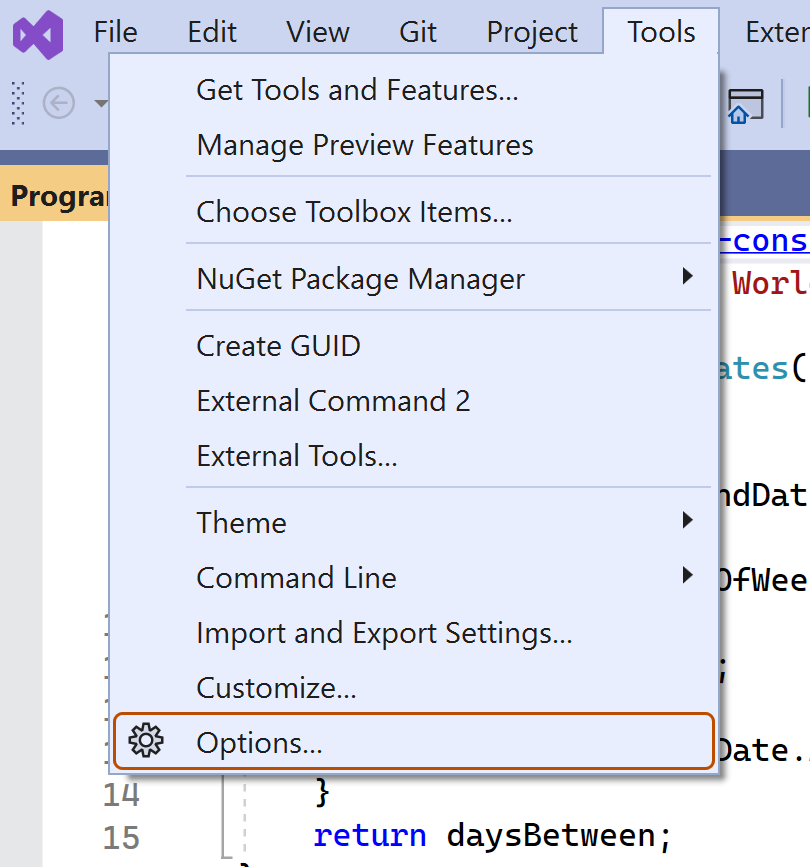
In the Visual Studio menu bar, under Tools, click Options.
-
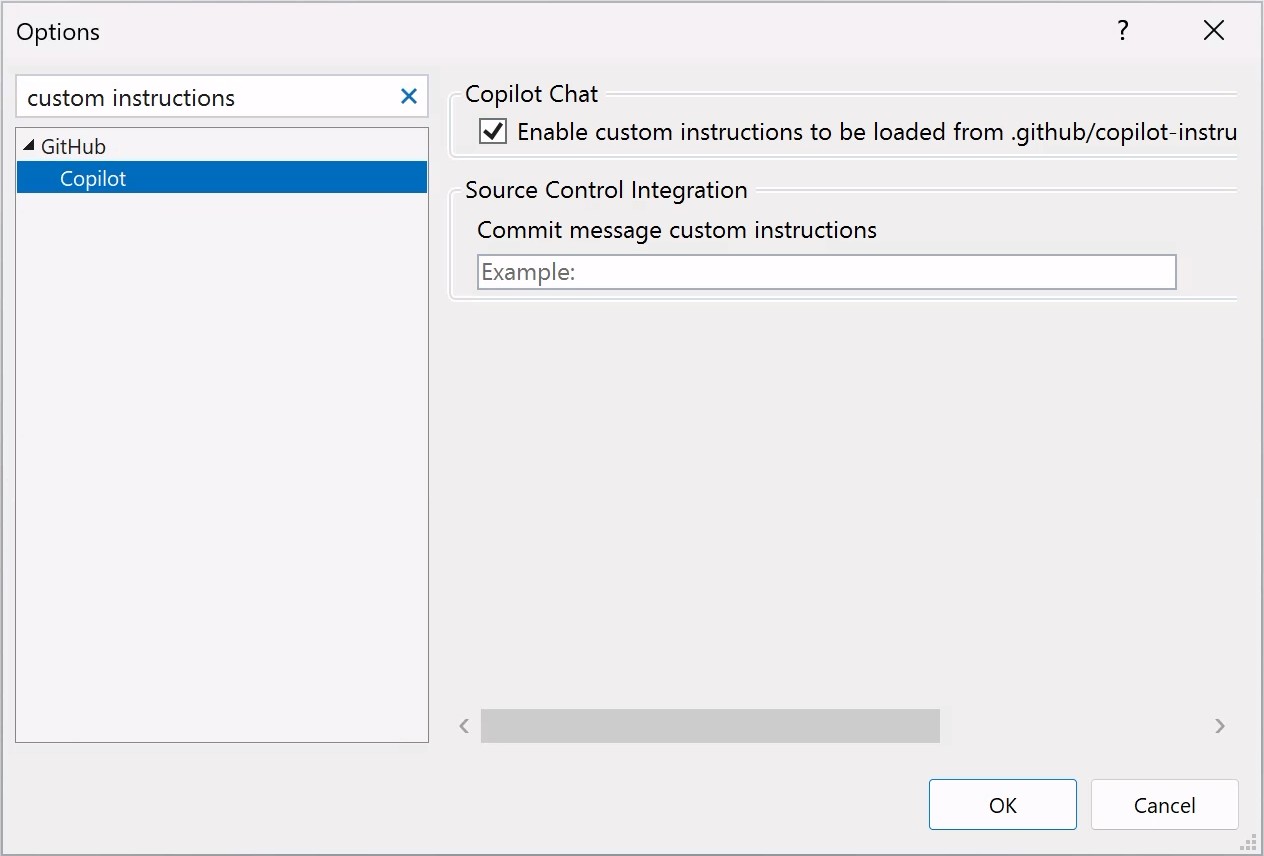
In the "Options" dialog, type
custom instructionsin the search box, then click Copilot. -
Select or clear the checkbox for Enable custom instructions to be loaded from .github/copilot-instructions.md files and added to requests.


에 대한 사용자 지정 지침 사용 또는 사용 안 함 Copilot code review
사용자 지정 지침은 기본적으로 사용하도록 설정되어 Copilot code review 있지만 리포지토리 설정 GitHub.com에서 사용하지 않도록 설정하거나 다시 사용하도록 설정할 수 있습니다. 이는 이 리포지토리에서 수행하는 모든 코드 검토에 대한 사용자 지정 지침을 사용하는 데 적용됩니다 Copilot.
-
GitHub에서 리포지토리의 기본 페이지로 이동합니다.
-
리포지토리 이름 아래에서 Settings를 클릭합니다. "설정" 탭이 표시되지 않으면 드롭다운 메뉴를 선택한 다음 설정을 클릭합니다.
-
사이드바의 "코드, 계획 및 자동화"에서를 클릭한 다음 Copilot****.
-
“끌어오기 요청을 검토할 때 사용자 지정 지침 사용” 옵션을 켜거나 끕니다.
Using prompt files
참고
* Copilot에 프롬프트 파일이 있으며 변경될 수 있습니다. 프롬프트 파일은 VS Code, Visual Studio, 그리고 JetBrains IDE에서만 사용할 수 있습니다. GitHub Copilot 응답을 사용자 지정하는 방법에 대한 정보을 참조하세요.
- 특정 언어 및 시나리오에 대한 프롬프트 파일의 커뮤니티 기여 예제는 Awesome GitHub Copilot Customizations 사이트를 참조하세요.
Prompt files let you build and share reusable prompt instructions with additional context. A prompt file is a Markdown file, stored in your workspace, that mimics the existing format of writing prompts in Copilot Chat (for example, Rewrite #file:x.ts). You can have multiple prompt files in your workspace, each of which defines a prompt for a different purpose.
Creating prompt files
-
Add a prompt file, including the
.prompt.mdfile name extension inside the.github/promptsfolder in the root of the repository. The name can contain alphanumeric characters and spaces and should describe the purpose of the prompt information the file will contain. -
Write the prompt instructions, using Markdown formatting.
You can reference other files in the workspace by using Markdown links—for example,
[index](../../web/index.ts)—or by using the#file:'../../web/index.ts'syntax. Paths are relative to the prompt file. Referencing other files allows you to provide additional context, such as API specifications or product documentation.
For more information about prompt files, see Use prompt files in Visual Studio in the Visual Studio documentation.
Further reading
- 다양한 유형의 사용자 지정 지침 지원
- 사용자 지정 라이브러리—a curated collection of examples
- 사용자 지정 지침을 사용하여 Copilot 코드 검토의 기능 잠금 해제
This version of this article is for using repository custom instructions in JetBrains IDEs. Click the tabs above for instructions on using custom instructions in other environments.
소개
리포지토리 사용자 지정 지침을 사용하면 Copilot에 리포지토리별 지침 및 기본 설정을 제공할 수 있습니다. 자세한 내용은 GitHub Copilot 응답을 사용자 지정하는 방법에 대한 정보을(를) 참조하세요.
리포지토리 사용자 지정 지침의 필수 조건
-
사용자 지정 지침 파일이 있어야 합니다(아래 지침 참조).
-
The latest version of the Copilot extension must be installed in your JetBrains IDE.
Creating custom instructions
JetBrains IDEs support a single .github/copilot-instructions.md custom instructions file stored in the repository, and a locally stored global-copilot-instructions.md file.
You can create the .github/copilot-instructions.md file in your repository using the Copilot settings page, or you can create the file manually.
Whitespace between instructions is ignored, so the instructions can be written as a single paragraph, each on a new line, or separated by blank lines for legibility.
Using the settings page
- JetBrains IDE에서 파일 메뉴(Windows) 또는 메뉴 모음(macOS)에서 애플리케이션의 이름을 클릭한 다음 설정을 클릭합니다.
- 왼쪽 사이드바에서 툴을 클릭하고 GitHub Copilot 를 클릭합니다., then click Customizations.
- Under "Copilot Instructions", click Workspace or Global to choose whether the custom instructions apply to the current workspace or all workspaces.
Manually creating a workspace custom instructions file
-
In the root of your repository, create a file named
.github/copilot-instructions.md.Create the
.githubdirectory if it does not already exist. -
Add natural language instructions to the file, in Markdown format.
Once saved, these instructions will apply to the current workspace in JetBrains IDEs that you open with Copilot enabled.
Manually creating a global custom instructions file
To apply the same instructions across all workspaces in JetBrains IDEs, you can create a global custom instructions file on your local machine.
-
Open your file explorer or terminal.
-
Navigate to the appropriate location for your operating system:
- macOS:
/Users/YOUR-USERNAME/.config/github-copilot/intellij/ - Windows:
C:\Users\YOUR-USERNAME\AppData\Local\github-copilot\intellij\
- macOS:
-
Create a file named
global-copilot-instructions.mdin that directory. -
Add your custom instructions in natural language, using Markdown format.
Once saved, these instructions will apply globally across all workspaces in JetBrains IDEs that you open with Copilot enabled.
사용 중인 사용자 지정 지침
파일의 지침은 파일을 저장하는 즉시 Copilot가 사용할 수 있습니다. 제출한 요청에 지침이 Copilot자동으로 추가됩니다.
사용자 지정 지침은 채팅 보기 또는 인라인 채팅에 표시되지 않지만 채팅 보기에서 응답의 참조 목록을 확인하여 Copilot에서 이 지침이 사용되고 있는지 여부를 확인할 수 있습니다. 사용자 지정 지침이 모델에 전송된 프롬프트에 추가된 경우 .github/copilot-instructions.md 파일이 참조로 나열됩니다. 참조를 클릭하여 파일을 열 수 있습니다.
Using prompt files
참고
* Copilot에 프롬프트 파일이 있으며 변경될 수 있습니다. 프롬프트 파일은 VS Code, Visual Studio, 그리고 JetBrains IDE에서만 사용할 수 있습니다. GitHub Copilot 응답을 사용자 지정하는 방법에 대한 정보을 참조하세요.
- 특정 언어 및 시나리오에 대한 프롬프트 파일의 커뮤니티 기여 예제는 Awesome GitHub Copilot Customizations 사이트를 참조하세요.
Prompt files let you build and share reusable prompt instructions with additional context. A prompt file is a Markdown file, stored in your workspace, that mimics the existing format of writing prompts in Copilot Chat (for example, Rewrite #file:x.ts). You can have multiple prompt files in your workspace, each of which defines a prompt for a different purpose.
When writing prompt instructions, you can reference other files in the workspace by using Markdown links—for example, [index](../../web/index.ts)—or by using the #file:../../web/index.ts syntax. Paths are relative to the prompt file. Referencing other files allows you to provide additional context, such as API specifications or product documentation.
Once prompt files are saved, their instructions will apply to the current workspace in JetBrains IDEs that you open with Copilot enabled.
Creating prompt files using the command line
- Create the
.github/promptsdirectory if it doesn't already exist in your workspace. This directory will be the location for your prompt files. - Create a prompt file in the
.github/promptsdirectory. The prompt file name can contain alphanumeric characters and spaces and should describe the purpose of the prompt information the file will contain. The file name must end with the.prompt.mdfile name extension, for exampleTESTPROMPT.prompt.md. - Write the prompt instructions using Markdown formatting, and save the file.
Creating prompt files using the settings page
- JetBrains IDE에서 파일 메뉴(Windows) 또는 메뉴 모음(macOS)에서 애플리케이션의 이름을 클릭한 다음 설정을 클릭합니다.
- Under Tools, under GitHub Copilot, click Edit Settings.
- Under "Settings Categories", click Customizations.
- Under "Prompt Files", click Workspace, to create a prompt file in your workspace.
- Enter a name for the prompt file, excluding the
.prompt.mdfile name extension. The prompt file name can contain alphanumeric characters and spaces and should describe the purpose of the prompt information the file will contain. - Click Ok to save the prompt file name.
- Write the prompt instructions using Markdown formatting, and save the file.
Using prompt files
-
In the chat input box, type
/followed by the name of the prompt file. For example,/TESTPROMPT. -
Optionally, attach additional files, to provide more context.
-
Optionally, type additional information in the chat prompt box.
Whether you need to do this or not depends on the contents of the prompt you are using.
-
Submit the chat prompt.
Further reading
- 다양한 유형의 사용자 지정 지침 지원
- 사용자 지정 라이브러리—a curated collection of examples
- 사용자 지정 지침을 사용하여 Copilot 코드 검토의 기능 잠금 해제
This version of this article is for using repository custom instructions in Xcode. Click the tabs above for instructions on using custom instructions in other environments.
소개
리포지토리 사용자 지정 지침을 사용하면 Copilot에 리포지토리별 지침 및 기본 설정을 제공할 수 있습니다. 자세한 내용은 GitHub Copilot 응답을 사용자 지정하는 방법에 대한 정보을(를) 참조하세요.
리포지토리 사용자 지정 지침의 필수 조건
-
사용자 지정 지침 파일이 있어야 합니다(아래 지침 참조).
-
The latest version of the Copilot extension must be installed in Xcode.
Creating custom instructions
Xcode supports a single .github/copilot-instructions.md custom instructions file stored in the repository.
You can create a custom instructions file in your repository via the Copilot settings page.
Whitespace between instructions is ignored, so the instructions can be written as a single paragraph, each on a new line, or separated by blank lines for legibility.
- Open the GitHub Copilot for Xcode application.
- At the top of the application window, under Settings, click Advanced.
- To the right of "Custom Instructions", click Current Workspace or Global to choose whether the custom instructions apply to the current workspace or all workspaces.
사용 중인 사용자 지정 지침
파일의 지침은 파일을 저장하는 즉시 Copilot가 사용할 수 있습니다. 제출한 요청에 지침이 Copilot자동으로 추가됩니다.
사용자 지정 지침은 채팅 보기 또는 인라인 채팅에 표시되지 않지만 채팅 보기에서 응답의 참조 목록을 확인하여 Copilot에서 이 지침이 사용되고 있는지 여부를 확인할 수 있습니다. 사용자 지정 지침이 모델에 전송된 프롬프트에 추가된 경우 .github/copilot-instructions.md 파일이 참조로 나열됩니다. 참조를 클릭하여 파일을 열 수 있습니다.
Further reading
- 다양한 유형의 사용자 지정 지침 지원
- 사용자 지정 지침—a curated collection of examples
- 사용자 지정 지침을 사용하여 Copilot 코드 검토의 기능 잠금 해제
참고
This feature is currently in 공개 미리 보기 and is subject to change.
This version of this article is for using repository custom instructions in Eclipse. Click the tabs above for instructions on using custom instructions in other environments.
소개
리포지토리 사용자 지정 지침을 사용하면 Copilot에 리포지토리별 지침 및 기본 설정을 제공할 수 있습니다. 자세한 내용은 GitHub Copilot 응답을 사용자 지정하는 방법에 대한 정보을(를) 참조하세요.
리포지토리 사용자 지정 지침의 필수 조건
-
사용자 지정 지침 파일이 있어야 합니다(아래 지침 참조).
-
The latest version of the Copilot extension must be installed in Eclipse.
Creating custom instructions
Eclipse supports two types of repository custom instructions: workspace and project custom instructions.
To create a workspace custom instructions file, you can use the Copilot settings page. To create a project custom instructions file, you can create the file manually in the project directory.
Whitespace between instructions is ignored, so the instructions can be written as a single paragraph, each on a new line, or separated by blank lines for legibility.
Creating a workspace custom instructions file
- To open the Copilot Chat panel, click the Copilot icon () in the status bar at the bottom of Eclipse.
- From the menu, select "Edit preferences".
- In the left pane, expand GitHub Copilot and click Custom Instructions.
- Select Enable workspace instructions.
- In the "Workspace" section, under "Set custom instructions to guide Copilot's code suggestions in this workspace", add natural language instructions to the file, in Markdown format.
Creating a project custom instructions file
- In the root of your project directory, create a file named
.github/copilot-instructions.md. - Add your custom instructions in natural language, using Markdown format.
Once saved, these instructions will apply to the current project in Eclipse that you open with Copilot enabled.
사용 중인 사용자 지정 지침
파일의 지침은 파일을 저장하는 즉시 Copilot가 사용할 수 있습니다. 제출한 요청에 지침이 Copilot자동으로 추가됩니다.
Further reading
- 다양한 유형의 사용자 지정 지침 지원
- 사용자 지정 지침—a curated collection of examples