This version of this article is for using repository custom instructions and prompt files in VS Code. Click the tabs above for instructions on using custom instructions in other environments.
介绍
通过存储库自定义说明,可以为 Copilot 提供特定于存储库的指导和首选项。 有关详细信息,请参阅“关于自定义GitHub Copilot 响应”。
仓库自定义指令的先决条件
-
必须有自定义指令文件(请参阅以下指令)。
-
Custom instructions must be enabled. This feature is enabled by default. See Enabling or disabling repository custom instructions later in this article.
Creating custom instructions
VS Code supports three types of repository custom instructions. For details of which GitHub Copilot features support these types of instructions, see 关于自定义GitHub Copilot 响应.
-
Repository-wide custom instructions, which apply to all requests made in the context of a repository.
These are specified in a
copilot-instructions.mdfile in the.githubdirectory of the repository. See Creating repository-wide custom instructions. -
Path-specific custom instructions, which apply to requests made in the context of files that match a specified path.
These are specified in one or more
NAME.instructions.mdfiles within or below the.github/instructionsdirectory in the repository. See Creating path-specific custom instructions.If the path you specify matches a file that Copilot is working on, and a repository-wide custom instructions file also exists, then the instructions from both files are used.
-
Agent instructions are used by AI agents.
你可以创建一个或多个
AGENTS.md文件,存储在仓库内的任意位置。 当 Copilot 工作时,目录树中最近的AGENTS.md文件将优先。 有关详细信息,请参阅 agentsmd/agents.md 存储库。注意
Support of
AGENTS.mdfiles outside of the workspace root is currently turned off by default. For details of how to enable this feature, see Use custom instructions in VS Code in the VS Code documentation.
Creating repository-wide custom instructions
-
In the root of your repository, create a file named
.github/copilot-instructions.md.Create the
.githubdirectory if it does not already exist. -
Add natural language instructions to the file, in Markdown format.
Whitespace between instructions is ignored, so the instructions can be written as a single paragraph, each on a new line, or separated by blank lines for legibility.
Creating path-specific custom instructions
-
如果尚无
.github/instructions目录,则创建该目录。 -
(可选)创建用于组织指令文件的子目录
.github/instructions。 -
创建一个或多个
NAME.instructions.md文件,其中NAME指示指令的用途。 文件名必须以.instructions.md结尾。 -
在文件开头,创建包含
applyTo关键字的前辅文块。 使用 glob 语法指定指令应用于的文件或目录。例如:
---
applyTo: "app/models/**/*.rb"
---
可以通过用逗号分隔多个模式来指定这些模式。 例如,若要将指令应用于仓库中的所有 TypeScript 文件,可以使用以下前辅文块:
---
applyTo: "**/*.ts,**/*.tsx"
---
Glob 示例:
*- 会匹配当前目录中的所有文件。**或**/*- 均会匹配所有目录中的所有文件。*.py- 将匹配当前目录中的所有.py文件。**/*.py- 将以递归方式匹配所有目录中的所有.py文件。src/*.py- 将匹配.py目录中所有src文件。 例如,src/foo.py和src/bar.py但_不_src/foo/bar.py。src/**/*.py- 将以递归方式匹配目录中的所有.py文件src。 例如 、src/foo.py``src/foo/bar.py和src/foo/bar/baz.py。-
`**/subdir/**/*.py` - 将递归匹配任意深度下任意 `subdir` 目录中的所有 `.py` 文件。 例如,`subdir/foo.py`、`subdir/nested/bar.py`、`parent/subdir/baz.py` 和 `deep/parent/subdir/nested/qux.py`,但不匹配_不_`foo.py`包含 `subdir` 目录的路径。
-
或者,为了防止文件被 Copilot cloud agent 或 Copilot code review 使用,将
excludeAgent关键字添加到 frontmatter 区块中。 使用"code-review"或"cloud-agent"。例如,以下文件将仅由 Copilot cloud agent 读取。
---
applyTo: "**"
excludeAgent: "code-review"
---
如果在 front matterblock 中不包括关键字
excludeAgent,则 Copilot code review 和 Copilot cloud agent 都将使用您的说明。 -
使用 Markdown 格式以自然语言添加自定义指令。 系统会忽略说明信息间的空格,因此可将信息编写为一个段落,每个段落位于一行上,或用空白行分隔,以保持其可读性。
正在使用的自定义说明
文件(s)中的说明可在保存文件后立即使用 Copilot 。 指令会自动添加到您提交给Copilot的请求中。
自定义说明在“聊天”视图或内联聊天中不可见,但可以通过查看“聊天”视图中的回复引用列表来验证 Copilot 是否正在使用这些说明。 如果将自定义说明添加到发送到模型的提示中,引用信息中会列出文件 .github/copilot-instructions.md。 可以单击引用信息来打开该文件。

启用或禁用存储库自定义说明
可以选择是否要让 Copilot 使用基于仓库的自定义指令。
为 Copilot Chat 启用或禁用自定义指令
默认情况下,Copilot Chat 已启用自定义指令,但你可以随时禁用或重新启用它们。 这适用于你自己的 Copilot Chat 使用,不会影响其他用户。
- Open the Setting editor by using the keyboard shortcut Command+, (Mac) / Ctrl+, (Linux/Windows).
- Type
instruction filein the search box. - Select or clear the checkbox under Code Generation: Use Instruction Files.
启用或禁用 Copilot code review 的自定义指令
默认情况下,Copilot code review 已启用自定义说明,但你可以在 GitHub.com 上的仓库设置中将其禁用或重新启用。 这适用于 Copilot 在此仓库中执行所有代码审查时对自定义指令的使用。
-
在 GitHub 上,导航到存储库的主页面。
-
在仓库名称下,单击 “Settings”****。 如果看不到“设置”选项卡,请选择“”下拉菜单,然后单击“设置”。

-
在边栏中的“代码、规划和自动化”下, 单击 Copilot,然后单击 代码评审。
-
打开或关闭“Use custom instructions when reviewing pull requests”选项。

Enabling and using prompt files
注意
* Copilot 提示文件位于 公开预览 并且可能会更改。 提示文件仅适用于 VS Code、Visual Studio 和 JetBrains IDE。 请参阅 关于自定义GitHub Copilot 响应。
- 有关社区贡献的特定语言和场景的提示文件示例,请参阅 GitHub Copilot 网站。
Prompt files let you build and share reusable prompt instructions with additional context. A prompt file is a Markdown file, stored in your workspace, that mimics the existing format of writing prompts in Copilot Chat (for example, Rewrite #file:x.ts). You can have multiple prompt files in your workspace, each of which defines a prompt for a different purpose.
Enabling prompt files
To enable prompt files, configure the workspace settings.
- Open the command palette by pressing Ctrl+Shift+P (Windows/Linux) / Command+Shift+P (Mac).
- Type "Open Workspace Settings (JSON)" and select the option that's displayed.
- In the
settings.jsonfile, add"chat.promptFiles": trueto enable the.github/promptsfolder as the location for prompt files. This folder will be created if it does not already exist.
Creating prompt files
-
Open the command palette by pressing Ctrl+Shift+P (Windows/Linux) / Command+Shift+P (Mac).
-
Type "prompt" and select Chat: Create Prompt.
-
Enter a name for the prompt file, excluding the
.prompt.mdfile name extension. The name can contain alphanumeric characters and spaces and should describe the purpose of the prompt information the file will contain. -
Write the prompt instructions, using Markdown formatting.
You can reference other files in the workspace by using Markdown links—for example,
[index](../../web/index.ts)—or by using the#file:../../web/index.tssyntax. Paths are relative to the prompt file. Referencing other files allows you to provide additional context, such as API specifications or product documentation.
Using prompt files
-
At the bottom of the Copilot Chat view, click the Attach context icon ().
-
In the dropdown menu, click Prompt... and choose the prompt file you want to use.
-
Optionally, attach additional files, including prompt files, to provide more context.
-
Optionally, type additional information in the chat prompt box.
Whether you need to do this or not depends on the contents of the prompt you are using.
-
Submit the chat prompt.
For more information about prompt files, see Use prompt files in Visual Studio Code in the Visual Studio Code documentation.
Further reading
- 支持不同类型的自定义说明
- 定制化库—a curated collection of examples
- 使用自定义指令来激发Copilot代码评审的强大功能
This version of this article is for using repository custom instructions and prompt files in Visual Studio. Click the tabs above for instructions on using custom instructions in other environments.
介绍
通过存储库自定义说明,可以为 Copilot 提供特定于存储库的指导和首选项。 有关详细信息,请参阅“关于自定义GitHub Copilot 响应”。
仓库自定义指令的先决条件
-
必须有自定义指令文件(请参阅以下指令)。
-
The Enable custom instructions... option must be enabled in your settings. This is enabled by default. See Enabling or disabling repository custom instructions later in this article.
Creating custom instructions
Visual Studio supports two types of custom instructions. For details of which GitHub Copilot features support these types of instructions, see 关于自定义GitHub Copilot 响应.
-
Repository-wide custom instructions, which apply to all requests made in the context of a repository.
These are specified in a
copilot-instructions.mdfile in the.githubdirectory of the repository. See Creating repository-wide custom instructions. -
Path-specific custom instructions, which apply to requests made in the context of files that match a specified path.
These are specified in one or more
NAME.instructions.mdfiles within or below the.github/instructionsdirectory in the repository. See Creating path-specific custom instructions.If the path you specify matches a file that Copilot is working on, and a repository-wide custom instructions file also exists, then the instructions from both files are used.
Creating repository-wide custom instructions
-
In the root of your repository, create a file named
.github/copilot-instructions.md.Create the
.githubdirectory if it does not already exist. -
Add natural language instructions to the file, in Markdown format.
Whitespace between instructions is ignored, so the instructions can be written as a single paragraph, each on a new line, or separated by blank lines for legibility.
Creating path-specific custom instructions
-
如果尚无
.github/instructions目录,则创建该目录。 -
(可选)创建用于组织指令文件的子目录
.github/instructions。 -
创建一个或多个
NAME.instructions.md文件,其中NAME指示指令的用途。 文件名必须以.instructions.md结尾。 -
在文件开头,创建包含
applyTo关键字的前辅文块。 使用 glob 语法指定指令应用于的文件或目录。例如:
---
applyTo: "app/models/**/*.rb"
---
可以通过用逗号分隔多个模式来指定这些模式。 例如,若要将指令应用于仓库中的所有 TypeScript 文件,可以使用以下前辅文块:
---
applyTo: "**/*.ts,**/*.tsx"
---
Glob 示例:
*- 会匹配当前目录中的所有文件。**或**/*- 均会匹配所有目录中的所有文件。*.py- 将匹配当前目录中的所有.py文件。**/*.py- 将以递归方式匹配所有目录中的所有.py文件。src/*.py- 将匹配.py目录中所有src文件。 例如,src/foo.py和src/bar.py但_不_src/foo/bar.py。src/**/*.py- 将以递归方式匹配目录中的所有.py文件src。 例如 、src/foo.py``src/foo/bar.py和src/foo/bar/baz.py。-
`**/subdir/**/*.py` - 将递归匹配任意深度下任意 `subdir` 目录中的所有 `.py` 文件。 例如,`subdir/foo.py`、`subdir/nested/bar.py`、`parent/subdir/baz.py` 和 `deep/parent/subdir/nested/qux.py`,但不匹配_不_`foo.py`包含 `subdir` 目录的路径。
-
或者,为了防止文件被 Copilot cloud agent 或 Copilot code review 使用,将
excludeAgent关键字添加到 frontmatter 区块中。 使用"code-review"或"cloud-agent"。例如,以下文件将仅由 Copilot cloud agent 读取。
---
applyTo: "**"
excludeAgent: "code-review"
---
如果在 front matterblock 中不包括关键字
excludeAgent,则 Copilot code review 和 Copilot cloud agent 都将使用您的说明。 -
使用 Markdown 格式以自然语言添加自定义指令。 系统会忽略说明信息间的空格,因此可将信息编写为一个段落,每个段落位于一行上,或用空白行分隔,以保持其可读性。
正在使用的自定义说明
文件(s)中的说明可在保存文件后立即使用 Copilot 。 指令会自动添加到您提交给Copilot的请求中。
自定义说明在“聊天”视图或内联聊天中不可见,但可以通过查看“聊天”视图中的回复引用列表来验证 Copilot 是否正在使用这些说明。 如果将自定义说明添加到发送到模型的提示中,引用信息中会列出文件 .github/copilot-instructions.md。 可以单击引用信息来打开该文件。

启用或禁用存储库自定义说明
可以选择是否要让 Copilot 使用基于仓库的自定义指令。
为 Copilot Chat 启用或禁用自定义指令
默认情况下,Copilot Chat 已启用自定义指令,但你可以随时禁用或重新启用它们。 这适用于你自己的 Copilot Chat 使用,不会影响其他用户。
-
In the Visual Studio menu bar, under Tools, click Options.
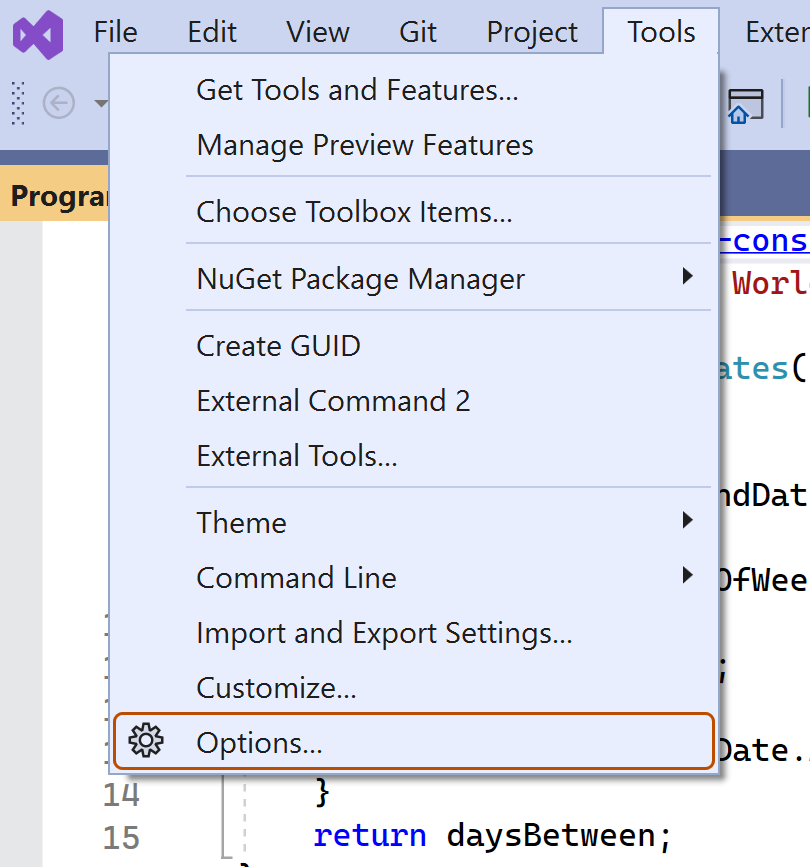
-
In the "Options" dialog, type
custom instructionsin the search box, then click Copilot. -
Select or clear the checkbox for Enable custom instructions to be loaded from .github/copilot-instructions.md files and added to requests.
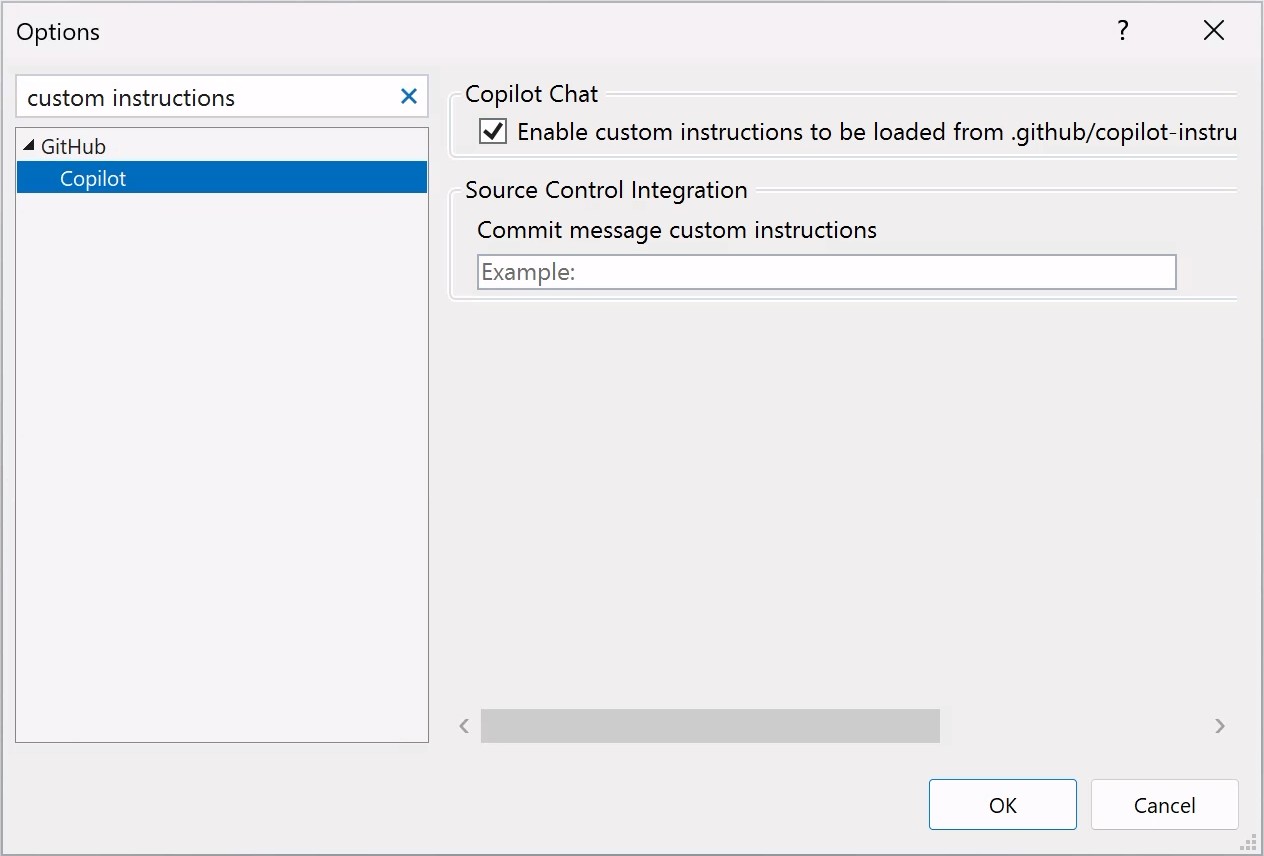


启用或禁用 Copilot code review 的自定义指令
默认情况下,Copilot code review 已启用自定义说明,但你可以在 GitHub.com 上的仓库设置中将其禁用或重新启用。 这适用于 Copilot 在此仓库中执行所有代码审查时对自定义指令的使用。
-
在 GitHub 上,导航到存储库的主页面。
-
在仓库名称下,单击 “Settings”****。 如果看不到“设置”选项卡,请选择“”下拉菜单,然后单击“设置”。
-
在边栏中的“代码、规划和自动化”下, 单击 Copilot,然后单击 代码评审。
-
打开或关闭“Use custom instructions when reviewing pull requests”选项。
Using prompt files
注意
* Copilot 提示文件位于 公开预览 并且可能会更改。 提示文件仅适用于 VS Code、Visual Studio 和 JetBrains IDE。 请参阅 关于自定义GitHub Copilot 响应。
- 有关社区贡献的特定语言和场景的提示文件示例,请参阅 GitHub Copilot 网站。
Prompt files let you build and share reusable prompt instructions with additional context. A prompt file is a Markdown file, stored in your workspace, that mimics the existing format of writing prompts in Copilot Chat (for example, Rewrite #file:x.ts). You can have multiple prompt files in your workspace, each of which defines a prompt for a different purpose.
Creating prompt files
-
Add a prompt file, including the
.prompt.mdfile name extension inside the.github/promptsfolder in the root of the repository. The name can contain alphanumeric characters and spaces and should describe the purpose of the prompt information the file will contain. -
Write the prompt instructions, using Markdown formatting.
You can reference other files in the workspace by using Markdown links—for example,
[index](../../web/index.ts)—or by using the#file:'../../web/index.ts'syntax. Paths are relative to the prompt file. Referencing other files allows you to provide additional context, such as API specifications or product documentation.
For more information about prompt files, see Use prompt files in Visual Studio in the Visual Studio documentation.
Further reading
- 支持不同类型的自定义说明
- 定制化库—a curated collection of examples
- 使用自定义指令来激发Copilot代码评审的强大功能
This version of this article is for using repository custom instructions in JetBrains IDEs. Click the tabs above for instructions on using custom instructions in other environments.
介绍
通过存储库自定义说明,可以为 Copilot 提供特定于存储库的指导和首选项。 有关详细信息,请参阅“关于自定义GitHub Copilot 响应”。
仓库自定义指令的先决条件
-
必须有自定义指令文件(请参阅以下指令)。
-
The latest version of the Copilot extension must be installed in your JetBrains IDE.
Creating custom instructions
JetBrains IDEs support a single .github/copilot-instructions.md custom instructions file stored in the repository, and a locally stored global-copilot-instructions.md file.
You can create the .github/copilot-instructions.md file in your repository using the Copilot settings page, or you can create the file manually.
Whitespace between instructions is ignored, so the instructions can be written as a single paragraph, each on a new line, or separated by blank lines for legibility.
Using the settings page
- 在 JetBrains IDE 中,单击“文件”**** 菜单 (Windows) 或菜单栏中的应用程序名称 (macOS),然后单击“设置”****。
- 在左侧栏中,单击 工具,单击 GitHub Copilot, then click Customizations.
- Under "Copilot Instructions", click Workspace or Global to choose whether the custom instructions apply to the current workspace or all workspaces.
Manually creating a workspace custom instructions file
-
In the root of your repository, create a file named
.github/copilot-instructions.md.Create the
.githubdirectory if it does not already exist. -
Add natural language instructions to the file, in Markdown format.
Once saved, these instructions will apply to the current workspace in JetBrains IDEs that you open with Copilot enabled.
Manually creating a global custom instructions file
To apply the same instructions across all workspaces in JetBrains IDEs, you can create a global custom instructions file on your local machine.
-
Open your file explorer or terminal.
-
Navigate to the appropriate location for your operating system:
- macOS:
/Users/YOUR-USERNAME/.config/github-copilot/intellij/ - Windows:
C:\Users\YOUR-USERNAME\AppData\Local\github-copilot\intellij\
- macOS:
-
Create a file named
global-copilot-instructions.mdin that directory. -
Add your custom instructions in natural language, using Markdown format.
Once saved, these instructions will apply globally across all workspaces in JetBrains IDEs that you open with Copilot enabled.
正在使用的自定义说明
文件(s)中的说明可在保存文件后立即使用 Copilot 。 指令会自动添加到您提交给Copilot的请求中。
自定义说明在“聊天”视图或内联聊天中不可见,但可以通过查看“聊天”视图中的回复引用列表来验证 Copilot 是否正在使用这些说明。 如果将自定义说明添加到发送到模型的提示中,引用信息中会列出文件 .github/copilot-instructions.md。 可以单击引用信息来打开该文件。
Using prompt files
注意
* Copilot 提示文件位于 公开预览 并且可能会更改。 提示文件仅适用于 VS Code、Visual Studio 和 JetBrains IDE。 请参阅 关于自定义GitHub Copilot 响应。
- 有关社区贡献的特定语言和场景的提示文件示例,请参阅 GitHub Copilot 网站。
Prompt files let you build and share reusable prompt instructions with additional context. A prompt file is a Markdown file, stored in your workspace, that mimics the existing format of writing prompts in Copilot Chat (for example, Rewrite #file:x.ts). You can have multiple prompt files in your workspace, each of which defines a prompt for a different purpose.
When writing prompt instructions, you can reference other files in the workspace by using Markdown links—for example, [index](../../web/index.ts)—or by using the #file:../../web/index.ts syntax. Paths are relative to the prompt file. Referencing other files allows you to provide additional context, such as API specifications or product documentation.
Once prompt files are saved, their instructions will apply to the current workspace in JetBrains IDEs that you open with Copilot enabled.
Creating prompt files using the command line
- Create the
.github/promptsdirectory if it doesn't already exist in your workspace. This directory will be the location for your prompt files. - Create a prompt file in the
.github/promptsdirectory. The prompt file name can contain alphanumeric characters and spaces and should describe the purpose of the prompt information the file will contain. The file name must end with the.prompt.mdfile name extension, for exampleTESTPROMPT.prompt.md. - Write the prompt instructions using Markdown formatting, and save the file.
Creating prompt files using the settings page
- 在 JetBrains IDE 中,单击“文件”**** 菜单 (Windows) 或菜单栏中的应用程序名称 (macOS),然后单击“设置”****。
- Under Tools, under GitHub Copilot, click Edit Settings.
- Under "Settings Categories", click Customizations.
- Under "Prompt Files", click Workspace, to create a prompt file in your workspace.
- Enter a name for the prompt file, excluding the
.prompt.mdfile name extension. The prompt file name can contain alphanumeric characters and spaces and should describe the purpose of the prompt information the file will contain. - Click Ok to save the prompt file name.
- Write the prompt instructions using Markdown formatting, and save the file.
Using prompt files
-
In the chat input box, type
/followed by the name of the prompt file. For example,/TESTPROMPT. -
Optionally, attach additional files, to provide more context.
-
Optionally, type additional information in the chat prompt box.
Whether you need to do this or not depends on the contents of the prompt you are using.
-
Submit the chat prompt.
Further reading
- 支持不同类型的自定义说明
- 定制化库—a curated collection of examples
- 使用自定义指令来激发Copilot代码评审的强大功能
This version of this article is for using repository custom instructions in Xcode. Click the tabs above for instructions on using custom instructions in other environments.
介绍
通过存储库自定义说明,可以为 Copilot 提供特定于存储库的指导和首选项。 有关详细信息,请参阅“关于自定义GitHub Copilot 响应”。
仓库自定义指令的先决条件
-
必须有自定义指令文件(请参阅以下指令)。
-
The latest version of the Copilot extension must be installed in Xcode.
Creating custom instructions
Xcode supports a single .github/copilot-instructions.md custom instructions file stored in the repository.
You can create a custom instructions file in your repository via the Copilot settings page.
Whitespace between instructions is ignored, so the instructions can be written as a single paragraph, each on a new line, or separated by blank lines for legibility.
- Open the GitHub Copilot for Xcode application.
- At the top of the application window, under Settings, click Advanced.
- To the right of "Custom Instructions", click Current Workspace or Global to choose whether the custom instructions apply to the current workspace or all workspaces.
正在使用的自定义说明
文件(s)中的说明可在保存文件后立即使用 Copilot 。 指令会自动添加到您提交给Copilot的请求中。
自定义说明在“聊天”视图或内联聊天中不可见,但可以通过查看“聊天”视图中的回复引用列表来验证 Copilot 是否正在使用这些说明。 如果将自定义说明添加到发送到模型的提示中,引用信息中会列出文件 .github/copilot-instructions.md。 可以单击引用信息来打开该文件。
Further reading
- 支持不同类型的自定义说明
- 自定义说明—a curated collection of examples
- 使用自定义指令来激发Copilot代码评审的强大功能
注意
This feature is currently in 公开预览 and is subject to change.
This version of this article is for using repository custom instructions in Eclipse. Click the tabs above for instructions on using custom instructions in other environments.
介绍
通过存储库自定义说明,可以为 Copilot 提供特定于存储库的指导和首选项。 有关详细信息,请参阅“关于自定义GitHub Copilot 响应”。
仓库自定义指令的先决条件
-
必须有自定义指令文件(请参阅以下指令)。
-
The latest version of the Copilot extension must be installed in Eclipse.
Creating custom instructions
Eclipse supports two types of repository custom instructions: workspace and project custom instructions.
To create a workspace custom instructions file, you can use the Copilot settings page. To create a project custom instructions file, you can create the file manually in the project directory.
Whitespace between instructions is ignored, so the instructions can be written as a single paragraph, each on a new line, or separated by blank lines for legibility.
Creating a workspace custom instructions file
- To open the Copilot Chat panel, click the Copilot icon () in the status bar at the bottom of Eclipse.
- From the menu, select "Edit preferences".
- In the left pane, expand GitHub Copilot and click Custom Instructions.
- Select Enable workspace instructions.
- In the "Workspace" section, under "Set custom instructions to guide Copilot's code suggestions in this workspace", add natural language instructions to the file, in Markdown format.
Creating a project custom instructions file
- In the root of your project directory, create a file named
.github/copilot-instructions.md. - Add your custom instructions in natural language, using Markdown format.
Once saved, these instructions will apply to the current project in Eclipse that you open with Copilot enabled.
正在使用的自定义说明
文件(s)中的说明可在保存文件后立即使用 Copilot 。 指令会自动添加到您提交给Copilot的请求中。
Further reading
- 支持不同类型的自定义说明
- 自定义说明—a curated collection of examples